DIY cat pillows - original patterns. DIY cat pillows for every taste. Patterns Pillow pattern offended cat life-size
Various decorative pillows can add warmth and comfort to any interior. They can be different in size and shape, intended for sleeping or hugging, or can be used exclusively for decorative purposes.
Soft and cozy pillows will surely bring comfort to your home.
One of the original options could be a pillow in the shape of a cat. They can also be very diverse, from simple products to complex designs. In addition, a pillow with a picture of a cat on it can easily be made with your own hands. What types of pillows in the shape of a cat can you make yourself? Let's try to figure it out.

Scops owls, hugs, pillow toys - the variety of products is amazing.
Before you begin making such a product, you must acquire the following materials and tools:

Such pillows consist of simple shapes and you can even sew them together with your children.
- pillow base fabric;
- filler for the product;
- pattern for complex shapes or individual elements;
- contrasting material of the required color, made of felt, fleece, matting, fur;
- decorative plastic elements that will serve to form the nose and eyes;
- rigid threads that hold their shape well for making mustaches;
- thread, scissors, ruler, sewing machine.

There is nothing easier than sewing a cat pillow with your own hands.
General algorithm for sewing a pillow
Regardless of which design you choose to manufacture such a product, you must follow a certain sequence of actions.

Pillows in the house perform several functions: they make the house more comfortable, decorate it and serve as armrests and headrests.
- Preparing a base pattern, which will actually be the pillow. It can be classic rectangular or square, or shape the body or face of a cat. When cutting out the base, it is necessary to take into account seam allowances, which should be at least 5 mm.
- On the front side of the pillow, which will form the cat's face, sew individual elements - the nose, mouth, tongue, areas around the eyes - by hand or using a machine.
- Carefully baste the individual elements in the form of paws and tail where they will be located near the pillow.
- After this, sew along the wrong side along the entire contour of the seam, leaving a small part for stuffing the pillow with filler.
- Carefully fill the pillow with filling and sew up the hole.
- After this, you can glue individual plastic elements that represent the eyes and nose. Also, if necessary, sew on a mustache.

Nowadays you won’t surprise anyone with store-bought ones, but with hand-sewn cat pillows it’s quite possible.
The simplest cat pillows
The easiest way to make a cat pillow is to use a regular rectangular or square pillow shape and stick an applique on it.

You can choose a material and take it to a workshop that specializes in thermal transfer printing - they will “draw” what you want.
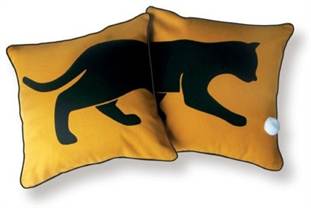
In this case, the image of the cat can be absolutely anything. But it will look best if, for example, two cats sit on the pillow. They can be located close to each other - this is how you can make “cats in love.” Or, on the contrary, you can spread the image on different sides of the pillow, turning their backs to each other. We get – “offended cats”.

The drawing can be done with acrylic paints or special ones for textiles.

You can also make stencils yourself from scratch by drawing only the silhouette of a cat or a complex design with some details on thick paper.
It is very easy to make such products:
- you can sew a square or rectangular pillow that matches the shape;
- but you can take a finished product;
- in accordance with the size of the pillow, choose a pattern of two cats - in this case, the color of the animals should be harmoniously combined with the color of the pillow itself and be contrasting with it;
- It is advisable to choose a textured fabric for appliqué - this way the image will look more realistic;
- Recommendation: to cut a stencil out of fleece, you can use a sharply sharpened stationery knife;
- the applique can be glued using a special glue, or it can be sewn on manually using matching or contrasting threads, but at the same time, be careful about the accuracy of the stitch;
- if the image includes elements of a muzzle, then cut them out and attach them in the same way to the pillow.

For cutting, you should use a stationery knife; carry out the process itself by placing the sheet with the design on a wooden cutting board.
Travel pillow for Herodotus the cat
For those who want to travel comfortably on a bus or sit comfortably in a chair, you can sew a pillow under your head. In order for it to be truly ergonomic, you need to choose the right pattern. At the same time, take into account your own body parameters, although in most cases the dimensions are standard - the internal diameter ranges from 13 to 15 cm, the outer diameter from 43 to 45 cm.

How to make the road fly by unnoticed? That's right, ideally - sleep the whole way.
Such a half ring is first cut out on paper, and then the pattern is transferred to the fabric. In this case, it is necessary to make a reserve for the seams.

The first thing you need to do in preparation for the trip is to sew special pillows for the bus.
To ensure that the pillow is not faceless, it can be made in the shape of a funny cat. In addition to the muzzle, you can also form paws and a tail. The execution technique is given above. The only thing that can be recommended here is to sew on the elements of the eyes and nose with a zigzag stitch for secure fastening.

The eyes and nose are made of felt and stitched with a zigzag.
Cat fisherman
This pillow will be an excellent accessory for a child's room. It is quite simple to sew, but you will have to tinker a little. An applique of a cat with all the elements of the body - hind legs, tail, ears and muzzle - is sewn onto an ordinary rectangular pillow.

Funny pillow with a cat who caught a lot of fish.
The front legs must be cut out separately and hemmed under the applique;

A good and positive gift for an adult fisherman, and children will also like it.
Place the fish between the cat's paws and securely fix them - this way it looks like the cat is being held in an armful by a slave.

The cat pillow can be made in any size.
Cat face pillow
For relaxation procedures, you can sew a mask in the shape of a cat's face. To do this, you need to choose natural fabric. Moreover, for the lower part you need to take the lightest possible canvas. Whereas on the top side you can use any color you like. Don't forget to sew on two small triangular ears, which will need to be inserted when attaching.

It looks just great on the sofa, and not only cats, but also guests like this toy.
Fill the pillow of your choice:
- aromatic herbs;
- buckwheat husk.

A pillow can be a great handmade gift
The muzzle can be decorated either with applique or simply embroidered with thick threads.

The pillow will look great on your sofa!
Knitted pillows
If you have experience in knitting or crocheting, you can make a pillow in the shape of a cat from threads. Moreover, you can use leftover yarn of different colors. One point worth considering! If you knit with knitting needles, the pillow will turn out soft, so this one can also be used for relaxation.

You can knit cute sofa pillows with your own hands.
If you crochet, the fabric becomes denser. Therefore, it is with crochet that more voluminous and realistic models of any complexity are created.

All over the world, things made by hand are valued. Things keep the warmth of the hands of the person who made them.
Simple knitted pillow
For those who do not have much knitting experience, you can choose the simplest pillow option.

These original sofa pillows in the shape of cats can be knitted
A rectangular fabric is knitted. The number of stitches cast on should be equal to the width of the pillow. Next, you can knit either with stockinette stitch or with a pearl pattern to a height equal to two heights of the pillow. After the required length is knitted, the loops are closed, the fabric is folded in half and sewn up on three sides. But before you sew the seam to the end, you need to add filler. The hind legs are sewn to the underside of the pillow, while the front legs are sewn to the sides. The paws themselves can also be knitted or made of fabric.
A tail is sewn to the back of the pillow. It can be knitted on circular knitting needles.

We decorate the face with applique.
After this, the front side of the pillow is decorated with the cat’s nose and eyes, as well as a mustache.
In order to form the ears, it is enough to sew two corners of the pillow, grabbing a little filler and, as it were, separating them with diagonal seams.
Crochet cat
In order to crochet a cat, you must first make a pattern on paper. The peculiarity of crocheting is that it is easy and simple to crochet, you can crochet absolutely any cat.

You can even sleep with such a toy, which is what children love so much.
If a pattern is made on paper, this will greatly facilitate the process, since you can constantly apply it to it during the knitting process and check how well the fabric matches the pattern. In order for the fabric to match the pattern, it is necessary to decrease and add columns. After two identical halves are knitted, they are sewn together and the pillow is completed according to the standard pattern.

These adorable cat pillows will bring you a lot of joy!
VIDEO: How to sew a pillow in the shape of a cat.
50 photos of DIY cat pillows:


An original decorative pillow can enliven the most austere and restrained interior. Especially when it comes to pillows made in the shape of a pet, such as a cat. After all, cats, as guardians of home comfort, are a kind of talisman for household members. A homemade cat pillow will not only decorate any room, but will also serve as a wonderful gift for a loved one.
There are many options for making a decorative cat pillow with your own hands. You just need to choose what this fashionable piece of furniture should be and start making it.
First you need to prepare the following materials:
- Pattern. The pattern can be printed or simply transferred to graph paper.
- Textile. The choice of fabric for such a product is truly unlimited - it can be fleece, velor, cotton of any color.
- Threads, needles, pins, chalk and scissors.
- Pillow stuffing: padding polyester, holofiber. Natural materials are also used - buckwheat husks, sawdust.
- Finishing materials - buttons, colored scraps, floss, beads, glue.
Important. If the pillow is planned to be purely decorative, for decoration (cat's eyes), you can use buttons and other plastic parts. And if the pillow will be used for its intended purpose, then it is better to use fabric and colored embroidery.
Classic version
A DIY fabric cat pillow will look great on a sofa, chair or bed. When choosing a material by color, you can focus on the shade of the furniture upholstery, then the pillow will fit especially harmoniously into the interior.
The first step in the manufacturing process is choosing a pattern. The proposed pattern can be downloaded, enlarged to the desired size and printed on paper.

Then the pattern should be transferred to the fabric folded in half and secured with pins.
The fabric is cut along the contour, resulting in two pillow parts.
Important! When cutting, be sure to leave 1 cm for seam allowance.
Before you start sewing the pillow pieces together, you should design the cat's face - eyes, whiskers and mouth.
To do this, we cut out two circles from white fabric (you can use felt) and sew them on the front side of the pillow, in the center we make embroidery in the form of pupils or sew small black buttons.
We embroider the cat's whiskers and mouth with black and red floss threads.

The two resulting parts are sewn together. In the lower part of the future we leave a hole for turning the product inside out and stuffing it with filler.
Having turned the product right side out, we proceed to stuffing the pillow with padding polyester or holofiber through the hole left. We adjust the amount of padding ourselves, depending on the desired degree of softness of the product.
We sew the hole with a hidden seam.

Cushion in the form of a bolster
This is one of the easiest ways to make a cat pillow with your own hands from fabric.
As a filler you can use foam rubber, holofiber, padding polyester.
Important! Foam rubber may lose its shape with prolonged use, while holofiber or padding polyester are more durable. Also, an excellent solution would be to use buckwheat husks, which will give the pillow orthopedic properties.
Having decided on the filler, you can proceed directly to making a cat pillow with your own hands.
The algorithm of actions will be as follows:
- the fabric is cut in the form of a rectangle, the length of which will be equal to the length of the pillow;
- the sides forming the width of the rectangle must be processed and tucked to form a drawstring;
- the rectangle is sewn from the inside out and turned outward;
- the resulting cylinder is filled with filler;
- You should thread the cord into the drawstring and pull it off at both ends, securing it with a knot;
- for the head, you should sew a ball out of fabric (cut it out and gather it on a thread), and sew ears - triangles - onto it and embroider the muzzle with floss threads;
- for the tail, fabric is sewn together in the form of a narrow rectangle and stuffed with filler;
- the head, body and tail of the cat are gathered together.

The simplest cat pillow
This method does not require any special patterns and is suitable for those who do not like curved stitches and complex lines.
However, a simplified version of a cat pillow will look no less original and serve as a worthy decoration for any interior.
For making, a piece of any rectangular fabric from which a regular pillowcase is sewn is suitable. It is better to combine fabric of two shades, this will give the product an elegant and cheerful look.
- White felt circles are sewn onto the front part - these are the eyes of the cat. For the pupils and nose, use black felt or other dense fabric that will not fray around the edges.
- The mustache is embroidered with floss threads.
- Two triangles are sewn into the top seam of the resulting product - the ears of the future cat.
- The pillow is stuffed with filling through the hole left in the bottom of the pillowcase.
- The hole is sutured. If desired, you can add a hidden zipper.

Thus, you can decorate and diversify your interior without making much effort or financial investment. You just need to show your imagination and spare a few hours of time. And the presented patterns, diagrams and photos will help you make an original accessory with your own hands.
How to sew a cat pillow: video
Handmade home decorations are all the rage these days. All kinds of textile accessories help to create an atmosphere of harmony and comfort very well. This very simple product will look fun and unusual. Even a novice needlewoman can handle making a soft sofa guest.
What do you need for sewing?
Use the list below to create a beautiful cat pillow:
- pattern;
- fabric of several natural shades for the animal or bright variegated decorative colors;
- pins, chalk, scissors;
- threads with a needle;
- filler (sintepon, holofiber);
- sewing machine, although you can make a pillow manually, for example, from felt, which does not require processing of the edges and is connected along the front side, and details such as eyes and nose can be easily glued to the base.
So, you don’t need anything special to make a cute souvenir. You probably have some small scraps at home. Any workpiece can be made even from several parts, it will just require more seams.

Which sample to choose?
In order for you to get an original cat pillow, the pattern must be appropriate. First of all, you need to choose what your product will look like and find the appropriate template. If you want to take the blank you like, simply print it on a printer at the desired scale. If the element does not fit completely on the sheet, divide it into two or more, and then glue it with tape.
Consider your experience, if you are a beginner, try simple schemes. Below are templates designed for beginner craftswomen, so you can safely choose any option.
What is the sequence of actions)?
To make a simple accessory, you need to do the following:
- Make paper blanks for the parts.
- Lay out the elements on the fabric, trace around the seam allowances and cut out.
- The parts are usually sewn down along the wrong side, followed by turning them inside out and filling them with padding polyester or holofiber. Don't forget to leave a small hole for this, which is sewn up by hand at the very end.
- If the ears and tail were cut out as separate parts, they should be sewn to the finished product or into a seam.
- The eyes, nose, mouth and mustache are embroidered (don't forget to use a hoop) or the blank parts are attached using a needle and thread. This must be done before sewing the base seams. You can glue the parts last.
Work always follows this pattern, regardless of the complexity of the product. The technology differs in the number of seams that need to be made. The simplest thing is to connect two identical parts in the form of a cat's silhouette.

In this case, you will actually only make one seam unless the tail is made as a separate piece. In the picture below, the pattern also suggests the presence of a side part in the pillow. For this purpose, two additional stripes are made. So, the product can be given more volume.

Although it is enough to simply sew two parts.
The simplest product
If you don't like to stitch along arched lines, you can choose a very easy method. You can quickly and effortlessly create a cat pillow with your own hands. There is no need to make patterns here at all. The base is made in the form of a regular rectangle or square, and ears, tail and muzzle details are sewn to it.

If you choose a material with cat themes and patterns, you will get an original, eye-catching bright accessory.
Flat product of complex shape
If you have no problem stitching along a rounded line and want your DIY cat pillow to be more realistic rather than looking like a square “bag,” use the following templates.
The first option is performed as one piece with the tail and ears. In the diagram, the arrow indicates the direction of the grain thread, although if the size of the fabric does not allow the part to be positioned exactly this way, do it as best as possible. This is not a dress, but just a small accessory. The seam allowances and the line where the stitching is performed are also indicated. An opening for turning and filling is left on the side.

The second option is a great idea. The outline of the product is very reminiscent of a heart, and additional decorative stripes of the same shape can be used in any quantity and size.

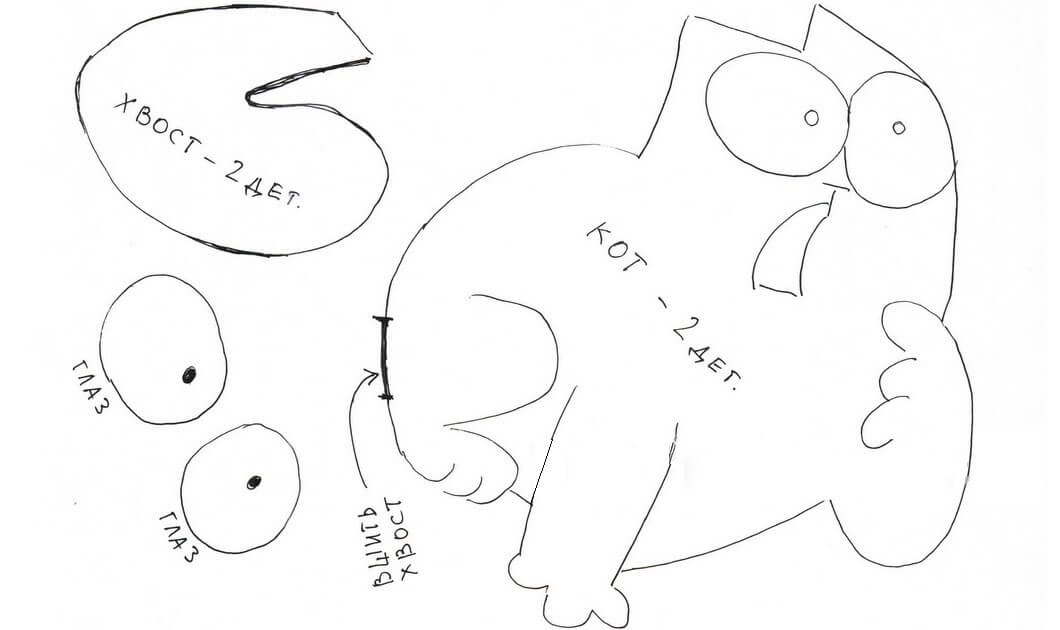
In the third sample, the tail is made as a separate piece and sewn to the base. You will need to cut out two parts of each element.

Pillow in the shape of a cat's face
Another cheerful option is the head of an animal with an emotional one, which can be either cheerful, happy, or sad, causing tenderness.

Using such a blank, you can make only the base itself voluminous, and sew or glue the remaining parts flat. But it’s even better to make all the parts slightly voluminous. When sewing on a nose or muzzle part, simply place a little filler under it and attach the element to the end.
Pillow toy
If you have some experience in needlework or have already practiced on simple samples, you can move on to creating a voluminous souvenir. Below is a cat toy pillow. The pattern in the same picture allows you to create a cute three-dimensional creature for your sofa. If you choose terry or fluffy fabric that imitates wool, you will get a very natural animal.

Pillows "Offended cats"
The pattern for creating such a cute accessory is suitable for any of the ones given above, since these creatures can be of any shape, both in a flat version and in the form of a 3D toy. The most important thing is to make a “facial expression” that matches the emotions.

All parts can be easily made from felt or fleece. You can draw the template yourself or use the muzzle pattern that has already been discussed. To make different "Offended Cats" pillows, the pattern doesn't really matter. The main thing is the arched mouth, and it is usually embroidered, although it can also be cut out of pink material. The details of the muzzle are easy to stitch or even glue, for example, from felt.

You saw how a cat pillow is made. The pattern (any of the options) given in the article will help you create this cute accessory,
Pillows in the shape of cats are very popular in the world. Why not get yourself such a wonderful pillow? Moreover, you can do it yourself. After all, your home with such a pillow will become more comfortable and will improve the mood of its residents and guests. A cat pillow is not at all a useless item; in addition to its direct purpose - a pillow, it will also be an excellent armrest or decorative item. Store-bought pillows have become so banal that now the best thing to surprise others is a DIY cat pillow.
We have prepared interesting patterns, using which you can make amazing pillows. Those who like to lie on the sofa with their pets are not always able to catch them in their place, but in order not to get bored without them at all, a cat pillow will be a temporary substitute for a living friend.
Of course, you can simply print a photo of your younger friend on fabric in a specialized salon, but this is not interesting. The realized idea as in the photo will leave much more impressions.

Moreover, everything that is made with one’s own hands is worthy of greater respect.
Simple stencils
You can make a pillow using stencils. It's pretty simple.
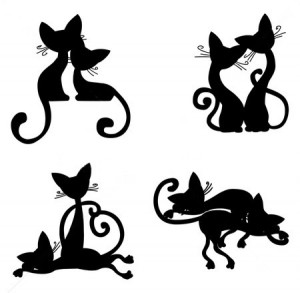


The stencils are made independently; you can draw absolutely any cat silhouette. This is done on thick paper. If you don’t want to draw, you can find a picture you like and just print it. Next, it is cut along the contour and transferred to the fabric. Now all that remains is to cut it, sew it and fill it with filler.
Fleece motifs
Fleece is a very soft and pleasant fabric, it is ideal for various needlework. We will conduct a detailed master class on making a cat pillow from fleece.

To work we need the following components:
- either two pieces of fleece in different colors, or fleece and felt, also in different colors. A large piece of fabric will be used for the cat’s body, and a small one for the face, that is, one should be darker in color, the other lighter;
- threads, needles, scissors;
- all kinds of decorations, if desired.
Let's make a pattern, the picture shows a pattern with a scale without specific numbers, decide for yourself what size your pillow should be, and calculate its size.

We transfer the finished pattern onto the fabric with a pencil, pen or marker so that we can clearly see the contours. We pin the fabric, folded right sides together, so that it does not move.

Now we sew on a machine or sew by hand directly along the contour, leaving room for the possibility of filling with entrails. When everything is stitched, we cut it out with scissors according to the shape of the parts, but leave a little less than one centimeter allowance.

We prepare a small incision at the site of the mouth. This should be done if you forgot to leave room in the seam for filling the guts. After filling with filler, this incision is sutured.

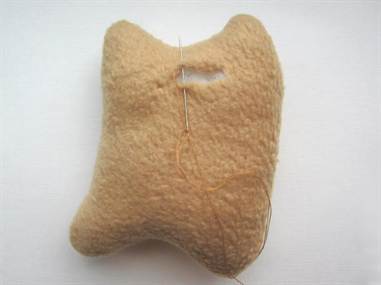

Having drawn it on a piece of paper, we transfer it all to the fabric and embroider it. Now the finished face is pinned for fitting with needles. And if we’re happy with everything we’ve got, we sew it on.

Add the tail last.

This cute cat pillow will now live in your home or go as a gift to someone to visit.

Knitted option

You can knit not only sweaters, but also beautiful little things, like this cat pillow. It is knitted with regular needles of medium thickness. You can also use any kind of thread. Two similar squares are knitted. The size is chosen at your discretion. After the squares are ready, they are sewn together and filled with soft insides. You can even simplify your task and knit not two squares, but one rectangle, which is then simply folded.

To the finished regular knitted pillow, all that remains is to add paws, a tail and build a muzzle.
Sleeping cat
The Scops Owl cat is very popular. Well, it’s true, cats spend most of their lives sleeping. This prompted this idea.
Unusual, original, unique pillow toys in the form of animals or dolls become favorite things for both children and adults. A hand-made cat pillow will not be an exception. It can be sewn using ready-made patterns or sketches drawn by yourself.
If your baby has trouble falling asleep and needs company, offer him this toy pillow. With it, the child will calm down faster. Adults will also need a small thought pillow, with which it is easier to relax the cervical vertebrae, you can lie down comfortably, and fall asleep faster and more soundly. Of course, you can buy a model of any size and shape in stores, but sewn or knitted yourself, these products become an indispensable element of decor, created only for your closest and dearest people.
How to cut correctly
A DIY cat pillow is a gift for both yourself and your child, a decoration and addition to the stylish design of the room. In order for such an accessory to be truly one and only, you will have to make your own pattern for the future cat. It would seem, what could be simpler? But no. After all, cats and cats are so different, and everyone wants their pet to be the cutest.
They cannot be similar to one another, and therefore you will need to find a special drawing or make a sketch yourself. When preparing to work on creating a pattern, it is important to consider the purpose of the future product. If this is just to decorate a new sofa, then it is important to make sure that the color and shape of the cat is in harmony with the surrounding furniture.
But most often it is a real pillow with which you can comfortably fall asleep. In this case, you need to carefully consider:
- its size;
- the quality of the fabric that an adult or child will touch with their face;
- the presence of decorative elements that are safe for children;
- quality and quantity of filler.
Of course, it is very important to choose the character who is sure to become everyone’s favorite, and the pillow should be an exact copy of him. The well-known cat Simon has long become such a hero.
This funny soft toy was loved by children from different countries many years ago, and to make it with your own hands, just find a detailed image and prepare the components. White, fluffy, with huge bulging eyes and erect ears, the cat will take root in any home. He can really decorate the interior and become a friend to the baby.
Preparation
When starting to make a pattern for a soft pillow toy, you should think in advance what size the cat will be and who will use it. Usually such a handsome man is made of faux white fur, and if desired, it can be replaced with plush, terry or flannel. To work you will need:
- material for the body, folded in half;
- floss threads to highlight the mustache and the desired outline;
- pins to secure the pattern to the material;
- colored crayons;
- threads whose color differs from the main one;
- scissors;
- filler;
- sewing needles.
You can make an accurate pattern by watching a video or photo where real masters of their craft give a master class on cutting and sewing.
You will need several sheets of A4 format, but it is better if you prepare graph paper, which will make it easier and more convenient to recreate an accurate image of every detail of the component of the future pillow, and you can get to work:
- Having decided on the size, it is important to decide whether the pillow toy will be one-piece or whether some parts will need to be sewn on. The image drawing must contain all parts in exact size. Smaller details are drawn on the same sheet.
- Having cut out each component, lay out the parts on the material so that there is a distance of at least 1.5-2 cm between them. This will be the seam allowance.
- Secure all parts of the pattern with pins and circle with chalk, marking the places of future connection.
- Carefully cut out each detail, not forgetting about the allowances.
- To ensure that all components match in size, make a running stitch along the line drawn in chalk with air loops, push the edges of the fabric apart and carefully cut the threads between the layers of fabric. All the necessary lines and outlines have been transferred to the second part.

Assembly of parts
Having laid out and swept away all the component parts, you can begin assembling the toy itself.
- Attach all the required small parts to one of the resulting components. These are the pads on the paws, eyes and tongue. Embroider the mustache and outline of the mouth with floss threads.
- Having folded the resulting parts with the right side of the fabric inward, fasten them with pins or baste them and carefully stitch them on a machine, leaving a hole for filling.
- Carefully overcast all edges so that the fabric does not fray.
- If the cat has a tail, then it needs to be stitched and stuffed with stuffing. Then insert between the two halves of the body so that the body can be sewn together, leaving a hole next to the tail for filling.
- Unscrew the resulting cover through the hole left, paying attention to all available corners.
- Fill the toy pillow with filling and carefully sew the edges of the remaining hole by hand or stitch it on a machine.
When filling the pillow, it is important to remember that it should be soft, but keep its shape. You cannot use too much filling, otherwise the pillow will be very uncomfortable.
Design details

Decorating a toy is also a rather important moment. When getting started, it is important to consider the future use and age of the owner of the pillow. You should not use glued toy eyes or small buttons if such a cat becomes a pillow for your baby. The child may tear them off and inadvertently harm himself.
To get bright, beautiful eyes, the pads on the paws to be visible, and a bright tongue to stand out, all you need to do is use pieces of fabric and sew them in the appropriate places. Individual details can be simply embroidered using floss.
Features of the pillow toy
If for the first time in your life you decide to make a pillow in the form of a soft toy with your own hands, let it be a cat. Such a pillow is easier to sew; it does not require special knowledge, experience and skills. All you need is imagination and the desire to achieve results, bringing pleasure to your family and friends.