Halloween Ideas: DIY Decorations. How to make Halloween decorations with your own hands from paper - create a holiday atmosphere at home, mastering simple decorating methods from improvised materials Halloween decorations from paper
It's worth getting well prepared for Halloween. But even if you only have one evening left, your rich imagination and desire for a holiday will help you out.
Someone is decorating a house, someone is going to celebrate a holiday at an educational institution, have a Halloween corporate party, or dress up a cafe for Halloween. Of course, you can order jewelry in advance, but it’s not always possible to start preparing it in a timely manner. Therefore, when compiling a selection of Halloween decorations, we tried to take into account all the options. Well, you choose the one that suits you, and if you still don’t know how to celebrate Halloween on October 31, our selection will help you.
halloween pumpkin
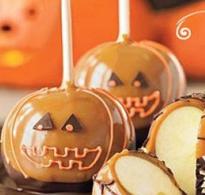
The most important symbol of Halloween is a pumpkin - preferably a large one, with a face carved on it. But if you haven’t had time to grow a pumpkin in the garden, and the holiday is very close, you can replace it, for example, with apples. And this won’t even be a violation of tradition, because Halloween treats have long been made from apples. Feel free to cut out funny or scary faces on them, decorate them with caramel, place them on a platter in a puddle of blood (raspberry jam is perfect) - and the setting is ready.

What else can replace the main beauty of Halloween? Balloons. Buy orange balloons, draw scary faces on them with a marker, and for greater effect, if you have a little time left, place a neon glow stick inside each balloon. And the composition can be diversified with Christmas tree decorations or even ping-pong balls, which can be wrapped in gauze and painted with orange paint.

Gauze ghosts for Halloween
Halloween isn't Halloween without evil spirits. So, let's try to create scarier creatures at home. The easiest way is to have a little ghost at home.
For this you will need gauze and your imagination. You can throw it over a large floor lamp, or you can wrap coat hangers from the closet layer by layer. Or put gauze over a white balloon. The composition will be completed by eyes and a mouth cut out of black cardboard.

If you have time, soak the gauze in a starch solution and dry it on a frame made from improvised means - a bottle, a ball and wire or twigs. When the gauze dries and hardens into the bizarre shape of a real ghost, the frame can be removed. Looks terribly cool.

DIY Halloween spiders
Another indispensable attribute of Halloween is, of course, spiders. And if you didn’t plan to get a tarantula on the eve of All Saints’ Day, create one from scrap material. For example, cut out spiders from cardboard or black fabric and attach them to walls, curtains and ceilings. Silhouettes of cats, rats or ghosts will enhance the effect.
Like a pumpkin, a spider can be made from a balloon. Inflate a black balloon and attach eight cardboard legs to it. The scary eight-eyed face will add to the creepiness of the spider. If you place such a creature under the ceiling on fishing lines, it will definitely impress your guests.
And for children, you can arrange a less scary option - a spider treat. Wrap lollipops or kinder surprises in black plastic. By attaching eight legs to each, you will get a whole flock of small and cute spiders.

Witches for Halloween
It is not necessary to invite a witch into your home or into a festive cafe for a Halloween corporate party. But leaving traces of her presence is easy and simple. If you have a jar, cauliflower and tea on hand, make pickled brains for a scary potion.

Witch shoes or pointed hats can also not only be worn as a carnival costume, but also used to decorate almost anything with them - for example, the shoes look impressive on table legs, and decorators advise hanging a hat from the ceiling, putting it on a pumpkin, or turning it over and pouring it into its treats . And don't forget the broom. A mop handle and dry branches will make a broom for a real witch, and it will certainly delight guests at the entrance.
Halloween decor from improvised materials
To create a Halloween atmosphere, you can even use improvised means. For example, cardboard silhouettes in the windows will convince passers-by that a real Sabbath began in your apartment on November 31st.

Valuable helpers for Halloween at home are dry branches and gauze. An armful of twigs makes gloomy bouquets. Melt the wax and pour it over branches for beauty or hang spiders, cardboard pumpkins or candies there.

If you crush the gauze and tear it with your hands, it will form a very convincing web. The walls and ceiling can be decorated with cardboard footprints - someone was in a hurry, running away from an aggressive zombie! And a garland of mice will come out of faux fur and laces.
We wish you an atmospheric and successful Halloween. Do not limit your imagination, and then everything in your hands will turn into decorative elements. And to entertain your guests, read about Halloween contests and don't forget to press the buttons and
Halloween is one of the most ancient holidays in the world. Its history dates back thousands of years. It closely intertwines the Celtic rite of honoring evil spirits and the Christian rite of worship of all saints. Halloween is celebrated on October 31st. It was on this night, as our ancestors believed, that the evil spirits of nature gathered in the forests and on the tops of the hills, and the Druids lit fires and made sacrifices to them in order to achieve favor on their part.
Halloween is one of the most ancient holidays in the world, its history dates back thousands of years.
We invite you to learn how to make several interesting crafts that will help you beautifully decorate your apartment for Halloween.
Craft options
There are many interesting craft options for decorating your home for Halloween. They can be created from:
- Pumpkins;
- Orange;
- Papers;
- Salt dough
- Polymer clay, etc.
Below we will look at master classes on creating Halloween crafts from the materials listed above.
From pumpkin

Beautiful glowing pumpkins create the perfect Halloween atmosphere
Pumpkin is an essential attribute of Halloween. According to ancient beliefs, it can scare away evil spirits from your home. The traditional version of crafts made from this fruit is a carved face with lighting inside. To create it you will need the following materials:
- Pumpkin;
- Tablespoon;
- Knife;
- Template with a face;
- Thick needle;
- Spatula.
Step-by-step instruction:
- Let's take a pumpkin. Cut out a circle as shown in the picture and remove the cap. If you want to place a candle in it, start cutting from the top. If you are placing a glowing jar or flashlight, it is better to cut the bottom of the pumpkin.
- Take a spoon and remove the seeds and pulp from inside the pumpkin. This can be done by hand if the pumpkin is very ripe and soft inside.
- Take a ready-made face template or draw it yourself. We apply the finished design to the outside of the pumpkin and use a needle to pierce it along the contour.
- Using a sharp thin knife, we cut out a design on the pumpkin, adhering to the previously outlined outline. Don't rush, the holes should be perfectly straight.
- After the pumpkin has a “face”, we proceed to lighting it. To make a bright glow, you can use a single-color New Year's garland. We wrap it around the jar and place it inside the pumpkin. In this case, the hole in the pumpkin should be at the bottom so that the wire from the backlight is not visible. An easier option to illuminate our craft is to use a simple candle.
Photo gallery: Halloween light-up pumpkin craft

Illustration for point 1

Illustration for point 2

Illustration for point 3

Illustration for point 4

Illustration for point 5
Orange candlestick

What's not a worthy substitute for pumpkin?
Not everyone starts preparing for Halloween early. Many people usually remember it at the last moment. Then you may not have a pumpkin suitable in shape and size at hand. But don't despair: you can replace it with an orange and make a beautiful Halloween-themed candlestick out of it. To make it you will need the following materials:
- Large orange;
- Felt pen;
- Knife;
- Face template;
- Big spoon.
Step-by-step instruction:
- Take a large fruit and cut it into several parts. Cut off about 1/3 of the top, leaving 2/3 of the orange.
- We carefully clean the peel, trying not to damage it. To do this, cut the pulp several times with a knife, divide it into several parts and carefully separate it from the peel.
- We proceed to the most creative part of the work: we give the peel the shape of a smiling and at the same time fearful face. Take nail scissors, they will be easier for you to cut out small details. On the “lid” we make a cut in the shape of a star, create eyes and a nose, and cut a smiling mouth in the shape of a triangle.
- All that remains is to put a drip candle inside and set it on fire. The decoration is ready.
Photo gallery: Making an orange candle holder for Halloween

Illustration for point 1

Illustration for point 2

Illustration for point 3

Illustration for point 4
Origami
You can also create original Halloween crafts from plain paper. Let's consider several options.

This garland can be hung on the wall on the eve of Halloween.
First, let's make a garland in the form of ghosts. It will serve as a wonderful themed decoration for the apartment. To make it we need:
- Roll paper;
- Felt pen;
- Scissors;
- Thread.
Step-by-step instruction:
- Take rolled paper and cut a strip of the desired height to the width. You choose the length of the future garland at your discretion.
- Draw a ghost pattern on a separate piece of paper. Fold the main paper into an accordion shape. Its width should fit the ghost blank.
- We attach the template to the paper accordion so that the ghost’s hands are clearly along the edge of the paper. Let's redraw it.
- We cut clearly along the line, capturing all the small details. The ghosts in our garland are holding hands, so we leave the connecting lines uncut.
- We unfold the garland on the floor and draw eyes and a mouth on each element.
Ghosts can also be located separately from each other. Then they will need to be attached to a thin thread.
Photo gallery: Creating a ghost garland for Halloween

Illustration for point 2

Illustration for point 4

Illustration for point 5
You can also cut out a beautiful pumpkin from paper. To make it you will need the following materials and tools:
- Orange paper;
- Felt pen;
- Scissors.
Step-by-step instruction:
- Fold the sheet into a square and draw a template on it.
- Take small scissors and cut out a pumpkin with a mouth and nose.
- We bend the sheet again over the already cut out mouth. Draw half a triangle and cut it out. These will be the eyes.
- We unfold the sheet and we get a pumpkin.
Photo gallery: Cutting paper pumpkins for Halloween

Illustration for point 1

Illustration for point 2

Illustration for point 3

Illustration for point 4
The bats

Original interior decoration for Halloween
Now let’s find out how to make a beautiful bat. We need very few materials and tools:
- Black paper;
- Templates of different sizes;
- Scissors
- Pencil.
Step-by-step instruction:
- First you need to prepare a template. You can take a ready-made one or draw it yourself.
- Fold the paper in half and place our template on top.
- Carefully redraw the required number of mice along the contour and cut them out with nail scissors.
- If desired, we add faces to them and attach them to the wall using double-sided tape.
Photo gallery: Making black paper bats for Halloween

Illustration for point 1

Illustration for point 2

Illustration for point 3

Illustration for point 4
Crepe paper spider
A simple and, at the same time, original spider can be made from corrugated paper. With its help, you can give volume to the body of our insect, making it look as if it were alive.
To make it you will need the following materials and tools:
- Crepe (corrugated) paper;
- Black cardboard;
- Yellow paper (ideally fluorescent);
- PVA glue;
- Double-sided tape;
- Scissors;
- Pencil.
Step-by-step instruction:
- Prepare black corrugated paper, a small piece of black cardboard and yellow fluorescent paper.
- For a small spider 10 centimeters long, cut a piece of crepe paper measuring 50x20 centimeters.
- We measure a third of the length and bend the paper in this place. This is where the division between the head and the torso will come.
- We squeeze each side into a ball, straighten the folds so that they are on the bottom. Two hemispheres are formed on top.
- We cut out a base from paper of the same shape as the main part of the spider, only slightly smaller in size. We glue it to the bottom using double-sided tape or glue.
- We correct the upper part, giving the spheres volume.
- We cut out 8 identical strips of cardboard, 9 centimeters long and 1 centimeter wide. These will be the legs of our spider. We also make a “tick” for the mustache.
- Fold the strips in half and bend them in the opposite direction 10 and 13 millimeters from each edge, respectively.
- We glue legs, antennae and glowing eyes from fluorescent paper to the body. Now this spider is ready to scare everyone in the house!

Illustration for point 1

Illustration for point 2

Illustration for point 3

Illustration for point 4

Illustration for point 5

Illustration for point 6

Illustration for point 7

Illustration for point 8

Illustration for paragraph 9
Salted dough pumpkin
You can even create a beautiful and unusual Halloween decoration from salt dough!
To prepare the dough, mix a glass of flour with a half glass of kitchen salt. To add flavor, you can add vanillin and a spoonful of vegetable oil. Stir and divide the dough equally into four parts. Add a little food coloring of the desired color to each of them. Our example uses Easter egg dyes. Knead the dough.
Helpful Hint: If you have any unused dough, you can cover it with plastic wrap and use it after a few days. It is important that it does not come into contact with air. Otherwise, it will dry out and quickly become unusable.
Step-by-step instruction:

Salted dough pumpkin will surprise your family
- Roll several orange balls. You can make several different sizes of pumpkins (for example, 3 and 5 centimeters).
- Press them down a little with your finger.
- Take a toothpick and make several dents with it - the relief of the pumpkin. Start from the bottom and gradually change the angle of inclination.
- Roll out small green dough flatbreads.
- Now you need to cut out the leaves and create several relief strips with a toothpick
- Place in the oven and bake until completely hardened at 180°.

These pumpkins can be created at home
A small but original decoration in the form of a skeleton pumpkin can be made from polymer clay.
Step-by-step instruction:
- To begin, roll out the orange layer with a rocker and cut out round pumpkin molds.
- We form identical balls from the figures by rolling the clay in our hands.
- We also roll out a black layer. We form balls of the same size.
- Roll out another orange layer and wrap black balls in it.
- Using a blade, we cut out the eyes of our skeleton pumpkin in the form of small triangles. We make such cuts only for those pumpkins that have a black base inside.
- Just below the eyes, exactly in the middle, we make a triangular hole for the nose. Carefully separating the top orange layer of the bases of the eye and nose, remove it to the black base.
- We make the mouth with curves using a blade. We cut through the top layer of orange plastic to the black clay.
- Using a stack and a ball, we make a depression in the plastic at the top and bottom of the pumpkin.
- Use a toothpick to make grooves by pressing on the base.
- In the formed orange balls we make similar indentations using a stack.
- Fill the entire surface with grooves.
- We form a thin strip of green polymer clay and wrap it around a needle. This will be the top of our product.
- Carefully remove the tendril from the needle. Make a small hole in the top of the pumpkin. We place the antennae there. Spread it a little over the base of the pumpkin.
- From the same green clay we make thin strips that are needed for the tail on the top.
- Place the tail exactly on top in the middle and press it to the surface of the product.
- Now we make leaves. Take the green layer and roll it out. Cut out a leaf from it. If you don’t succeed the first time, it’s better to draw a template on paper and cut it out. Using this contour it will be easier for you to create leaves of the desired shape.
- Use your fingers to bend the edges of the leaves and use a needle to make small indentations that look like veins.
- Before fastening, we make through holes in the leaves and thread metal nails with heads through the entire workpiece. Bake the finished decoration in the oven.
- Finally, the last stage. After firing, degrease each part and cover it with varnish.
Photo gallery: Creating skeleton pumpkins from polymer clay

Illustration for point 1

Illustration for point 2

Illustration for point 3

Illustration for point 4

Illustration for point 5

Illustration for point 6
Illustration for point 7

Illustration for point 8

Illustration for paragraph 9

Illustration for point 10

Illustration for paragraph 11

Illustration for paragraph 12
Illustration for paragraph 13

Illustration for paragraph 14

Illustration for paragraph 15

Illustration for paragraph 16

Illustration for paragraph 17

Illustration for paragraph 18

Illustration for paragraph 19
Balloon pumpkin
To make a beautiful pumpkin balloon decoration you will need the following materials:
- Three orange balls;
- One green ball for modeling;
- sediment;
- Calibrator.
Step-by-step instruction:
- Take the orange balloon and inflate it with a large pump. Then we deflate and re-inflate. On the calibrator we set a mark of 6 inches and measure the required size of the ball.
- We tie it when it reaches the required dimensions. Divide the ball in half. Grab the opposite side and twist it.
- In the picture below you can see what the workpiece should look like.
- We perform the same manipulations with other orange balls, observing the proportions.
- Take two balls and connect them with a cross. We twist them so that they are on the same level. Then we attach the third ball. Align all the balls along one line. We get the base for the pumpkin.
- Then we take a green modeling ball and make the top of the pumpkin out of it. When inflating, leave a free edge approximately three fingers thick. From the other edge we measure a distance of four fingers. We twist in this place. Then - again into three fingers, twist again. We unite with the help of a ponytail.
- We make a few more bubbles with three and four fingers alternately. We repeat 5 times, after which we combine the resulting composition into a flower. Now we straighten the bubbles so that there are segments of 3 fingers at the bottom and 4 fingers at the top.
- To combine the stem with the base, we insert the bubbles inside the green ball through the cuts of the pumpkin.
- We measure 4 fingers from the base of the leg on the remaining segment of the ball and twist it. We cut off the other part and tie it. This cute balloon pumpkin is ready for the holiday.
Photo gallery: Making a balloon pumpkin for Halloween

Illustration for point 1

Illustration for point 2

Illustration for point 3

Illustration for point 4

Illustration for point 5

Illustration for point 6

Illustration for point 7

Illustration for point 8

Why not make such a cute spider for Halloween?
To make such a beautiful “airy” spider, prepare the following materials and tools:
- Several black balloons;
- Black and white cardboard;
- Scissors;
- PVA glue;
- Thread or rope.
Step-by-step instruction:
- We inflate the balloons. We make one larger (for the body), the other a little smaller (for the head).
- We tie them together with rope or thread.
- We make 8 strips of the same length and thickness from black cardboard. These will be the spider's legs.
- We bend the strips so that they look like legs. Glue them on the sides of the large ball.
- Draw the eyes and nose of the spider on cardboard and cut them out. Glue to a small ball. That's it, our spider is ready.
For Halloween, you can make many beautiful and original crafts yourself. They will decorate your apartment and create the atmosphere of this unusual holiday. We've covered the most popular crafts so you can get ready for Halloween in advance.
Useful tips
Despite the fact that this holiday is not official in Russia and the CIS countries, people still like to celebrate it, because it is not only unusual, but also quite colorful and original.
Many people throw parties on Halloween. They can take place both in clubs, cafes and restaurants, and at home.
To beautifully decorate the room and prepare original Halloween crafts,We provide several interesting ideas, many of which you will definitely like.
DIY Halloween: Little Ghosts

You will need:
Styrofoam balls (found at an office supply store)
White cloth or gauze
Black pins
Thick thread.
1. Wrap each foam ball in fabric and tie a thick thread at the neck to secure the fabric.

2. Insert black pins to become eyes.

3. To hang the ghost, you can make a small loop of thread on the top of the head.
DIY Halloween Crafts: Spider Garland

You will need:
Thin brushes
Strong thread
Needle and thread or tape.

1. Prepare 4 pipe cleaners, gather them into a bunch and bend them in half.

2. Grasp the top of the head where the pipe cleaners fold, bend it slightly and twist the pipe cleaners to form the body of the spider.

3. Start straightening the spider's legs.

4. Using a thread and a needle or tape, attach the spider to the thread.

5. Make a few more spiders to create a larger garland.

DIY Halloween decor

For this project, you can use your imagination and use any objects (things, toys) to create an original Halloween corner.

In this case, a witch's locker was created. A large wooden box was used for this, but instead you can use a cardboard box to which you can attach several shelves and decorate with paints (gouache) and/or black duct tape (or duct tape).

As decorations you can add:
Toy skulls
Bats cut from black paper
Artificial web (buy in cans or make your own from threads)
Antique books and unwanted keys
Jars and cones, painted with gouache in the desired colors.

DIY Halloween at home: bloody candles

You will need:
Food parchment (baking paper)
White thick and thin candles
1 red candle
Pins and nails

1. To begin, cover your work surface with parchment paper and remove all stickers (if any) from the candles.
2. Light the red candle and get ready to drip red paraffin onto the thick white candle. You can insert pins and nails into the white candle in advance. Be careful, remember - paraffin is hot.
3. The same can be done with thin candles and then insert them into the candlestick.
How to make flying candles for Halloween


How to Decorate Your House for Halloween: Glow in the Dark Ghosts


Halloween Crafts: Hand


DIY Halloween Crafts: Cardboard Anti-Zombie Barricades


DIY Halloween Decorations: Eyes in the Dark


Halloween door decoration

How to make a big Halloween ghost with your own hands

You will need:
Transparent trash bags
Transparent wide and thin tape
Mannequin or volunteer
* you can use part of a mannequin (without the head) or something that has the shape of a torso, as well as a ball for the head.
Fishing line (for hanging).
1. Torso
1.1. Place a large clear bag over the mannequin. If you have a volunteer as a mannequin, make holes in the bag for the head and arms and then put it on it.
1.2. Start wrapping thick tape around the bag. Pay special attention to the most intricate parts of the torso. Wrap around your waist, neck and shoulders. Add some tape to connect all the already wrapped parts - a couple of pieces from the neck to the shoulders and a couple from the waist to the neck.


* For more difficult places, you can use thin tape.
In the picture you can see strips of blue tape - this is so that you can better understand what to do next.
1.3. Continue wrapping the tape, varying from horizontal to vertical strips. The main thing is that the entire torso is covered.


1.4. To make the shape stronger, add another layer of tape. You can add a couple more layers if desired, but the more tape, the less transparent the ghost will be.
1.5. Using scissors (preferably with rounded ends), cut the shape from the back from the neck to the waist in a straight line. The dark tape in the picture shows exactly where this needs to be done.

1.6. Carefully remove the form from the mannequin and set it aside.
7. Nowhead.
If you don't have a head model, you can use a regular ball of the appropriate size.
*Under no circumstances use a real person for this.
7.1. Place a transparent bag over the mold.

7.2. Wrap thin tape around the neck to secure the bag at the bottom. And to secure the bag on top, wrap tape around it in the forehead area. If you are using balls, simply place some tape on the bottom and then start wrapping it around the entire ball.
Below we will present several options on how to quickly and easily make scary decorations for the wonderful holiday of Halloween, also with your own hands, from the most ordinary paper and other improvised materials that are likely to be found in every home.
How to make DIY Halloween decorations from paper
Halloween (or All Hallows' Eve)- an ancient holiday that has survived to this day from the pre-Christian era. Traditionally celebrated on the night from October 31 to November 1 in English-speaking countries. The history of the holiday is as follows: among the ancient Celts, October 31 was considered the last day of summer, marking the end of the harvest work and the transition to winter, which began on November 1. The celebration of this transition took place at night, when, according to legend, the door of the world of the dead opened and spirits entered the world of people. To protect themselves from dark forces, the Celts dressed in animal skins, left treats for spirits at the doors of their houses, and gathered around the fires where the Druids performed rituals. These traditions have survived to this day, somewhat modified.
Now Halloween night is one of the most popular holidays among children and youth, a time for fun dress-up parties, when you can try on a carnival costume and have a lot of fun and fool around with friends.
Halloween symbols.The well-known symbols of the Halloween holiday are black cats, bats, spiders and everything that is in one way or another connected with the night, black magic and evil spirits, and the scarier the better! After all, all these creepy attributes are made in order to deceive the dark forces. The most popular symbol is, of course, a jack-o'-lantern called Jack's Head. The lamp was named after the cunning Irishman, who during his lifetime managed to deceive the devil himself several times, and therefore, when he died, he was not allowed into hell, and because of his numerous sins, he was not taken to heaven either. Jack had to wander in the darkness between worlds, lighting his way with a light placed in a hollowed-out turnip. And such lamps began to be carved from pumpkins in the United States of America, where the harvest of this vegetable is harvested at the end of October.
If you decide to throw a party for Halloween, then you are probably thinking about how to decorate the room in accordance with the traditions of the holiday.
We make our own lamps from glass jars

To make such lamps, glass jars of any shape and size, acrylic paints or special paints for painting on glass, PVA glue, brushes and black colored paper are suitable.
A well-cleaned jar should be coated with paint and an applique of pictures cut out from paper templates should be glued on top.
You can cut out figures from plain paper, and then tint them with black paint.
Such lamps with a tea candle placed inside will create an atmosphere of mystery that matches the spirit of the holiday.
And here is another version of the lamp, reminiscent of a mummy's head, for the manufacture of which you will need an empty glass jar and a roll of toilet paper:

Everything here is very simple - you need to wrap the jar in several layers of paper, secure it with glue or tape, and draw eyes with a felt-tip pen. You can insert a tea light into the jar, but it is better to use special small diode lamps for safety reasons.
Trying to attach terrifying silhouettes to windows
Another very simple, budget-friendly and effective way to decorate for Halloween is silhouettes on the windows. Here you can use your imagination, cut out any creepy picture you like from paper and stick it on the window glass. When it gets dark and the lights turn on in the room, eerie shadows will appear on the windows:

We make bright paper pumpkins for the windowsill
These bright and original pumpkins can be made from orange paper!
From 4 sheets of A4 folded like an accordion you get one pumpkin:

All that remains is to glue on Jack’s creepy smile and eyes, a green stalk, and the elegant decoration is ready.
We release a large flock of paper bats
This is simply wonderful in its simplicity and original decoration of the hall for a Halloween party. Simply cut out silhouettes of bats of different sizes from black paper, bend them in half and attach them to the walls, ceiling and windows using double-sided tape or stationery gum. Below are stencils that you can use.

You can make such a garland from baking paper - it is thin and easy to cut. You need to cut a strip of paper of the required size from the roll, fold it like an accordion so that the silhouette of a little ghost fits on each part. Then transfer the silhouette onto paper and cut along the contour. The garland is ready! You can draw the silhouette of a ghost using this template.
Here are a few more options for garlands for decorating rooms, which can be easily made from paper:

Simply cut out the figures you like from paper in traditional Halloween colors, thread a thread through them and hang them under the stream and on the windows.
If you have not yet decided on the decor option for your home for a Halloween party, look at the examples in the photo on how to decorate a room.

As well as a selection of videos that tell you what other decor options you can use to make the party in your home bright and unforgettable.
A selection of videos on the topic of the article