Crafts from colored paper for elementary grades. Animals from cardboard How to make animals from cardboard and paper
9 944
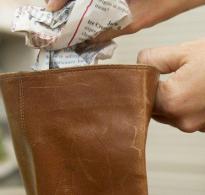
Animals made of cardboard. A box made of brown corrugated cardboard, a great source of entertainment (and not only for the cat who climbed into it and catches his tail there). Cardboard can serve as an excellent material for creating an entire doll world: animals made of cardboard, trees made of cardboard for a winter fairytale forest, and the trees themselves are also made of cardboard.

We need nothing at all, namely:
- Cardboard.
- White sheet of paper.
- Glue, scissors or carpet knife, black felt-tip pen.
- template (download PDF here)
- See what they are
Let's start with the fir trees. To create a three-dimensional Christmas tree, we simply draw on cardboard, two Christmas trees in the most childish way, a Christmas tree (of three triangles), both of the same size. The only secret is that the two halves of one Christmas tree will have slots as wide as the thickness of cardboard and as high as the middle of the layout. In the first new product, the slot is made from the base to the middle, in the second, from the top to the base. We imitate a snow cap on the top of the trees with paint or by gluing white paper. We connect both halves. I think it’s clear how to do this, the Christmas tree is ready.


Animals are made from cardboard using the same principle. Toy parts are connected according to the same principle using slots in the component parts.
The body is drawn separately, the legs, horns, and ears are drawn separately. The legs are just a piece of cardboard, cut in the shape of a horseshoe, of the required size, height and width. We cut out the horseshoe, make a slot from the middle of the upper arc to the middle.
Where the legs are attached to the body, we make a counter slot of the same thickness. The horns are also attached. All that remains is to connect the parts, first you can paint the animals from cardboard, or apply an applique (spots on the paws on the sides, eyes).
Making a sled for a dog sled is also not difficult, there are two sidewalls and a couple of crossbars, everything is connected using slots.


Add dolls and you can play.
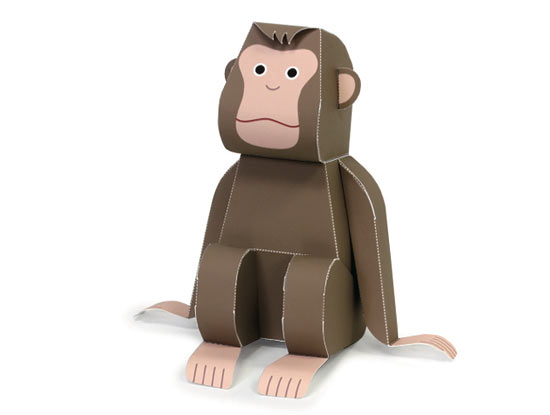
And again, voluminous paper crafts - forest animals: hare, fox, owl, monkey and squirrel. The author illustrated very cute forest animals, the design is quite simple, but the model diagrams themselves will still require some perseverance in assembly.
Gluing three-dimensional paper figures is very interesting and completely uncomplicated. Together with your children, you can collect and glue a lot of funny little animals, and then populate an entire paper forest with them. In addition, assembling such models is useful for children to develop fine motor skills.
Paper animal diagrams
All children love making, cutting and gluing fun crafts. But working on three-dimensional toys contributes to the development of a child’s spatial thinking. I suggest you join the children and get creative with them.
Using ready-made diagrams that can be downloaded on the Internet, it’s easy to make a lot of original three-dimensional figurines of forest inhabitants together with the children. This entertainment will keep your child busy and provide many hours of useful and educational activities.
To complete this work, we will need to download the diagrams and assembly instructions and print them on a color printer. Then, using scissors, cut out all the parts and, according to the instructions included, assemble and glue three-dimensional figures of animals or even a whole tree.
Let's start by making a cunning fox out of paper.
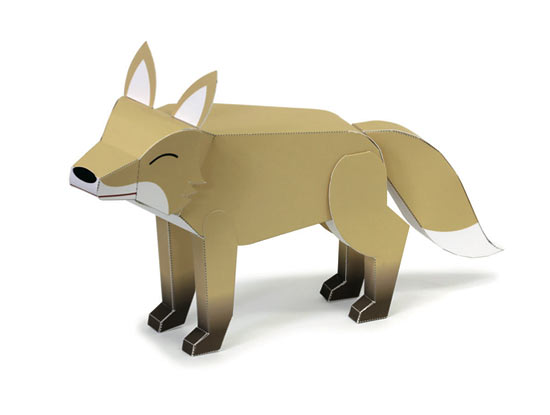
After we print out the sheets with the parts, we take scissors and cut them out taking into account the gluing allowances. Then we bend the parts along the dotted lines and glue them together according to the instructions and diagram. We glue on the ears and tail and as a result we get a real red-haired rogue.
As we remember from fairy tales, the fox always hunted a bunny and a paper bunny will keep our fox company.

The algorithm for creating a three-dimensional paper bunny craft is the same as for creating a chanterelle. ,
We print it on a printer, cut it out, bend it along the marked lines, glue it together and assemble the animal toy.
The forest is home to not only the hare and fox, but also various birds. A voluminous paper bird is made in the same way as

And of course, what is a forest without trees? and collect it as described above.

A large selection of ideas for what paper animals can be. All work with step-by-step photo instructions.
Animal crafts occupy most of the site’s work, and the process of creating them is not completed. As usual, so that you don’t have to look all over the site for interesting options, I collect tops where I post a short review and photos with links to a step-by-step master class. Let me clarify again that the links do not go beyond the site. You won’t have to switch to any illegal resources.
Since there are many animals made of paper, I will divide them into categories, depending on the technique used to create this or that craft.
Accordion paper animals
Accordion bunny

The whole bunny is in the shape of a round accordion, this is a great creative activity for children, room decoration for themed events, Easter.
Pig made from paper accordions

Accordion folding is a useful and fun technique for children of all ages. There are already many different characters on the site made in this way, only the heads and sometimes the limbs differ.
Bunny made from a complex accordion

Above is a hare and a simple accordion, which is made by folding paper into a small fold. This option is more complicated; the accordion consists of two strips intertwined in a certain way.
Paper bear

A large and imposing bear can also be made from accordion paper. Moreover, it can be made with a minimum of materials. All you need is:
- Brown cardboard;
- Some orange paper;
- Stationery (glue, scissors, pencil, markers)
Funny sheep

The work uses a complex accordion, which is also rectangular in shape. But its complexity does not lie in its execution; there is simply an even simpler version of the accordion. But both are ideal for creating paper animals.
Paper craft for children – dog

An excellent craft for children, simple, interesting, and incorporating paper folding techniques useful for children - an accordion paper dog. The dog turns out to be interesting and moving; children will enjoy making it and then playing with it.
Accordion hedgehog

A fun and very easy craft for kids. The work uses a minimum of materials:
- Cardboard and paper in brown and beige shades;
- Glue, scissors, markers.
Animals made from strips of paper
Paper strip panda

A paper panda consists of a head in the form of a circle and a voluminous body made of thin paper strips. There are a lot of characters created using this technique on the site, some of them can be found in the review - crafts from strips of paper.
Paper strip pig

The piggy craft is not much different from other characters made from thin strips of cardboard, the main thing is the corresponding appearance with a snout and characteristic ears.
paper mouse

Winter and off-season version of a mouse made of stripes. A simple children's craft, ideal for children. To make the craft as stable as possible, you should make it exclusively from cardboard.
Doggie made of stripes

Another great craft idea this year is a paper strip dog. The work is easy, creative and varied. In the process, children can develop the ability to cut with scissors, glue paper, and show their artistic talents in drawing a dog.
Striped deer

As a rule, this is a New Year's craft, easy, interesting and useful for children. Moreover, this deer is decorated not only with antlers, but also with a scarf made of chenille wire.
Bunny

A bunny made from paper strips is a wonderful craft, an interesting creative activity, useful for the development of children's fine motor skills.
Animal crafts made from paper cones
Pig from a cone

A paper cone pig is a very easy craft, ideal for preschool children. The most difficult part of the craft is rolling a cone out of paper, but the rest of the details are simple and can vary in shape, size, and personal preferences.
Mouse made from a cone with edges

This paper mouse is not complicated at all. It comes with a template, although it’s easy to make such a craft without it.
cone dog

A paper cone dog is an easy and cute craft. Children will love making it, especially since later they can play with the dog and make a collection of cone toys and animals.
Paper elephant

It’s not at all difficult to make such an elephant. It consists of a cone and a head with large ears and a trunk. Moreover, you can draw the head yourself or use the template already presented.
Cone hedgehog

For an autumn holiday or for classes with a theme about forest animals, a paper hedgehog would be a great idea. There are a lot of all kinds of hedgehog crafts, this one is distinguished by its simplicity and availability of materials.
Lion from a cone

This paper craft uses several techniques at once: cone, paper strips. The lion's body and paws are made of cones of different sizes, and the mane is made of thin strips glued into a loop. But since there are more cones, we will include the lion in this section.
Paper cone cat

The cat consists of a conical body and a head made of a roll. All components are extremely simple, ideal for children's creativity.
Animals from bushings, cylinders, rolls
Pig from a top hat

One of the simplest options for creating a funny pig that children can handle. The work uses:
- Pink cardboard and paper of the same shade;
- Sticky eyes;
- Markers, pencil, scissors and glue.
Wolf from the sleeve

This scary and terrible paper wolf is a simple children's craft that is very easy to make from a roll, a sleeve, or any cardboard cylinder. This is a great roleplaying character. Can even be used in a puppet theater.
Impressive pig

A pig can be made in a variety of ways, so we continue this theme on the site, and this time we have a fat, lazy and imposing (as it should be) pig made from paper rolls.
Rolled bunny

The paper roll bunny consists almost entirely of rolled strips of paper. This technique is easy and useful for children.
Fox from a roll

The original paper fox is made from a paper roll. But you can simplify the task by using a toilet paper roll. The work is not at all difficult, but it will require some perseverance to make several details that complement the fox.
Simple hedgehog from a roll

Even the smallest children can make a hedgehog made from a toilet paper roll. After all, the base is already ready, all that remains is to paint it, glue it, add details, and you will get an interesting character, a frequent guest of fairy tales and cartoons. Try making such a hedgehog with your children, they will like the process and the result of the work.
Hedgehog from a sleeve

Despite the fact that there is already one example of a hedgehog made from this material, I present to you another idea of what a hedgehog made from a toilet paper roll could be. The creation process itself is a little more complicated compared to the previous hedgehog from a sleeve, but the result is worth it. The hedgehog turns out to be original, all so prickly, prickly and funny.
Paper squirrel

The squirrel is not a simple one, but with a real acorn, which it holds in its paws. This craft will be an excellent option for an autumn holiday in kindergarten.
Pigs from the bushing

There are 2 ways to create pigs in the review, although this is not the limit. There are many variations, both in color and in the method of processing the sleeve. And, of course, instead of a sleeve, you can quite successfully use ordinary rolls, that is, paper rolled into a cylinder.
Bush dog

We continue our collection of crafts made from waste materials, and this time it’s a dog made from a toilet paper roll. The sleeve is an excellent basis for creating a wide variety of characters, even dogs can be completely different. I present to you two options for dogs, very light and cute.
Bat

She specifically clarified that this is also an animal, that is, the family of bats, but from the order of animals and something else. The craft is usually relevant for Halloween.
Regular mouse from a roll

Despite the fact that there are already a lot of different mice on the site, there is no mouse made from a toilet paper roll yet. Therefore, this review will present one of the options for creating a mouse, which, in my opinion, is very funny and cute.
Paper tiger cub

A tiger made from a toilet paper roll, or from any roll, like all other crafts made from this material, looks interesting and bright, and is easy and quick to make.
Cat from a top hat

From a sleeve or a paper roll you can make such a wonderful, flirty fashionista - a cat. The process itself is extremely simple, there are many variations for creativity.
Mythical animals made of paper

A bright and beautiful paper dragon is a wonderful craft that children can make with their own hands. It consists of a voluminous body with several halves of circles, as well as two parts in the form of a head and a tail, which can be drawn or use ready-made template images
Paper Toothless

This wonderful Toothless made of paper consists of simple parts - a cone body and a head with wings and paws, for which a template is provided. There are many ways to make such a dragon, but most often these are complex origami and designs. This same craft is ideal for children; they will enjoy the process of creating Toothless and the interesting toy itself.

The character is suitable for two sections - crafts from vtolk and crafts of mythical animals from paper. I will place it here, since it is one of the brothers of Toothless and the popular cartoon.
Crafts of the snake Gorynych

The three-headed Serpent Gorynych made of paper is not the easiest craft. One child may not be able to cope with it; adult help is needed. And it’s even better if it’s a team effort, where each child makes one of the parts of this gorgeous fairy-tale character.
Paper unicorn

A bright and colorful unicorn that children can make with their own hands without much hassle. All the details of the animal are simple; following the step-by-step description, the craft will definitely turn out at the highest level.
Monsters

Another roll craft, but they still have more mythical quality. Making them is very interesting, because there are no frames or restrictions, only personal imagination.
Other paper animal crafts for kids
Paper sheep

Using this method, children will get a wonderful paper sheep, which can be not only a craft, but also a toy. The sheep will add to the collection of funny paper animals, if the child has one.
Paper squirrel

A paper squirrel made using this method is an excellent children’s craft, almost a homemade toy. The main work is to create the base of the squirrel’s body, and the remaining details are easy to draw; alternatively, use the ready-made template presented in this review.
Paper crafts – mouse with cheese

I immediately liked the funny mouse on the paper cheese. But what impressed me even more was the ease and speed of its creation. If not for some small elements, the mouse can be made within 10 minutes. Try making this craft with your children, and you and they will be in a good mood.
A simple mouse for children

Even children 3-4 years old can cope with such work. After all, the body of the mouse is just paper folded in half, and all the other details are circles and rectangles.
Volumetric turtle

The voluminous paper turtle consists of a simple flat body and an impressive shell made from circles of colored paper. The craft is not at all difficult to make, because the main part of the work is cutting out circles from paper.
Paper simple deer for kids

This funny three-dimensional cardboard deer is an excellent craft option for preschool and primary school children. The work is easy and fun.
Paper cat

Would you like to know how to make a paper cat? Follow the step-by-step manual exactly and everything will definitely work out. This craft includes origami elements, but it is not at all complicated.
Paper crocodile

Simple, fast and interesting. Everything a child needs is displayed in this crocodile craft. The animal is made of cardboard so that the craft sticks well to the surface.
Paper animals with templates
Polar bear

A great winter craft is a paper polar bear. The step-by-step review also includes a template that will make the job as easy as possible. The little bear turns out to be funny, similar to Umka from the old and beloved cartoon of the same name.
Paper pig

A funny paper pig is very easy to create. All thanks to the template and the simplicity of the craft itself. All you need to do is cut out the piglet along straight lines, bend it where the dotted line is, and glue it together.
paper dog

A voluminous dog made from paper using the template shown below turns out great. A very cute, funny craft that is not at all difficult to make, since there is a ready-made template.
Paper turtle

Don't know how to make a paper turtle? But there is a very simple way: use a template and cut out a ready-made craft. Then, with a minimum of additions, create a three-dimensional, stable and cute character with whom children can play.
Paper deer

A paper deer using a template is a simple craft that does not require much effort or time. You can make a lot of such deer, both in realistic beige-brown colors and in bright, sometimes unexpected colors.
Making crafts with your own hands develops perseverance in children, reveals creative talents and develops fine motor skills of their fingers. The result of your children’s efforts can be saved as a keepsake or decorated in the nursery’s room. If you are thinking about what to do with your child for the evening, DIY paper crafts are the best choice. This technique is very simple to perform, and the result will in any case please the whole family. So let's get started.
SpongeBob and his friends
SpongeBob SquarePants is a very popular cartoon, your child has probably seen its characters. We invite you and your child to revive the main characters using a very simple technique. You only need to print out the diagrams that are attached to the article, cut along the contour and glue in the right places.
Harry the snail is SpongeBob's pet. It appears in almost every episode of the cartoon. It's very easy to create such a beautiful snail. Print out the diagram below:
After you have printed the diagram, cut it along the indicated outline and glue it on the white indents and that’s it. Your snail is ready. Ultimately it will look like this:

Mr. Krabbs is the owner of the Krusty Krabbs restaurant and SpongeBob's boss. More than his daughter Pearl, he loves only money.
Assemble the businessman by placing all the white parts inside and drain them.
The parts are small and there are a lot of them, there is a chance that it will be very difficult for children to handle them, so you will have to help him.
As a result, you will get something like this:
Patrick is SpongeBob's best friend and accompanies him throughout the entire cartoon. This wonderful pink star will perfectly decorate a collection of three-dimensional dolls.
Fold and glue Patrick according to the same pattern as the previous figures, and you will get such a simple and good-natured character.
Now is the time to create SpongeBob himself. This is the main character. An employee of the month since the beginning of Krusty Krabbs, he loves his job and the Krabby Patties he makes. He is also a sympathetic and devoted friend. See diagram below:
If you have already made all the previous characters, then you know exactly how to assemble the Sponge. You'll get a friend like this.
Animal world
Volumetric crafts made of paper and cardboard in the shape of animals are not only a way to keep your child busy for a while, but also an excellent opportunity to better remember and visualize the idea of animals. Let's begin.
“Sly Fox” is a simple craft that will help your child create his own personal fox. Download the diagram and print it on a color printer.
Once you have the printed diagram in your hands, arm yourself with glue and glue the cut out parts according to the instructions. If you do everything right, you will end up with such an adorable little fox.

"Bunny." This time we will collect a shy bunny, it can be a great decoration for your desktop. Download the diagram and print it.
The further algorithm of actions is exactly the same. We cut along the contour taking into account the indentations and glue according to the diagram. In the end you will end up with a little bunny like this.

"Squirrel". A beautiful forest squirrel along with a nut will keep company with the previously made figures. We cut it along the contour and glue it in accordance with the instructions, and then you will certainly get a squirrel like this.

These are the realistic animals we got.
Video on the topic of the article
For your convenience, watch a selection of videos on this topic.
Origami is an ancient art that many associate with the land of the rising sun. However, today making funny simple and luxurious complex paper figures is popular all over the world.
Ordinary origami is familiar to many from figures of cranes, boats and hats made from newspapers. The essence of the technique is to fold and bend a piece of paper, creating a shape without using scissors.


Kirigami is creativity using scissors.

Animals are also sometimes made using the raw (or wet) origami technique. The products are folded from paper moistened with water, which makes the bend lines clearer. A prerequisite is the presence of water-soluble glue in the paper.

The most patient and diligent will certainly enjoy creating using the modular origami technique. Animals, flowers, toys of various shapes can be created from colored modules - parts folded from paper quadrangles with pocket corners.

Still, it’s better to start making animals with ordinary origami.
Instructions for beginners in paper origami
To create any product according to the scheme, you need to learn to understand the symbols. There are many of them, we will tell you only about a few.
There are two main folding methods:
- “Mountain” is a fold away from you, it is indicated by a dotted line with dots.
- “Valley” - folding the paper towards itself, indicated by a dotted line in the diagram.
An inflection (that is, a fold) is indicated by a broken arrow.
The “zipper” fold (also known as a “step”) is, in fact, a combination of “mountain” and “valley” (sometimes in the reverse order - “valley” and “mountain”).
The diagrams also indicate bending outward or inward, rotation in one plane or to the other side, twists, turns, openings, inflations, cuts, the presence of equal parts or equal angles.

As for paper, you can start learning with office paper. It is affordable, quite dense and durable, and can be simply white or multi-colored.

You can also try to create your first products from durable foil or from the pages of glossy magazines. If you want to surprise and amuse the birthday boy or newlyweds with an original gift, you can make a symbolic figurine of an animal from a banknote (the so-called manigami).

But ordinary colored paper for schoolchildren is unlikely to be suitable for origami - it does not have sufficient rigidity, and there may be color problems on the fold lines. It is better to take special thick colored paper. In some stores you can buy special sheets for origami.
 To understand the intricacies of the instructions, you can start with an easy-to-make one-color animal - for example, folding a puppy figurine.
 .
.
Photos of origami animals
It is better to start learning origami with small-sized products. For example, these cute little dinosaurs are made from a sheet of paper by folding and folding.

You can also fold the faces of animals - piglets, cats, dogs - very simply and quickly. Once you finish drawing the characteristic faces, funny toys for kids are ready!

When the basic techniques are mastered, you can begin to manufacture more complex products. For them, you should stock up on thicker paper (wrapping paper and pieces of wallpaper will do). This elephant has smooth, rounded curves due to the ability of paper to maintain a certain shape.

Modular origami is a huge opportunity for creativity. Animal figures using this technique are dense and durable, but much more time must be spent.

Volumetric origami animals, how to make an origami hare from paper, master class

These colored hares can move - they squat in their hands, straighten their backs, can bow their heads a little and press their mouths to the lush grass.
To make such a toy animal you will need a square sheet of paper.
- The sheet is folded in half diagonally, then in half again.
- Each “wing” of the resulting triangle is folded in half outward.
- You need to pick up the triangle so that the “pockets” with vertices A, B and C are on the top right, and the obtuse angle is on the bottom right.
- The extreme vertices A and B are folded back, as shown in the figure, forming triangles with right angles on both sides below. The middle vertex C remains motionless.
- Next, tops A and B are folded in half outward, forming ear blanks.
- Top C bends inward.
- The edge of the top C is divided into two parts and “clasps” the ears. The left corner bends inward for the tail.
- The ears need to be unfolded and flattened, and the sharp edge of the nose should also be folded. Then flatten the muzzle and form two folds along the edges of the nose.
- Raise the ponytail up and make folds on the sides of the body (top and bottom).
- Lower the ponytail slightly, forming another fold. Bend the front legs outward.
The voluminous paper bunny is ready.

Origami paper cat, diagram of origami paper cat, step-by-step instructions for crafting a cat with photo
Option 1.
Let's try to make a black cat. To do this, take a square of one-sided black colored paper.
Place the square wrong side up. We fold the corners on both sides so that we get a quadrangle, and its black part forms an acute angle.
- Fold as shown in the picture to form a hexagon from a quadrangle.
- Make a fold on a sharp corner.
- Fold the resulting figure in half.
- We bend the black cat blank a little to the left of the center.
- We unfold the left top of the workpiece and bend the sharp edge.
- Create two more folds to create a hexagonal muzzle.
- Using the same method, we bend and secure the tail.
- We bend the corners at the bottom of the animal inward to create stable legs that continue the straight line of the tail.
- We bend part of the muzzle outward to form a white corner at the bottom.
- We bend the top of the white triangle on the muzzle to make a black nose.
- We outline the lines of the ears with two folds.
- Eyes are cut out and glued to the finished cat - two white circles and two dark, smaller ones.

Option 2.
And this very simple cat consists of two parts and is made from two squares of one-sided thick colored paper.
- Take a square sheet of paper and fold one corner from the inside out.
- The opposite corner is folded from the outside inside out to the middle of the sheet. The sheet is then folded in half, forming an unstable trapezoid.
- The upper corner of the trapezoid bends down.
- Then the second corner is bent.
- It turns out to be a square of two identical triangles with a gap in the middle.
- We bend the triangles on both sides of the gap upward.
- The middle upper corner is bent down.
- We turn the figure over to the reverse side - we get a blank cat’s face.
- Bend the top of the triangle outward to create a small nose. You can also draw or glue eyes - two white circles and two black ones.
- Let's start making the body. Take a square and also place it inside out. We bend the left and right edges towards the center, maintaining axial symmetry. It turns out to be a quadrangle.
- Fold the rectangle in half (right side out).
- We bend the figure closer to the center, leaning the acute angle against the obtuse one.
- We bend the sharp part to the right.
- The cat's body is ready, now you need to turn it over.
- We attach the head to the inverted body. The cat is ready!

There are many more options for making cute cats.
How to make an origami fox out of paper, master class
There are many ways to make a fox using the origami technique.


We offer a very simple option for children and beginners.
To make an animal you will need a square piece of paper.
- The edges of the sheet need to be bent towards the center, making a new square (smaller in size).
- Turn the new square over and fold it in half.
- Fold the sharp corners of the resulting triangle towards the center, maintaining axial symmetry.
- Fold the resulting square in half again.
- Rotate the resulting triangle at an obtuse angle downwards. The right acute corner should consist of three parts. Bend the first part so that the third part forms ears.
- Flatten the second part on top to form a muzzle.
- Bend the left edge of the figure so that the resulting tail gives stability to the fox.
- Add eyes and nose to the finished animal.

And here is another scheme for making a cute fox - for those who have already understood the symbols.

How to make an origami paper dog, step by step with photos
- First, take a square piece of paper (in the photo - single-sided colored paper). It is advisable to preliminarily outline future bends on it, as shown in the figure. Such “tips” will greatly facilitate subsequent work.
- First, the bottom corner is bent, then the sides.

- When the three corners are folded evenly, the paper is turned over to the colored side so that the unfolded corner is on the bottom.
- The side corners are taken from the other side, folded along the marked lines and connected in the center, as shown in the figure.

- The two vertices of the resulting figure are curved, as shown in the figure.
- Then the top corner is unfolded and the figure is turned over with the white side out.

- Three bends are created, as in the figure, and the figure is folded upward. Then the remaining white square is folded into a triangle.

- The muzzle is formed from the upper segment; the left corner arches, forming a tail. The next stage is when the muzzle is divided into two parts by a fold, the acute angle is turned out and turns into a white nose. The tail bends slightly and becomes thinner. The bottom of all four legs are turned outward to make the figure stable.

And this paper “biting dog” toy will surely become an active participant in children's games.
By the way, learning to make animals using the origami technique is useful not only for children and their parents who want to create toys with their own hands. Such activities develop attentiveness, logic, spatial thinking, as well as another quality necessary in everyone’s daily life - patience.