What to make from an old sweater with your own hands: ideas, photos, how to sew. Do-it-yourself blanket from old sweaters We sew a blanket from old sweaters
If you have a collection of old sweaters at home, don’t rush to throw them away! From these you can make an original, useful homemade product with your own hands - a warm blanket from sweaters.
“Knitted fabrics are decorative, original and sometimes are not inferior in beauty and elegance to machine-made knitwear” (quote from M.V. Maximova’s book “The ABCs of Knitting”)
Two old sweaters, one women's scarf and the remains of thread from old projects were used to make this blanket-blanket. (You will probably be interested). The sweaters were knitted from good wool, but it was impossible to unravel them - it was so much in the process of being worn. It was decided to simply cut a certain number of squares with dimensions that would allow the most complete use of the material. The size chosen was 15 by 15 cm. After preparing 42 squares, the edges were processed. It was not the well-known stitching that was used, but the glue method. A simple drawing was placed on the table (bench) under a transparent film and secured with adhesive tape.

A metal ruler was placed on the cut flap (an uneven blue line) along the red line and pressed very tightly against the flap. Next, with a solution of PVA glue “Stolyar” (diluted one to one with water), all sides of the square were sequentially coated along the RED line.

After the glue has dried (about an hour), you can continue processing the squares - cutting along the BLACK line. Then continue working as usual - tying to size, etc. Blanks - next photo.

After that, I washed all the blanks, steamed them to size and connected them in the order I needed. The washing mode for the blanks was manual, gentle - although there was PVA and waterproof glue, but suddenly everything would fall apart. The leftovers were used to create fringe and decorative stitching between the squares.
You need to sort wearable items based on frequency of use. If you have worn a piece of clothing at least once within 12 months, leave it. Products that have been gathering dust on shelves unused for several years should be thrown away.
But you shouldn’t throw away such valuable material. Take them and breathe a second life into them. Make a blanket with your own hands, for the production of which you will need old sweaters, jackets, scarves and other woolen and knitted items.
Take all available products. The wider the color palette, the more varied the materials, patterns and reliefs of the patches, the brighter, more original and unique your plaid will be.
 For a bedspread with dimensions of 200x200 cm you will need approximately 8-10 blouses. If you do not have a shortage of the required amount of consumables, but, on the contrary, have a surplus, select products for alteration that meet the following parameters.
- Color palette. First, decide for what purpose the blanket is being sewn and in what room it will be used. For going on picnics or relaxing at the dacha, choose a darker tone, and choose a denser and warmer fabric composition. If the item will serve as a bedspread for a bed or sofa, select the palette of the product taking into account the color scheme of the interior and its style.
- Composition of sweaters. There are two ways to go. The first option is to select materials that are similar in composition, and in the other, play with contrast, using products made from both natural wool and the addition of synthetic threads.
- Texture. Knitted sweaters come in a variety of patterns. This can be a straight stockinette stitch, purl stitch, ribbed stitch, braids, squares and diamonds. The more varied the pattern of the patches, the more interesting the final result.
- Aesthetics and suitability. Things must be clean, not eaten by moths. They may be old, but not dilapidated. This is necessary so that the blanket lasts longer. After washing, we iron the items, do not recycle areas with defects, cut out buttons and seams.
Once items have been selected, washed and ironed, the creative process begins. In order for the result of your work to be positive and you want to repeat a similar experience again (to create another masterpiece), you must clearly understand the stages of production and the tools necessary for it.
DIY knitted sweater blanket: step-by-step guide
 To sew a blanket, follow the instructions provided.
- From the selected blouses we cut strips 12 cm wide and about 36 cm long.
- Mix and sew three stripes into a square.
- Then we cut the stitched multi-colored strips crosswise at intervals of the same 12 cm. Now we have stripes, but already made up of squares.
Important! Knitted and woolen fabrics fray and unravel at the cut site, so they need to be overcast by hand or with an overlocker.
- Take a comfortable position on the floor and arrange the patches the way you want to sew them.
- Change the pattern until you are happy with the result.
- All that remains is to connect all the parts. We sew, making sure the seams match, and tighten the fabric to make the squares even.
If you are careful, the plaid is beautiful both from the front side and from the back.
How to make a patchwork blanket from knitted sweaters
 This method is more time-consuming and complicated.
To work you must have:
- threads of different thicknesses;
- needles;
- sewing machine;
- sharp scissors;
- pins;
- cardboard or plywood blanks.
There will be several templates. Large square (12x12 cm), triangles (large squares cut diagonally), small square (6x6 cm). We will make patchwork from the parts cut out with their help.
- Applying templates to the cut knitwear, we cut the required number of blanks.
- We iron and connect with pins, combining parts of different colors and textures into large squares.
- We sew together.
- We sew the squares into stripes. One strip will be equal to the width of the blanket. By analogy, we connect and stitch all the strips, forming a lengthwise fabric.
If you decide to make a warm blanket, then you need to combine three layers - a lining, padding polyester and a sewn blanket with an ornament. Before stitching, secure all layers with pins.
Advice! Start chopping from the middle and move diagonally towards the edges. This will help avoid unevenness.
 We quilt our blanket starting from the center. To improve the appearance of the blanket, we trim the edge with a knitted strip. We fasten it with a seam from the wrong side, bending it to the front. Sew with a decorative stitch.
We sew a blanket from old sweaters using a decorative seam
 A decorative seam adorns the product. A white wool thread running along the edge of the blanket and around the perimeter of the squares closes the seam between them. Decorative stitching is done by hand using a needle with a wide eye. If you follow the diagram, it will be easy to lay such a seam.
The eyes are afraid, but the hands are creative. Even if at first it seems to you that this task is overwhelming, then in the process you will gain confidence in your strengths and talents.
This type of needlework, like knitted patchwork, is gaining popularity. This technique is used to make blankets, pillows, bags and much more. And we will try to create an unusual blanket from ordinary sweaters. There is no cost to us for this! Every practical needlewoman has everything we need at home.
To create a blanket using the patchwork technique we need:
- old sweaters
- leftover yarn
- hook
- scissors
The blanket will be 1.5 double-sided.
Let's get started! We rip the sweater and give its fragments (sleeves, back, front) a rectangular shape.

We crochet the resulting piece in a circle. The first row is a single crochet.


The second and subsequent rows are double crochet. We knit an arbitrary number of rows. The blanket fragment is ready. Let's put it aside and move on.

Using the same principle, we tie the remaining parts of the sweater and proceed to the next sweater, with which we do the same. This method of creating a blanket using the patchwork technique is suitable even for beginner needlewomen.

We connect the resulting fragments together with a single crochet.

Having made the required number of “sweater patches”, we connect them all together with a single crochet.

This is the first side of our blanket. The photo shows that I needed 4.5 sweaters for it.

Using the same “technology” we make the second side of the blanket. In this case, I did not give the flaps a rectangular shape, but connected them as is.

Now you need to crochet both sides of the blanket with a single crochet stitch.


The result is such a unique beauty!

The blanket turned out to be very warm and comfortable, because it “breathes” since it is knitted.

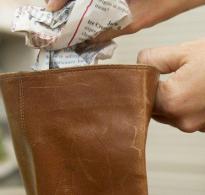
Before use, wash on wool cycle and tuck into duvet cover.
This is how you can save money on buying a blanket with the help of creativity.
Do you have a lot of T-shirts in your wardrobe? Let's find a use for them. Let's make a blanket from old T-shirts. We will use the patchwork technique.
This process is as simple as it is fascinating.
We will need:
- old T-shirts;
- fleece on the inside of the blanket;
- edge processing tape;
- sewing machine;
- ruler;
- good sharp scissors;
- iron;
- interlining;
- tailor's pins.
Take the t-shirts and arrange them in the order that the quilt pattern will be folded. Take a photo so you don’t forget or get confused during the process.
Cut out squares of the same size from the T-shirts. You can use a ruler, or you can cut out a template from cardboard and use it to cut out several layers of squares at once, chipping them with pins. This is where you will need very good sharp scissors because... Knitwear is not very easy to cut.

Each square must be placed on non-woven fabric. Trim straight edges.

Sew horizontal rows of squares. This quilt uses 30 squares. You should end up with six strips of five squares.

Lay out the finished tapes and check the drawing. Now we will sew the ribbons together. You can sew the ribbons one by one, or you can sew the top two first, then the bottom two, and then sew them to the central ribbon on both sides.

This is the canvas you got.

This is what the back of the blanket looks like.

Take the fleece, place the blanket blank on top and pin both sheets along the seam lines from top to bottom. Sew along this line on the right side of the quilt. This way you will need to follow all the seam lines.
You'll need a lot of patience because you'll have to adjust it every five seconds to get everything to lie flat because fleece is a very stretchy material.

This is what you should end up with. This is the inner side of the blanket, the one that will be towards the body.