DIY corrugated cardboard dog for children. Master class step by step with photos. Crafts from corrugated cardboard What crafts can be made from corrugated cardboard
We will tell you and show you how to make such a funny puppy out of corrugated cardboard.
To create the Dog craft you will need multi-colored strips of corrugated cardboard, scissors and PVA glue. In our case, these are strips measuring 1 cm by 48 cm. Strip colors: white, brown and blue
.jpg)
You will also need plastic eyes and a nose.
Step-by-step process for making a dog from corrugated cardboard
Glue together 2 brown strips and glue the tip. We twist the disk.
.jpg)
Use your fingers to form a hemisphere.
.jpg)
Similarly, we glue 2 white strips and glue the tip. We twist the disk.
Use your fingers to form a hemisphere.
.jpg)
We glue the hemispheres with glue.
.jpg)
We glue them together.
.jpg)
Glue together 2 white strips and glue the tip. We twist the disk.
Use your fingers to form a hemisphere.
.jpg)
Glue the ears together. To do this, glue ½ strips of white and 1 strip of brown. We count 11 ribs from the brown side and twist the oval. Glue the tip. We form the ears.
.jpg)
Glue all the parts of the muzzle together. Add a nose and eyes.
.jpg)
Let's make the body.
Glue together three strips of blue paper and 3 strips of white paper in length and roll them into disks.
.jpg)
We give both disks the shape of truncated cones. We glue it inside.
.jpg)
We glue these parts together. Cover the joint with a blue stripe.
.jpg)
Glue the muzzle and body together.
.jpg)
Making the lower legs
Glue together ½ strip of white and 3/2 strip of brown.
We form a disk from it. There should be two such disks.
.jpg)
We form a drop by squeezing the disk on one side with our fingers.
.jpg)
We glue the toes and heel onto the base, which we cut out from white corrugated cardboard.
.jpg)
We twist a disk from 3/2 white strips and squeeze it out lightly with our fingers. There should be two such details.
.jpg)
Glue the foot and heel together.
.jpg)
Glue the lower legs to the dog's body.
.jpg)
Making the upper paws
From ½ blue strip we twist a disk and squeeze out a cone with our fingers.
.jpg)
From ½ white strip we count 5 ribs and roll them into a tight oval. You need 2 of these ovals.
.jpg)
Glue this oval into the blue cone.
.jpg)
The upper legs are ready.
Glue them to the dog's body.
.jpg)
Our dog is ready.
.jpg)
.jpg)
Happy creativity!
Due to its flexibility and at the same time strength, corrugated cardboard is a very convenient material for crafts. Corrugated cardboard holds its shape perfectly, for which it is valued by paper rolling masters. Today we will talk about the technique of making crafts from corrugated cardboard.
Elena Zhukova makes crafts from corrugated cardboard herself and teaches it to children. Just think - the colored stripes can be twisted in such a way that you can get any character from a fairy tale, or an animal, or a wonderful flower. Admire it for yourself.


Crafts made from corrugated cardboard: aristocratic dog
Elena will tell us how to make such an aristocratic dog out of corrugated cardboard:

To make it we need :
Corrugated cardboard:
Orange stripes 43 pcs. + 1 strip for gluing joints
Yellow stripes - 4 pcs.
Plum stripes (the hat will be made from them) - 7 pcs.
To make it we will need:
heat gun
eyes
ribbon
good mood
Shall we get started?
Torso
You need to glue two long strips, each of 6 (7) strips.
1. Count 18 ribs, bend at the 19th and twist two ovals

2. These are the resulting blanks for the body. This time the strips turned out to be soft, so they don’t fit tightly in the middle, but that’s okay, it will all stick together later.

3. Now we give the desired shape to our blanks. The first one, for the back, we pull out and push out as high as possible, but at the same time we make the back (top) itself flat, we need to glue the neck to it.

4. We push out the second one, the belly, just a little bit, literally 3-4 rows of stripes. The bottom part should be as wide as possible - to glue the paws.

5. Coat both blanks with hot glue. I coat the bottom or the bottom of the resulting boats completely, thickly, squeezing them together so that they do not diverge and there are no cracks. And then up the sides - rays - strips of glue.

6. Apply glue to the very edge of one of the blanks and connect the back to the abdomen

7. Seal the joint (connection point) with a strip

The body is ready

Head
1. Glue together two long strips of 3 strips each. Roll two round tablets.

2. Give it shape. We form the back of the head into a hemisphere.

3. For the muzzle, we extend a cone, bend this cone, and form a slightly upturned muzzle

4. Coat the inside with glue. I pour more glue into the nose on the face

5. Apply glue to the edge of one of the blanks...

6. Glue the back of the head and the muzzle, glue the joint with a strip


Neck
We prepare two strips of two strips each. We twist two identical tablets and glue them together. Set the resulting neck aside.

Ears
Glue two strips of 2 yellow and 2 orange strips, count 18, fold and twist two ovals

Squeeze a little on one side and squeeze out a little in the wide part (shape the ears), coat the inside with glue

Paws
1. Roll 8 identical tablets, each from one strip. We glue two tablets together. Total - we get 4 legs
2. Roll up 4 tablets, each of the two strips is the pads of the paws. (at this stage I realized that I didn’t have enough orange stripes, so I glued the pads together from yellow and orange folded together). Squeeze the paw pads a little - make them a little oval

3. Glue the paws to the pads

In the photo above we see that you need to lubricate the inner sides of the paws to the middle (mine is a little less, I tried it on - that’s exactly what happens). Now we glue the body. Glue the neck in place

and glue the head

Glue the ears in place

hat
1. To make a crown, you need to twist a tablet of three strips, squeeze it out with a deep sphere, coat it inside

2. For the brim of the hat, take 4 strips, cut them widthwise, from the resulting 8 narrow strips we glue one strip and twist the disk. We push out the middle of this disk a little. We coat the recess with hot glue, and PVA - the brim of the cap. Let the PVA glue dry (let's go have some tea, that's just enough time :)
In everyday life, we are constantly surrounded by various things to which we often do not pay much attention. Meanwhile, some of these things can be very useful, such as cardboard. In the modern world, cardboard surrounds every person: people see goods packaged in cardboard boxes in stores, buy milk and eggs in cardboard packs, use paper towels and toilet paper, which are wound on special cardboard sleeves. We can safely say that cardboard is a universal thing that will be not only useful in the household, but also a material for original interior decorations.
Some cardboard crafts will not only add a touch of originality to the interior, but also significantly make life easier their owners. Do-it-yourself cardboard products will help you save money on purchasing store-bought counterparts and add a little practicality to the room. Let's say you can't make a car seat out of corrugated cardboard, but children's chairs, where instead of a backrest there are stylized animals - a fox, a pig, a bear or a cat - turn out to be very cute and funny.
Watch the following master classes to make some useful things for your home with your own hands.
Charger drawer
People who have known the problem forever tangled wires, the following craft is especially suitable. It often happens that the wires get confused with each other, and it becomes very difficult to figure out which charge a certain wire leads to. To prevent confusion, you can use the tip below and build a small drawer for chargers. It's very easy to make: you just need small box, for example, from under shoes and a carrying socket, and then  follow the master class:
- Make as many round holes in the side of the box as there are sockets on the carrier, and one on the side. The wire from the carrier will pass through this hole, and the wires from the chargers will pass through the rest. If desired, you can cover the box with colored paper, decorate it with ribbons or other decorative items.
- Place the portable socket inside the box, inserting the wire from it into the hole on the side.
- Insert the necessary chargers into the carrier, passing each wire into a separate hole. If you wish, you can label the holes so you don’t forget where the wire from a certain device is.
Works made of cardboard in various techniques - origami and corrugated quilling, three-dimensional panels and models, appliqués and much more - see the gallery.
Gallery: three-dimensional cardboard crafts (25 photos)


Jewelry storage box
Women who have a lot of different jewelry stored at home are probably familiar with the situation when they have nowhere to put it so as not to lose it and, if necessary, immediately find the right jewelry. This problem is solved perfectly special stands for jewelry, for which you don’t have to spend money in stores, you just need to find unnecessary box and a little bit transform her. The following master class will tell you how to do this:

Children's house
Many children dream of their own small house in which they could hide, play and just have a great time. You can make such a new house yourself from ordinary cardboard boxes. To do this you will need several large boxes. See the master class below for more details:

In the same way, you can build a small dollhouse, as well as furniture for it.
You can make it from a sheet of cardboard many different toys, in the production of which the child himself can take an active part.
Volumetric figures
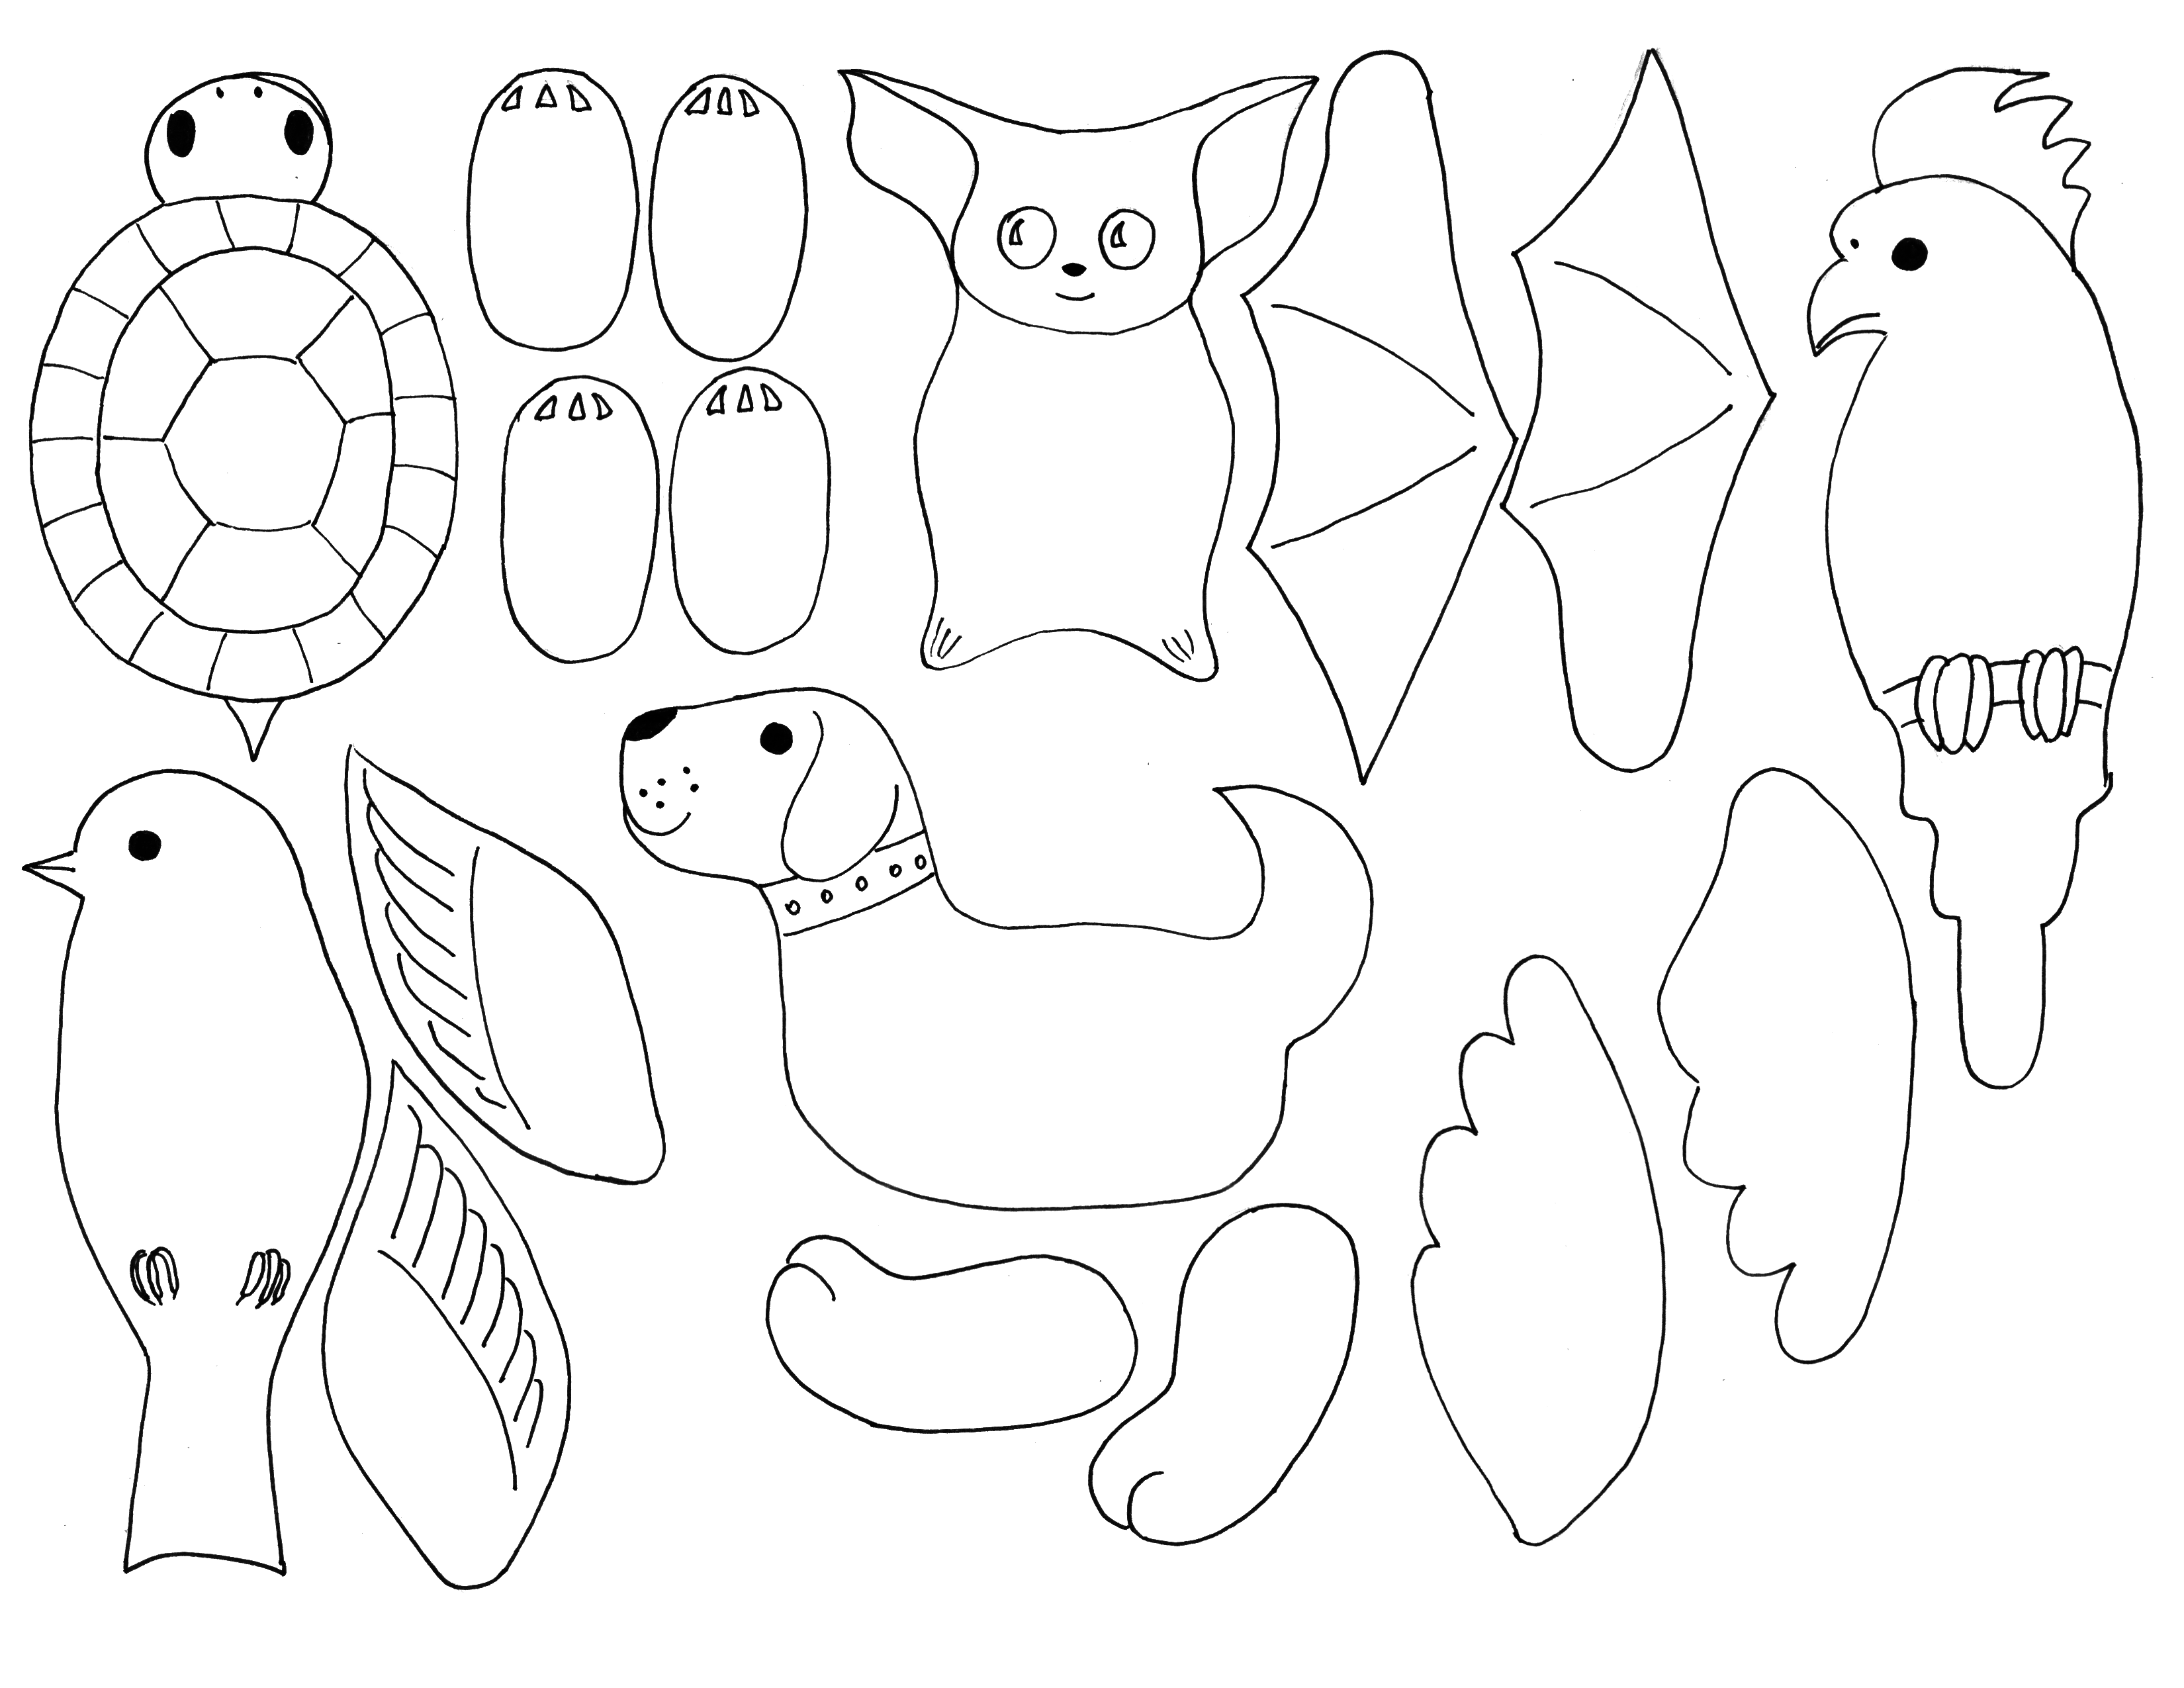
There are many on the Internet schemes, which can be printed or transferred to cardboard yourself, cut it out and fold it into some little animal. Such voluminous crafts are especially popular among children because they look like real toys and are very easy to make. Below are some patterns that you can print out and assemble into a figurine.
Children will be especially interested in such toys, but older children often pay attention and love such things. The point of the twitch toy is that its parts are connected with threads, by pulling which you can achieve the effect of a moving figure. The next master class will cover twitch toy in the shape of a dog:

Corrugated cardboard and crafts made from it
Corrugated cardboard is widely used in making crafts. Children like to use this kind of cardboard more, thanks to its airiness and unusual appearance, and crafts can be made from it. more interesting. Crafts made from corrugated cardboard for children are very simple, so you can make them together with a child of any age, using any master class below.
 One of the elementary crafts made from corrugated cardboard is a robot. The base used is ordinary toilet paper roll, pasted over cardboard. You can choose any colors; black and gray are used in the master class.
- At the first stage it is necessary to paint the upper and lower parts of the bushing black paint. This will be the head and legs.
- The unpainted part is pasted over a piece of gray corrugated cardboard.
- From the usual black cardboard cut out two strips and fold them into an accordion. When folded, glue them to the robot’s body and secure rubber band to achieve better effect.
- In a few minutes rubber is removed and the accordion straightens out, forming hands.
Snowman
The next craft is a small figurine of a snowman, made using a special technique - corrugated cardboard quilling. The distinctive feature of this technique is that a strip of cardboard is wound around a pencil to form a circle, and various shapes are made from these circles. Quilling from corrugated paper or cardboard looks very original, and making them yourself is an interesting activity.

Chick
A more complex craft using the quilling technique made from corrugated cardboard is a chicken. Such a cute bird Perfectly decorate a child's room, and the child will be interested in doing it step by step with his own hands.

Cardboard has many uses, so don't just throw away the various boxes. Sheets of cardboard may be needed not only for children's crafts, but also to make everyday life easier. Do-it-yourself corrugated cardboard crafts are very interesting to make with children.


There is hardly a house in which there is not corrugated cardboard. This popular industrial packaging material is perhaps the second most common after plastic. It usually consists of three layers: 2 smooth and one wavy. Recently, crafts made from this affordable material have become extremely common. And this is not surprising, because it is plastic, dense and cheap. You can use regular corrugated cardboard left over from boxes, cutting it into strips, or buy special colored cardboard.
At first glance, it may seem that the possibilities of such material are very limited. However, this is fundamentally wrong. We will tell you what crafts from corrugated cardboard you can make with your own hands together with children, and offer several interesting creative options for adults.
What will you need?
The main material for crafts is corrugated cardboard. It is best to cut it into strips of various (required) widths and lengths if the craft is planned to be voluminous. When you create an applique, first you need to make markings with a simple pencil. Accordingly, you need scissors and a stationery knife.

If the material is not painted, ordinary, then use paints (acrylic, gouache) and brushes. For complex crafts, corrugated cardboard and individual elements from it will need to be joined, so PVA glue or a glue gun is needed. In addition, stock up on ribbons, beads, colored paper, and a needle and thread. The main technique for working with corrugated cardboard is quilling, i.e. twisting strips into a spiral of varying density and then connecting individual elements into a composition, figures, etc.
New Year's toys
New Year's fireworks have gone off, the toys have been collected in a box, and in the yard the snow is about to begin to melt. And even though making Christmas tree decorations is not as relevant now as it was a couple of months ago, we still suggest adopting several interesting ideas. Save them, and next year you won’t have to worry about what to take to kindergarten or school. The main advantage of such toys is their lightness, but the disadvantage is that they cannot be used outdoors.

In just 10-15 minutes a Christmas tree can be made from corrugated cardboard, such as the one in the photo above. The amount of starting material depends on what size you will make the toy. Don't make the strip too wide. So, for a length of 50 cm, 3-4 cm will be enough. Carefully roll the strip of cardboard into a roll. Next, fasten it so that it does not unfold, and then stretch it into a cone. Make a smaller barrel from a roll. You can make Christmas tree decorations from leftover cardboard or use beads.

Or, for example, make a wreath like the one in the picture using a combined technique - applique and quilling. The main highlight of it is minimalism and simplicity of form: the fewer small details, the more stylish the result.
Cartoon characters
Corrugated paper and cardboard are very pliable and easy to use, but at the same time textured material. Working with him will be interesting not only for small children, but also for schoolchildren in the lower grades. To do this, you need to complicate the task. Try, for example, to make cartoon characters.

The picture above shows that the craft, among other things, can be adapted for storing small items, like a box. The system is the same. From one wide strip about 15 cm wide and 10 cm long, roll it up, fasten it, and glue the bottom. Then make the arms and legs in a similar way. Finally, roll the head - a strip of cardboard 1-1.5 cm wide and 20 cm long (focus on the diameter of the cylinder) into a roll and pull it out slightly. Glue the eye beads.

Or you can create a whole composition of figurines, like these charming and very popular minions in the photo.
How to make a photo frame from corrugated cardboard?
Cardboard, which has a high density and strength, can be easily used to make a photo frame with your own hands. You need to decide on the size, then cut out the base, and carefully attach the decor to it.

In this case, the photo frame is made in a marine style. Corrugated blue waves of cardboard are decorated with a palm tree, clouds and a boat. The craft is simple and original. You can easily change the photo in it, make a new frame with a different theme, or create an entire series. In the version for girls, sweets and fruits are used.
Food
Another popular theme for crafts is food. Corrugated cardboard will help you realize the most interesting and unexpected ideas. With your own hands, from a minimum amount of materials, you can create a table with the most exquisite dishes, unfortunately, inedible, but very beautiful. This idea can be used in various competitions, performances at school or kindergarten.

The simplest option is rolls. The craft will take a minimum amount of time. All you need is a few strips of multi-colored corrugated cardboard 1-1.5 cm wide and 5-6 cm long. This will be the filling. Roll them into rolls and fasten them together. Make a rice layer from a strip 1.5-2 cm wide and 10-15 cm long, cover it with one layer of black cardboard on top.

In order to create something more original, you will have to make some effort and show imagination. If you don’t have colored cardboard on hand, don’t worry, regular cardboard will do. The absence of color, as you can see, does not interfere with the quality of perception. The design in the photo, consisting of a stand for cakes and pastries on it, seems complicated only at first glance. In this case, the technique differs from quilling. The cardboard is rolled into a tube, and crumpled and cut pieces are laid on top in layers. Additional decor is created using thin strips of a wavy layer.
Caskets and boxes
As mentioned above, corrugated cardboard is initially a durable packaging material. However, it can be used in a more original context than just in the form of boxes. Colored cardboard makes original boxes for small items, stationery, etc.

They will be especially relevant for girls who are interested in such things. All you have to do is come up with the shape of the box, cut out its walls and bottom, fasten them together, and then add a lid. This is the main part of the work. Next, the decorating process begins - the most interesting and exciting.
Cardboard logs
Do you have a fireplace but no wood? Maybe we can make do with cardboard ones? This version of the craft is ideally suited for prop purposes (production, skits, etc.). A set of logs of various sizes and shapes is made quickly and simply. Take regular industrial cardboard from boxes. Cut it into strips of various lengths and widths and roll it into rolls, and then assemble it as shown in the picture.

Paint the top of the log with paint; the surface will be uneven and textured, very similar to real wood.
Castles and palaces made of cardboard
If your intentions are more serious and firm, and there are inexhaustible supplies of industrial cardboard around, then start building a castle or palace. You might then want to bring your dream of Big Ben to life in your child's room or the Eiffel Tower.

Start small and dream big. Use unpainted regular corrugated cardboard, and start adding color after the craft is completely ready. Sometimes you don’t even need to add anything, the natural color is good enough as is.
Details and techniques for working with corrugated cardboard
Disk
Twist the strip of corrugated cardboard tightly and glue the tip of the strip.
Oval
Roll the strip of corrugated cardboard like a disk, but at a distance of 1 cm or a little more from the beginning.
Petal
Roll the strip of corrugated cardboard like a disk, then unravel it a little and pin it on two opposite sides. Glue the end.
Zebra
A zebra is a disk twisted from 2-4 multi-colored corrugated cardboard strips. Glue the strips together to form steps, then twist the piece. Trim the ends of the strips with a ladder, as shown in the figure, and then glue them to the part.
Dome
Roll the disc and form a dome. shifting the layers to create a hemisphere. Then, on the inside, lubricate the entire surface of the part with PVA glue, which, when dry, will fix the resulting shape. Or coat the “dome” crosswise with a glue gun so that all layers of the part are captured.
Cone
Twist a disk of the desired diameter and form it into a cone. Fix the shape with PVA glue or a glue gun, like a dome.
Crafts made from corrugated cardboard for children - examples of work
Piglet
1.
Body. Twist 2 disks of strips, each 2.5 m long. form domes from the disks. Fix this shape with glue from the inside.
2.
Legs. roll a disk from a strip 50 cm long, glued together from 2 strips of a contrasting color, 25 cm each. Make the disk slightly convex and fix this shape with PVA glue on the inside. Do the front legs in the same way.
3.
Ears. From a thin strip 0.5 cm wide and 50 cm long, twist into a disk and form an ear. Do the same for the second ear.
4.
Assembly. Glue all the parts together using a glue gun. Make eyes. Decorate the ears and cheeks with colored paper figures made using a figured hole punch. 
Little Frog
1.
Head It is done in the same way as for a pig.
2.
Eyes they are made in the same way as the head, only each hemisphere is twisted from a strip 50 cm long, and the lower part is white or yellowish. Make the pupils out of black paper.
3.
Torso- twist a disk from a strip 3 m long. Form a cone approximately 8 cm high. Fix the shape from the inside.
4.
Paws- glue 2 strips 50 cm long of a contrasting color with the smooth side. form your fingers into loops and secure the shape from the inside.
5.
Assembly- glue all the parts together using a glue gun. Decorate the frog with buttons. 

For the sunflower Cut a petal out of a 1.7x3.5 rectangle of yellow corrugated cardboard. Make 17 of these petals. For the center of the flower, twist 2 strips of yellow and brown flowers, 0.5x50 cm each. Form a low dome and secure it.
Sunflower assembly: Cut a circle with a diameter of 4 cm from cardboard. Glue a stick along the radius and petals around the circumference. then glue the second layer of the petal center onto them with a shift; stick the center of the petal in the center of the petal.
Cut out the leaves from green corrugated cardboard and glue them to the stem.
Flower- petals are made like this - twist a disk from a strip of about 5x25 cm. unnecessarily, pin it in one place. glue the end. Make 5 petals. For the middle, twist a disk of 2 strips of contrasting colors, 0.5x12 cm each - make 2 of these parts.
Flower assembly- glue the petals together, glue a stem stick between 2 petals, glue the core in the middle - on both sides. for leaves, take a green strip 0.5x25 cm and use glue to form a leaf and glue it to the stem.


