DIY crafts from cereals, seeds or sunflower seeds. Crafts from cereals and seeds: ideas, master classes Working with semolina: coloring, types of crafts
Today it is a well-known fact that the development of a child’s brain is directly related to how developed the fine motor skills of his hands are. The development of speech, readiness for school and even the strength of the nervous system depend on how often his fingers move small objects, draw, sculpt, tie shoelaces.
One of these natural exercises that develop, entertain and calm a child is, for example, children playing with sand. No wonder they love them so much. But sand is not always available in a city apartment. And here, such popular do-it-yourself cereal crafts for children with templates already prepared by specialists for a certain age, come to the aid of parents.
What is the reason for the popularity of such DIY crafts? At least three advantages.
- Availability of materials. Cereals, sunflower or watermelon seeds, pasta - all this is available in every home.
- The usefulness of this activity for developing children's imagination and fine motor skills. Parents appreciate this, and children appreciate the fun of the process.
- Ready-made drawing templates help children, even those who can’t draw at all, get a decent craft that can be given to loved ones or hung in a frame on the wall.

So, you have firmly decided to make some kind of craft from cereals with your child with your own hands. In addition to the actual bulk materials of various cereals, grains, seeds (which we will discuss in more detail below), what else might be needed for this? It depends on what type of activity you choose with them.
DIY craft for children. Mushroom. How to make a craft from cereals
Drawing with cereals

This is an activity that will captivate both kids who have not even gone to kindergarten yet, and children who have left first grade in the distant past. It requires a minimum of materials: cereal, the finer the better, and a flat surface. Although you can take chaff from cereals, for example, semolina is usually used.
A flat surface for creating a masterpiece can even be a piece of the table that the mother will allocate to the little master, but a dark, plain tray or baking sheet is still better. For more skilled artists today, luminous surfaces are very popular on which they pour their drawings. If an older child takes this kind of drawing seriously, then the semolina can be pre-painted in several colors, dried and sifted so that there are no lumps.
The little ones draw with their fingers directly on the scattered semolina or buckwheat. Everyone else pours the design onto the work surface. Usually, after finishing the work, the drawing is removed. To preserve the memory of such a fleeting drawing, you will have to take a photo of it. If children want to preserve the drawing itself, then we will talk about appliqué. And here you need a little more.
Cereal applications

- Firstly, since many children do not yet draw well enough, to make their work easier and to ensure that the finished craft looks quite impressive, it is necessary to prepare a drawing template in advance. This will be the basis of the application. Parents can download and print the necessary pictures, or use children’s coloring books as templates. When choosing a template, choose a drawing with large details.
- But the template only helps to apply the drawing. You need to prepare the basis for the craft. It can be thick cardboard, or glass, a photo frame, a jar or a flower pot. Depending on the intended result and the chosen base, the method of fixing the grain is determined. If this is a regular glued application, then you will need PVA construction glue and a brush.
- In addition to glued appliques, pressed crafts made from cereals and seeds are very popular today. In this case, plasticine becomes the main fastening material for such an application. Here the children will need plasticine and a glass.
- Since the color range of seeds and cereals is quite modest, they are often painted in the colors needed for the design. To paint cereals, you can use your choice of gouache; brilliant green, iodine or food coloring. You can paint already pasted grains or in advance. Although this is not difficult, it is better to watch a separate master class about this.
- If a child wants to preserve a small masterpiece made with his own hands not only in a photo, then he will need a colorless varnish or aerosol enamel to cover the craft.
Master class applique with cereals: making a monkey
To better imagine how a child can make an applique of cereals with his own hands, let’s look at the step-by-step process of making a postcard with a monkey. Let's go through a short master class. 

Crafts from cereals and tea
As a bulk material, you can use not only semolina, but also drunk tea. They can also be used to pour a design, but it is better to use it for appliqué together with cereals. This will create an interesting game of textures. Tea is best used to depict some shaggy creatures - cats, monkeys, bear cubs. Or you can make a portrait from which Cheburashka will look.
A master class on making a monkey from cereals is given above, but now let’s look at how to make a Cheburashka with your own hands from cereals and tea. Cheburashka is suitable for young children not only because it is a well-known and beloved hero, but also because of the simplicity of the image. Cheburashka consists of large parts that are easy to draw and make.
- We draw a Cheburashka or, taking the desired template, glue it onto a thick base.

- Then we coat with glue those parts of the body where a dark shaggy surface is needed. Cheburashka has brown ears, paws, body, and only the face and chest will be a different color, so we don’t coat them with glue now.

- Then we pour the tea onto the leaf, after the glue has dried, we turn the drawing over and the extra tea leaves fall off on their own.
- Then, using buckwheat and rice, we fill in the surfaces that need to be highlighted - the brown breast, the white muzzle.
- You can make eyes from round peas. The peas and mouth of long rice need to be painted for greater expressiveness. Even a child who goes to kindergarten can make such an application with his own hands.
Crafts from cereals and pasta

In addition to applique, you can make other crafts from cereals, grains, seeds and pasta. Handicraft masters and kindergarten teachers have already developed many master classes on this topic. In photos or videos they show in detail and step by step how you can make a variety of crafts. For example, string beads, bracelets or funny mobiles.
With pasta of different shapes and cereals you can very effectively decorate various containers - jars, bottles, turning them into original flower vases. To do this, first thoroughly wash the selected vessel, remove labels, and degrease it with detergent. Then we apply glue and, in accordance with the artistic design, glue the cereals and pasta.
You can also take flat pumpkin or watermelon seeds. You can use them to make flowers, or just geometric shapes, ornaments. If cereals and grains easily stick to construction PVA, then you may need a glue gun for pasta.
Similarly, you can decorate a photo frame or flower pot, an interesting craft for kindergarten. In order for such pasta crafts to look especially impressive, they should be painted and varnished. All that remains is to take a photo of the master with the craft in his hands.
Craft a cat from pasta Crafts for children
In contact with
Handicrafts promote the development of vision, speech, hearing, and color perception through fine motor skills. Crafts made from cereals are a great way to awaken a child’s creative abilities.
Buckwheat, rice, semolina, barley, pea paintings and panels are a fashionable trend. As it turns out, grains of different color, texture, shape, and number of edges are a fertile material for creating real masterpieces.
This material is completely safe and environmentally friendly, accessible to everyone and inexpensive. Paper, cardboard sheets, plasticine, glue, food coloring, multi-colored crayons with pencil leads will come in handy in case you need to “color” semolina, which perfectly replaces sand in the so-called “sand drawing”.
Types of crafts
Starting with the simplest gluing of grains onto glue or plasticine, many do not even realize how diverse this area of applied creativity is. It is enough to list the main types of cereal products to understand: this hobby can develop into a serious hobby for many years.
So, from plasticine and cereal, as well as some additional materials and glue, you can make:
- Crafts (photo frames, vases, magnets, panels, figurines, sculptures, boxes). Objects are pasted over with grains, covered with paints and varnish.
- Paintings. The grains are glued using plasticine or glue.
- Compositions using sand or semolina painting techniques.
- Beads, seeds, pasta, dry berries can act as additional materials.
- Colored bottles, inside of which colored semolina, salt or sugar are poured in multi-colored layers.
This is far from the limit. DIY cereal crafts are varied. It often happens that the first rice hedgehog leads the young artist to a large and complex portrait, work on which can take many months.
The simplest pictures, which almost all kids start with, are grains glued to a plasticine or glue field. In both cases, the work begins with applying a simple drawing to a sheet of paper, individual parts and objects of which can be painted or covered with a thin layer of multi-colored plasticine or glue. Having offered the child jars with different grains, you should show how you can lay out different parts of the picture with grains, making them voluminous.
 Crafts made from cereals are a great way to awaken a child’s creative abilities.
 After some time, flat characters from a sheet of paper will literally “come to life”, become convex, tangible, shiny (if you cover them with varnish), and real. And if you experiment with the thickness of the plasticine layer, you can get interesting images. Therefore, when sending your child to kindergarten the day before, for example, you can get a picture that is precious to your heart with rice daisies or millet tulips.
 It is enough to list the main types of cereal products to understand: this hobby can develop into a serious hobby for many years
 Cereals and seeds
Moving from simple to complex in their creativity, most come to the conclusion that cereals can be combined with other natural materials:
- pasta;
- tea;
- seeds;
- dry berries;
- elements of the herbarium - leaves, inflorescences, buds.
Such combinations can be used both in the production of paintings, panels, and in the decoration of vases, boxes, photo frames and paintings. It is worth considering these techniques in more detail using practical examples.
 Cereals can be combined with other natural materials
 You can make a decorative plate with the image of a goose from semolina, apple and melon seeds. To do this, you need to prepare cereals, cardboard, and PVA glue.
In order not to waste time cutting out plates from thick cardboard, you can take a ready-made disposable white paper plate. You need to draw a big, cheerful goose on it and start laying out the grains.
 Combinations of grains can be used both in the production of paintings, panels, and in the decoration of vases, boxes, photo frames and paintings
 There is no need to apply glue to the entire sketch at once, otherwise due to slow, painstaking work it may dry out on the empty parts. It is applied in stages. The goose's body can be lined with melon or pumpkin seeds, and the contours of the wings can be emphasized with apple seeds.
The paws and beak are lined with cucumber seeds (it will be easier to paint them red). The background of the picture is covered with semolina. You can paint it in 2 colors: green for the “grass” and blue for the “sky”.
Attention! It will not be difficult for children to lay out images of various animals and birds from seeds and cereals with their own hands if sketches of such paintings are prepared in advance.
 This is the kind of chicken you can make from seeds
 Cereals and pasta
Cereals can be very successfully varied with pasta. You get not only paintings and panels, but also nice decorative elements. For example, pasta and cereal bottles.
To make it you need to prepare:
- several types of cereals (buckwheat, rice, pearl barley, peas);
- curly pasta;
- glue (tube and gun);
- a bottle with a cork, which must first be washed, dried, and freed from all labels.
 Cereals can be very successfully varied with pasta
 When working on a bottle, you should move from the bottom to the neck, gradually lubricating it with glue and laying out different cereal grains layer by layer.
Advice! You can alternate them in any order, as your heart or eyes please, remembering that this will only be the background for the subsequent pasta installation.
When the bottle is completely surrounded on the outside with several dozen rows of cereal, you need to lay it on top using a glue gun. Spaghetti will serve as flower stems. You can put another pasta pattern on the bottle cap. When everything is dry, you should cover the bottle with gold or silver paint.
 Not only paintings and panels are obtained, but also nice decorative elements
 Cereals and tea
Grain classes for children initially take place in the form of a game, which allows them to develop imagination and fine motor skills. With age, patterns gradually fade into the background, and children begin to experiment on their own. If combinations of cereals, pasta and seeds have already been mastered, you can add teas and other handicraft elements to this - ribbons, beads, multi-colored threads.
From several types of cereals, tea, beads, colored cardboard and threads you can make a cheerful Cheburashka. Moreover, it is the tea, its rough structure, that will give the animal a very realistic appearance. For the craft, you can choose a puppy, a bear cub or a fox.
 If combinations of cereals, pasta and seeds have already been mastered, you can add teas and other handicraft elements to this - ribbons, beads, multi-colored threads
 First you should sketch a drawing on paper. If you have any difficulties with this, you can find a stencil, cut it out and paste it on paper. Next, glue is applied to Cheburashka’s entire body, without touching his face and chest, and sprinkled with tea. When everything is dry, you need to grease the breast with glue and line it with buckwheat, and the face with rice. Using beads or buttons, lay out the nose and eyes. The red string will play the role of the company. And a lace ribbon will make an excellent bow.
Working with semolina: coloring, types of crafts
Semolina stands out among other cereals for its similarity to sand, as well as for the many ways it can be colored. Sand painting is a serious virtuoso art, in which the pinnacle of mastery has been achieved for decades. However, when it comes to children, using sand can be difficult and not even entirely safe. In contrast, semolina is a natural product, the availability and economy of which allows you to start mastering cereal creativity quite early.
 Semolina stands out among other cereals for its similarity to sand, as well as for the many ways it can be colored.
 At first, semolina crafts can be very simple. These are the same pictures, often with a winter theme, where semolina perfectly plays the role of snow. If you suddenly want to lay out a camel in the desert, semolina will act as sand. But you can begin more complex painting with semolina by first painting the cereal in different colors.
There can be several ways here:
- using gouache, water and a blender;
- colored pencil leads;
- crayons for drawing.
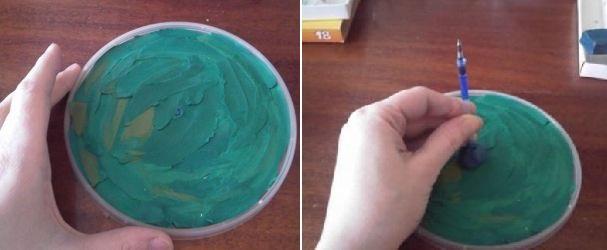
The first method is suitable for painting a large amount of “sand”: gouache is diluted in water, poured into a blender, and the required amount of semolina is added (the amount of paint depends on the desired shade). The mixture is poured onto paper and dried at room temperature.
 Sand painting is a serious virtuoso art, the heights of mastery in which have been achieved for decades
 If you need a small amount of multi-colored semolina, you can use pencil leads or crayons. They are crushed in any convenient way and mixed with cereal. In this way you can quickly get a large palette of colors.
Semolina is used with other cereals in simple patterns. It will provide beautiful snowdrifts, sand dunes and even clouds. With age, you can move on to drawing with semolina. Here you can get very serious abstract paintings, monochrome sketches and even portraits.
 At first, semolina crafts can be very simple. These are the same pictures, often with a winter theme, where semolina perfectly plays the role of snow
 It is worth mentioning the multi-colored bottles. They are made by simply pouring layers of semolina of different colors.
Idea! An interesting effect can be achieved if the vessel is first filled with a handful of large transparent beads or multi-colored pieces of glass.
Cereals and dried fruits
You can make a fun craft by combining plasticine, buckwheat, sunflower seeds, large beads, dried fruits and herbarium elements.
As a result, a hedgehog can be made from cereals and other materials. Moreover, it can be made in the form of a picture on a sheet of paper or a three-dimensional figure, which will first be sculpted from plasticine and then decorated with cereal.
 Crafts can be made from dried fruits
 In the first case, a drawing of a hedgehog is applied to a small sheet of paper, and the location of other elements is schematically outlined. Then buckwheat is laid out on the glue or plasticine layer. It will be the body of the animal, the seeds will be its needles, and the beads will be its eyes and nose. You can lay out dry leaves around, and “prick” small dried berries and fruits onto the needles. In the second case, the same thing is done, only not on a sheet of paper, but on a figure sculpted from plasticine.
Making crafts from cereals with your own hands is much easier than it seems at first glance; it is interesting for both children and adults. The main advantage of crafts made from cereals is originality, because even adults will examine the finished work, peering into the details. Not everyone will be able to guess what material was used, especially when viewed from afar. If a picture made in grains hangs on the same row with standard drawings, it will look brighter and more memorable.
Advantages of the idea
Originality is not the only reason to teach a child to make such crafts. Today, many parents teach their children to use gadgets from childhood, so that they quickly master the technology, while mental development, which directly depends on fine motor skills, suffers. Simply put, children are not accustomed to working with small parts, because of this their ability to learn and develop rapidly decreases.
Such problems arise especially often in families living in apartments; in such conditions, children may not even have the opportunity to play in the sand. Caring parents understand how important it is to take care of the child’s development, so the idea of making crafts from cereals attracts them. A pleasant advantage of this activity is that the finished work is an excellent gift for grandparents and other relatives, so that the child learns from childhood to please others.
Psychologists say that children with whom their parents engage in handicrafts from an early age tend to learn new things, perceive information, and develop faster in the future. Even in adulthood, they will be helped by the perseverance, hard work and diligence acquired from childhood.
Where to begin?
First, you need to make sure that the child is at an age when such an activity will be not only useful for him, but also interesting. Forcing children at a very young age to do something together is dangerous, as this may discourage them from spending time with their parents in the future.
There are no specific age restrictions. Every child has a moment when he begins to take an active interest in drawing: a pack of blank paper can last for a day, and the young “artist’s” marks appear on the wallpaper and other furniture in the house. This is the time to channel your child’s energy into creative development.
At the same time, children going to kindergarten and primary school also have a need to develop fine motor skills and perseverance. It happens that a child seems to be an uncreative person - nothing related to drawing arouses his interest. Then parents have to invent something, and the original idea will be crafts made from cereals.
The first thing you need to start with is choosing the right cereal. It is better not to be guided by the principle of “why don’t you mind”, but to think about how it will be more convenient for the child to work.
The main rule for choosing material is the smaller the better.
Using just one grain will be boring, so after coming up with an idea for a design, you need to choose different options. You can paint the selected material in different colors; some people like to paint semolina. You also need to prepare a flat surface, it can be part of the table or a tray, dish, or other flat vessel.
Templates
Preparing the template is the task of the parents, because the child cannot cope with it. The final appearance of the finished work will depend on the selected and drawn template. It is important that the drawing consists of large parts; it is necessary to calculate that there are no more of them than there are variations of different grains available.
Advice
The easiest way is to pick up a design from coloring books or children's books than to come up with it yourself. Most coloring books designed for children under 3 years of age contain simple pictures with large details; they can simply be redrawn.
Along with choosing a template, you need to prepare a basis, it can be anything:
Of course, the more complex the base, the more difficult it is to apply the design, so if you are practicing the craft for the first time, it is best to use thick cardboard. For this base you will need PVA glue and a brush for applying it.
An alternative to gluing the cereal is to press it into the plasticine. This technique also looks bright and original, but for the first time it is better to stick to it and then experiment.
How to do it?
Let's look at an example of how to implement applique ideas using a template. The entire process of making crafts consists of several stages:
Select and print a template. This method of preparing a template is the easiest; on the Internet you can find many simple drawings with large details and print them. You can use other methods - redraw, and if you have artistic inclinations, even draw by hand, but it is important to try to ensure that the contours and lines are as smooth as possible.
Blow off any remaining cereal that accidentally gets into the drawing and leave it to dry.. This may take about 10 minutes, if a lot of glue was applied, then more.
After this, you can use paints; this should be done if you did not initially paint the cereal, but there is such a need. It is also convenient to paint small details with paints.:
- eyes;
- buttons.
It is best to use acrylic paints.
After the work has completely dried, it can be hung in a frame or used as decor in a child’s room.
Advice
The easiest cereal to use is semolina. It is easy to paint, it is easy to apply, and holds well in a child’s little fingers.
From cereals and pasta
Pasta is an excellent crafting tool. Many people use them for various decorative purposes, for example, decorating a Christmas tree, making candlesticks and many other crafts. And all because the variety of pasta shapes allows you to do this.
Such crafts are made according to the same principle as those made simply from cereals. To begin with, a template is selected, then the parent determines which parts of the drawing will be made with cereals and which with pasta. Then, using glue and a brush, first large, then small parts are painted one by one, and the prepared material is glued.
However, some types of pasta are difficult to glue due to their weight, so the material chosen for the base of such an application must be durable; ordinary paper will definitely not work, and if you choose cardboard, it will be hard. If you can’t glue the product, you can sew it on. Pasta in the shape of wheels and spirals looks beautiful; you can simply grab them with a few stitches of a needle and thread.
Of course, this part of the process is carried out by parents, especially if the children are very young. If the child is already entering school, then performing such a craft may be a suitable reason to teach the child how to use a needle. Usually the pasta is attached to the finished drawing at the very end of the work.
The advantage of pasta is that it is easy to paint it in the desired color. Therefore, when making crafts from cereals, think about what you can decorate in it and try using pasta for this.
If you've chosen the puppy template, why not add a leash with a wheel-shaped spaghetti 'icon' on it, or why not use them for the snowman's buttons.
Advice
Many stores sell multi-colored pasta - they look great in crafts.
Crafts for hair decorations made from pasta
Pasta can be used not only with cereals, but also as the main material for work. Manufacturers of pasta seem to be specially developing beautiful designs so that craftsmen can use them not only for cooking.
Hair decorations with pasta look especially original. Few people will guess how they were made, but no child will definitely have the same accessory. There are several options for using pasta to make jewelry:
1 Hoop. All you need is to buy a plain headband, it should not be too thin so that the pattern can fit on it. Pasta in the form of spikelets glued along its entire length looks beautiful, especially if they are pre-painted silver or gold.
2 Crown. Using the same plain headband, you can make a crown for a little princess. To do this, you need to select several types of pasta; it is convenient to use wheels of different sizes. You need to design the shape in advance, and then glue them in rows.
3 Small hairpins. A suitable pasta shape for this is bows; they can be decorated in any colors, even with patterns. After this, the bow is attached with glue to a bobby pin or small hairpin so that it is not visible.
You can prepare several hairpins for different outfits. Under a blue dress with white polka dots, make a bow of that color, under a striped one - striped, and so on. The young fashionista will be delighted with such an abundance of jewelry.
Pasta accessories
Pasta can be used to make more than just hair decorations. Everything that girls love to wear, beads, bracelets, earrings, can be made from this material. How much joy a child will have if parents don’t just buy jewelry in a store, but take the time to make it themselves with their children.
The easiest way to make beads is from pasta in a shape that is strung on a thread. You can use different types, painting them in different colors. It is important that the thread is strong; if it is thick and looks ugly from under the “beads”, you need to match it to the color or simply paint it.
Beads with pasta in the form of bows look beautiful. It is impossible to string them on a thread, so this work is more painstaking and takes more time.
Advice
Each bow must be tied in the middle with a thread, secured to a knot, then move on to the next one.
You can make beads and bracelets by combining pasta with regular beads. You can design not just one thing, but a whole set, complementing it with a hairpin in the same style. Such sets of “jewelry” look stylish and original.
New Year's crafts
The easiest way to use cereal for New Year's crafts is to make New Year's cards with your child, which he can give on his behalf to relatives and friends. To do this, you need to choose a simple New Year-themed drawing template, print it, transfer it to cardboard, and decorate it with cereals.
A common idea is a Christmas tree. You can draw it yourself without using a template. The selected small grain must be painted green in advance, allowed to dry and used for drawing; in this case, it consists of one large part. You can decorate the Christmas tree with beautifully shaped pasta, such as bows.
Small crafts that can be hung on a wall, window, or Christmas tree look original. To do this, you need to cut out New Year's figures from cardboard. You can make many different options and hang them together as a continuous garland. Good options would be:
- mitten;
- skates;
- felt boots;
- Christmas decorations.
It’s easy to draw and cut out all these shapes along the contour, and you can decorate them with grains in different ways, because each of them is one continuous piece. For example, the “fur” of a mitten can be made from rice, and the rest from any other cereal. If there are many children in the family, this idea will be a particularly good option, because every child will be able to show creativity; sometimes parents themselves are surprised at how many things little dreamers can come up with.
Christmas tree toys made from cereals
Typical glass Christmas tree decorations are a thing of the past, and there are many creative ideas that can be used. One of the popular ones is the use of cereals. For many, it is surprising that you can not only decorate a finished ball with it, but make it from scratch.
This craft won’t take much time; if at first glance the idea seems complicated, just try it. Manufacturing takes place in several stages:
- We take a newspaper and roll it into a ball. How much material to take depends on the size of the expected toy. If you are doing it for the first time, you shouldn’t make a big one right away, but you don’t need to make it very small either - it will be uncomfortable to hold in your hands.
- We give the ball the correct round shape using threads. To do this, you just need to start winding them in a circle, periodically changing direction, as if rolling them into a ball. When the shape is smooth, secure the ends of the thread by making a small knot.
- We prepare the cereal that we will use for decoration, pour it into a plate. Buckwheat toys look elegant.
- Spread PVA glue on top of the threads using a brush, envelop it in a plate. If there are empty spaces to which the grains are not attached, lubricate them with glue and add them using tweezers.
- We take spray paint, preferably gold, spray it on the toy, and leave it to dry. It is advisable to match the color of the spray to the color of the cereal used; gold looks good on buckwheat, silver on rice and semolina.
You can choose any animal, imagine what kind of cereal or pasta of a certain shape can be used to make it. All you need to do is turn on your imagination, look at a picture of the animal, think about what its fur, body shape, and other features look like. Let's consider, for example, a hedgehog based on puff pastry, but using this idea, you can come up with your own options:
- Prepare the salt dough: for 2 cups of flour, take 1 cup of salt and 250 water at room temperature. Knead the dough, give it the desired shape. This is easy to do, since the softened salt dough is similar to plasticine.
- For needles, oblong-shaped pasta is best suited - let's take spiral pasta. Let's paint them silver using spray paint. When they dry, you can make needles.
- Visually draw a line that separates the muzzle from the body, lubricate the edges of the pasta with glue, place a “needle,” and press down lightly. We start moving from the muzzle, because if the last row turns out to be uneven, it should not be visible.
- We paint the rest of the dough with silver spray paint, make eyes, a nose, and a mouth. To do this, you can also take pasta - star crayons; if you don’t paint them, they will stand out well. You can also take beads and place them on glue.
You can decorate such a hedgehog in any way you like: make it a bow out of pasta, put some small craft on its needles, or simply make it colorful.
From grain
The most original idea for crafts made from grain is making a bird feeder. Such work will take time, require perseverance and patience, but the result is worth it. You can make a feeder from grain for your child to take to school; children are often given similar tasks in labor lessons, or you can hang it on your own balcony or in the courtyard of a private house.
The base can be anything, some people buy a ready-made feeder; the most ordinary, nondescript-looking structure at first glance will do. Others make it from wood or other available materials.
A popular method is to cut a juice can and make a hole in it for the birds. The material for the feeder is unimportant; decorating with grains will give it an original appearance and beauty.
It is not advisable to use glue, although this is the simplest option, it can be toxic to birds. Even a small piece that comes off can cause harm to birds. Therefore, it is better to use a natural gluing agent - flour.
It’s easy to prepare such an environmentally friendly paste: you just need to brew the flour with boiling water. This method is often used in construction, for wallpapering and more; starch can also be used instead of flour.
It is best not to brew a lot of paste at once, but to do it in parts, since it is important to have time to lay out the pattern before it hardens. The design and ornament must be thought out in advance; it is better to draw it on paper so as not to lose sight of it. We treat one side of the feeder with paste, apply the cereal, simply sprinkle the chalk, and lay out the large one with tweezers, leaving it to dry.
Some people use such feeders only for decoration, because they are worried that birds will ruin their work. In fact, it is difficult to pick out well-glued grains, especially since they will not do this if there is always food inside.
From coffee beans
This type of crafts is more suitable for adults, because among them there are also those who like to do something with their own hands. A distinctive feature of such souvenirs is that the aroma that comes from the coffee beans is stored for a long time. This craft will be a great gift idea for a coffee lover, or you can make it for yourself.
It is believed that coffee is a drink that brings people together, so such a gift will show the right person that you value them.


It is best to choose not just cardboard as a base, but burlap or other similar material. Making crafts takes place in several stages:
- Cut out a sheet of cardboard and a piece of burlap a couple of centimeters larger on all sides. We cover the cardboard with fabric and seal the corners at the back. It is important to use a smooth cloth; if it has been lying around for a long time, it is better to iron it.
- After the glue has dried, we begin working with the grains. We measure the same distance from the edge, about 2 cm, and draw straight lines under the ruler with a simple pencil. Then we draw any design in the center; a cup of coffee on a saucer looks beautiful.
- We grease each grain with glue, first lay out the pattern inside the picture, then the frame. Lightly press down each time after gluing the grain. Leave to dry.
To make simple and at the same time beautiful original figures and appliques, you can use different natural materials. The most unusual crafts are made from seeds of fruits and various deciduous trees. You can also make cool crafts from cereals, which can be found in any housewife’s kitchen. Natural materials are quite easy to stick to any surface using plasticine or silicone glue. Therefore, they can even be used for partial decoration of watches or vases. But children studying in kindergarten or school can easily make original three-dimensional figures or make funny pictures from them. Below we have looked at many ideas for making similar crafts. Using simple examples and step-by-step master classes, you and your children can easily and quickly make such crafts with your own hands.
Features of using seeds for creativity
A wide variety of crafts can be made from natural materials such as bones, seeds and cereals. From them you can make:
- appliqués: paintings can be laid out using a stencil or creating a design during the manufacturing process;
- three-dimensional figures: large elements can be connected to each other using silicone glue, small ones are usually glued with plasticine, you can also paste foam blanks with seeds and cereals;
- small decor: small natural material is suitable for gluing individual parts of large crafts or paintings, watches;
- pendants and beads: gluing seeds to ribbons or gluing them in the shape of different objects (snowflakes, Christmas trees) allows you to get non-standard home decor or original jewelry.
Variety of seeds
By combining different types of seeds, you can get the most unusual and amazing crafts. Such natural materials can be divided into the following groups:
- Regular seeds (in the form of droplets and ovals).
These include sunflower, watermelon and pumpkin seeds. They are most often used to create three-dimensional crafts or paste bases.
- Cereals.
From ordinary buckwheat, millet, and rice, you can create bright, cool applications and full-fledged paintings. When used, different types of materials can be glued side by side or even lightly overlapped (glued) on top of each other to form three-dimensional pictures.
- Tree seeds (maple, ash, elm).
Due to their large sizes and unusual shapes, they are more often used for making three-dimensional children's crafts.
- Legumes (beans, beans, peas).
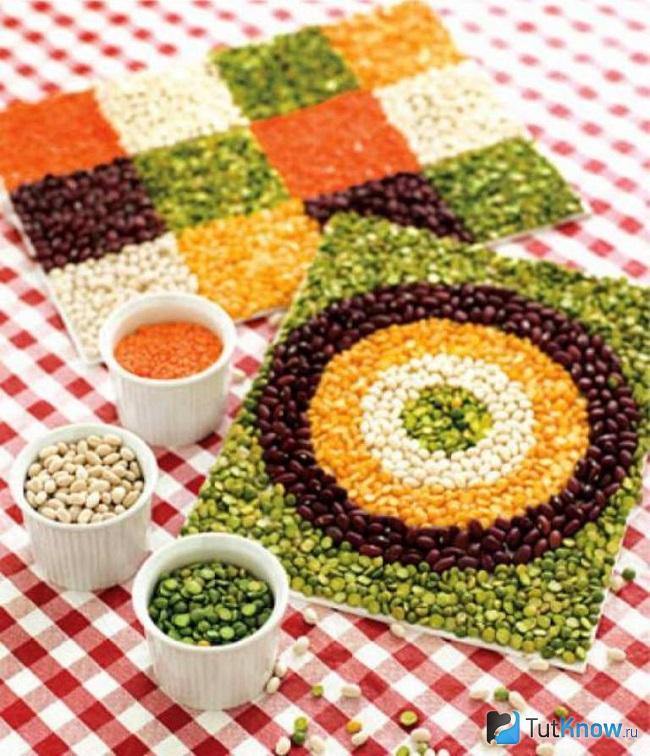
The variety of shades of such seeds makes it easy to use them to create colorful, unusual paintings and applications.
- A variety of seeds and grains (apple, walnut, coffee).
Used for gluing bases or assembling three-dimensional figures.
Separately, it is worth highlighting the cones. Their individual scales are great for decoration. But whole cones are often used to make children's crafts for kindergartens and schools.
How to prepare
To create original crafts using seeds, be sure to dry the natural materials well before use. This is the only way to guarantee their long-term preservation in the future (they will not peel off or shrink in size), and also to eliminate the possibility of deformation of the finished painting or three-dimensional decor. To prepare watermelon and pumpkin seeds for work, you need to thoroughly clean them of any remaining pulp, then spread them out in one layer and wait for them to dry naturally (they can also be dried in the oven). If necessary, you can color the seeds (often used for rice, pumpkin seeds):
- Transfer the seeds to a bag, add acrylic paints (you can also use food coloring, or in extreme cases, gouache).
- Close the bag and mix the seeds well, distributing the paint or dye evenly. Leave for 30-60 minutes.
- Place on a flat surface and dry completely.
Also, seeds can be painted directly after assembling crafts or laying out applications.
Crafts from sunflower seeds
With the help of sunflower seeds available to everyone, the following crafts can be easily and simply created:
- Beautiful decor "Sunflower".
A disposable paper plate is used as a base. It is covered with yellow paper. A thin layer of black plasticine is glued to the central part of the plate. Sunflower seeds are glued to this plasticine.
- "Hedgehog" figurine.
The body and legs of the hedgehog are made from plasticine. Sunflower seeds are glued to the back with the sharp edges facing up. The figurine is completed with eyes and a nose made of plasticine.
- Figurine "Owl".
The foam ball is completely covered with a thin layer of black plasticine. In the front upper part of the sunflower seed ball, two circles of 2 rows are laid out. These will be the eyes of an owl. They can be supplemented with highlights from white plasticine. The rest of the ball is completely covered with seeds to form feathers.
Pumpkin seeds are ideal for coloring, so you can make bright and unusual crafts from them. For example, together with your child, using this natural material, you can make:
- Application "Sailboat".
Color some of the seeds blue, blue and brown. A boat and a mast are made from brown seeds, and a sail is made from white seeds. And from blue and blue seeds the sea and sky are laid out.
- Painting "Carrots".
The seeds are colored brown, orange and green. Carrots are made from orange seeds, and their tails are made from green seeds. And the brown ones are the soil in which these carrots grow. The background remains undecorated, so it is recommended to use white or light blue cardboard as a basis.
Watermelon seeds
Small watermelon seeds are more suitable for laying out various applications. For example, using such natural material you can make the following crafts:
- Application "Cheburashka".
Cheburashka is drawn on a white sheet of cardboard. Its body and ears are sealed with watermelon seeds. You can use black peppercorns as eyes or make eyes from black plasticine.
- Painting "Peacock".
A peacock is drawn on a white sheet of cardboard. The stripes dividing its tail into feathers are lined with watermelon seeds. You can stick pine cone scales or beans on the ends. The remaining “empty” elements of the picture are simply painted.
- Unusual kitchen clock.
The old kitchen clock is disassembled into individual parts. The base (into which the clock mechanism is inserted) is covered with seeds. An indication is cut out of golden paper and pasted over the seeds. The watch is assembled in reverse order.
Maple, elm and ash seeds for creativity
Unusual tree seeds are ideal as an addition to ready-made figurines. They make interesting wings and ears. You can also make the following original crafts separately from these natural materials:
- From ash seeds you can make a three-dimensional chrysanthemum or a real porcupine. To do this, plasticine is glued to a cardboard base in the shape of a circle, and the seeds themselves are glued to it.
- And maple seeds can be made into an applique in the form of a Christmas tree or unusual snowflakes. Such natural materials are very well suited for making simple crafts for the New Year.
- “Fluffy” elm seeds will be an excellent basis for creating applications with different flowers. You can use pea halves as the centers of the inflorescences. But the ash seeds themselves will become beautiful petals. Such applications can be supplemented with butterflies made from dry leaves and branches and stems.
Ideas for crafts made from seeds
To choose which craft to make to decorate your home or to participate in a competition in kindergarten or school, we recommend that you read the simple instructions for making original products. You can use different types of seeds for:
- Layouts of simple applications.
On a sheet of cardboard you need to draw an image (for example, the sun, an owl, a cat). Lay out the background from small grains or cereals, paste over the image itself with larger seeds of different shades: the sun can be made from sunflower seeds, the wings of an owl can be decorated with beans.
- Topiary.
A very simple craft that uses a large foam ball as the base. Such a ball can be covered with watermelon seeds and coffee beans. If desired, you can make a stand for him from a skewer or branch. The structure itself is installed inside a small flower pot.
- Kitchen panels.
A more complex craft that is made on plywood. Thin slats are glued onto the plywood to form numerous cells. The cells themselves are pasted over with different grains and cereals.
You can make a beautiful and realistic hedgehog using sunflower seeds. Also for work you will need a sheet of cardboard, silicone glue or plasticine, plastic decor in the form of mushrooms and apples. The work is carried out step by step according to the following master class:
- A hedgehog is drawn on a sheet of cardboard. His paws and muzzle are painted pink (with a pencil, felt-tip pen, paints).
- The back is covered with plasticine.
- Carefully, starting from the top and going down, sunflower seeds are glued onto the plasticine. Subsequent rows should slightly overlap the previous ones.
- Plastic apples and mushrooms are glued to the back of seed needles with silicone glue (or a glue gun).
- You can glue a dried berry or a ball of black plasticine as a nose to the hedgehog.
Pictures from seeds
Bright paintings can be made from different materials using seeds of different colors. Without repainting them and selecting applique elements according to shade, you can create an unusual craft with your child to submit to the competition. The work should be carried out according to the following scheme:
- Glue a piece of burlap to the thick cardboard.
- Closer to the upper right corner, separately glue 3 pea seeds - they will act as the centers of the flowers.
- Stick millet in 2 rows around one pea, and lentils and rice next to the others.
- Around the finished cores, petals from pumpkin, sunflower, and watermelon seeds are laid out in 1-2 rows.
- 1 thin branch is glued to each flower - it will act as a stem.
- You can supplement the “bouquet” with dried leaves, which will become the leaves of the flowers themselves.
Flowers
To prepare for autumn craft competitions in kindergarten and school, you can make not only flower-shaped appliques from pumpkin seeds, but also three-dimensional flowers. For work you will need: cardboard, pumpkin seeds, plasticine, a thick branch, a glue gun. The craft itself can be made using the following master class:
- One circle (with a diameter of about 7 cm) is cut out from a sheet of cardboard.
- A thin layer of plasticine is glued onto a cardboard circle.
- In the central part of the inflorescence, 3 pumpkin seeds are placed vertically.
- Along the perimeter of the circle, 2 rows of seeds are glued horizontally.
- Moving from the edges of the inflorescence to its center (the stamens of the seeds), the remaining empty space is filled.
- Using a glue gun, a thin branch—the stem of a flower—is glued to the bottom of the circle.
- If desired, dried or paper leaves can be glued to the stem itself.
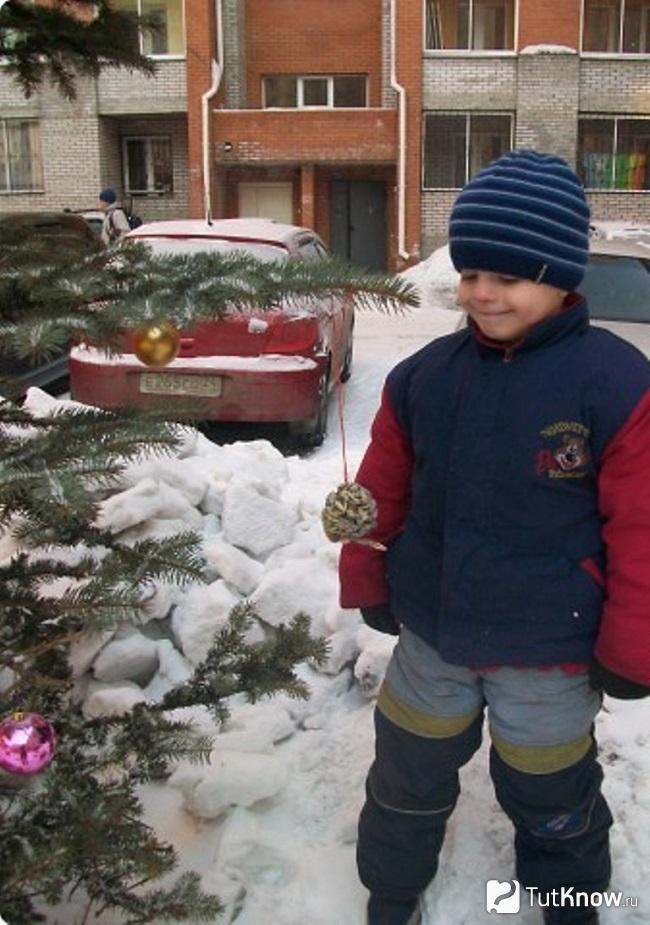
Crafts made from cereals and seeds include panels, appliqués, decorative elements, and bird feeders. See how to make a topiary, a wreath from peas, a Christmas tree from seeds.
The content of the article:
Children will really enjoy making various crafts from cereals and seeds if adults show them how to create them. Such fruits of joint labor will not only help the child’s development, but will also teach him kindness. After all, this technique creates original bird feeders that a child will be happy to hang outside. He will rejoice when the birds flock to the treat.
How to make a feeder from a pine cone, gelatin, from a bottle with your own hands?

Often in the city or countryside growing Christmas trees are decorated for the New Year. Having made bird feeders, the child himself will decorate the forest beauty with them and get a lot of pleasure from it. To implement your plan, place next to your children:
- cones;
- a tall small bowl;
- cereal seeds;
- seeds;
- brush;
- a thread.
- If the honey is thick, first melt it in a water bath; when it cools, pour it into a bowl. Pour cereals and small unroasted seeds into another similar bowl.
- Let your child coat the cone with liquid honey, then roll it in another container so that the seeds stick to the sweet surface.
- Now he will place his creation on a spread paper or tray so that the honey dries and the treat for the birds is better attached to the pine cone.
- After this, it’s time to tie a thread to the feeder and go for a walk with the child to hang the craft on the tree.
Instead of honey, you can use a thick paste. To make it, pour 1 tbsp into a container. l. flour, dilute with a glass of water. Stirring, bring to a boil.
Remind the children that birds should not be given salty or black bread, so that children do not use such products when making bird feeders.
Invite the children to make bird feeders that look very original. First take:
- 1.5 cups of birdseed;
- 0.5 glasses of water;
- 2 small bags of gelatin;
- leg-split;
- cookie cutters;
- straw;
- baking paper.

- Soak the gelatin in water for 20 minutes if the instructions require it. But usually they sell one in small bags that does not need to be soaked; immediately dilute it with water and put it on the fire.
- When the solution boils, remove from heat, cool slightly and mix with bird food.
- Lay baking paper on the table, place cookie cutters on it, fill them with the prepared mixture.
- Place a loop of twine or ribbon inside, with the knot facing inward. Place in the freezer for half an hour.
- After that, the forms are taken out from there and left on the table so that the contents dry out during the day. Then the bird food is removed and hung outside the window, on the trees in the yard.

It can be made from:
- empty 5-liter canister;
- large wooden spoon and fork;
- straw;
- hot glue;
- twine;
- accessories.

- Cut out windows on one and the opposite side. Below them, make 2 paired cuts. Insert two wooden spoons here. Or the second could be a large fork made of the same material.
- But first, using a hot gun, attach the twine and the straw on top, first tying it in a bundle. If you do not have such material, then use natural washcloth.
- All that remains is to decorate the birdhouse. Using yellow and white rope and gluing it, make window frames. Fabric flowers glued to the bottom of the birdhouse will also be a wonderful decoration for the birds' dining room.
How to make a butterfly with your own hands?
You will turn the following items into it:
- transparent plastic bottle;
- plasticine;
- small foam ball;
- plastic cocktail straws;
- beads.
- hot gun with silicone rods;
- scissors;
- water-washable marker.
- You need to remove the label from the bottle, cut off the middle part to make a fairly large canvas. Cut it in half. Attach the butterfly wing template to one and the other piece and trace with a water-washable marker. Cut along these outlines.
- Now you need to decorate the wings. Use a hot gun to attach beads as decoration. Cut the straws into small pieces and glue them along the edge of the wings.
- Let the child stick plasticine around the ball; you can use the same material to attach decorative elements. To continue children's creativity, the child will sculpt the body of an insect from plasticine; help the child put both wings here and secure them.

Crafts from cereals and seeds: master classes
Under your guidance, your child will engage in the creative process and make a wonderful palm tree. For this you will need:
- bowl;
- pen rod;
- pumpkin seeds;
- plasticine.
The tree trunk is stuck into it and secured, which needs to be coated with plasticine.
Now let the child roll a “sausage” out of brown plasticine and begin to wrap it around the bottom of the trunk, moving up.

Here's how to make similar crafts from seeds and cereals. It's time for pumpkin seeds. These will be the needles of a lush Christmas tree. They need to be driven into the tree trunk, also starting from the bottom. Try to place the elements of subsequent rows between the seeds of the previous ones.

What a wonderful tree made from seeds! The next job is no less exciting. To create a round panel, take:
- cucumber or melon seeds, as well as apple seeds;
- semolina;
- gouache;
- glue;
- pencil;
- round disposable plate.

The semolina is ground with gouache - half with green, half with yellow. On the plate you need to put a drawing with large features, for example, such a goose.

Starting from the tail, coat parts of its body with glue and attach cucumber or melon seeds. The wing should be highlighted with black apple seeds, but you can also use quince seeds.

To make the legs and beak, melon or cucumber seeds are covered with red gouache and allowed to dry. Now they need to be glued to the markings.

To make grass, apply glue to the lower part of the background and sprinkle this area with green semolina. The upper half of the picture is decorated with the same grain, but yellow.

DIY children's crafts from legumes
Children can also make crafts from beans, beans, and peas. At the same time they will learn the alphabet. Draw letters on whatman paper, let the child coat each one in turn with glue and attach the prepared seeds.

To make a panel in the shape of a pumpkin, give your child:
- seeds of dry pea halves;
- glue;
- a sheet of cardboard and colored paper;
- tree leaf;
- sesame seeds;
- pencil.

Children can also make chickens, so funny and beautiful, from legumes. Give them a template of these baby chickens. Let them circle it and sketch out the noses and paws with a yellow pencil. Dry peas need to be glued onto the surface of one chicken. Create another one from beans. For the third, corn is suitable.

To make an owl, kids will need:
- pattern of this bird;
- cardboard;
- beans of white, brown, red color;
- beans;
- dry yellow soup peas;
- glue.
The wings are made from red, and the belly and outlines of the eyes are made from white. The pupils are lined with black beans, and the paws and beak are lined with yellow peas or corn of that color.

Legume seeds make wonderful colored crafts. You can invite your child to lay out a circular pattern. Glue lentil seeds in the center and outside, and make circles from white beans, broad beans, yellow peas or corn.
You can make a photo frame from green peas by covering the perimeter with these seeds.

There is a very interesting decor for Easter eggs. For it you will need:
- boiled eggs;
- paste based on flour or starch;
- grains;
- small grains;
- dried herbs;
- spices.
You can create mosaic patterns by drawing a sketch on the shell in advance. If desired, use stencils.

You can attach legume grains to the surface using not only boiled eggs, but also balls for the base. Great idea for room decor.

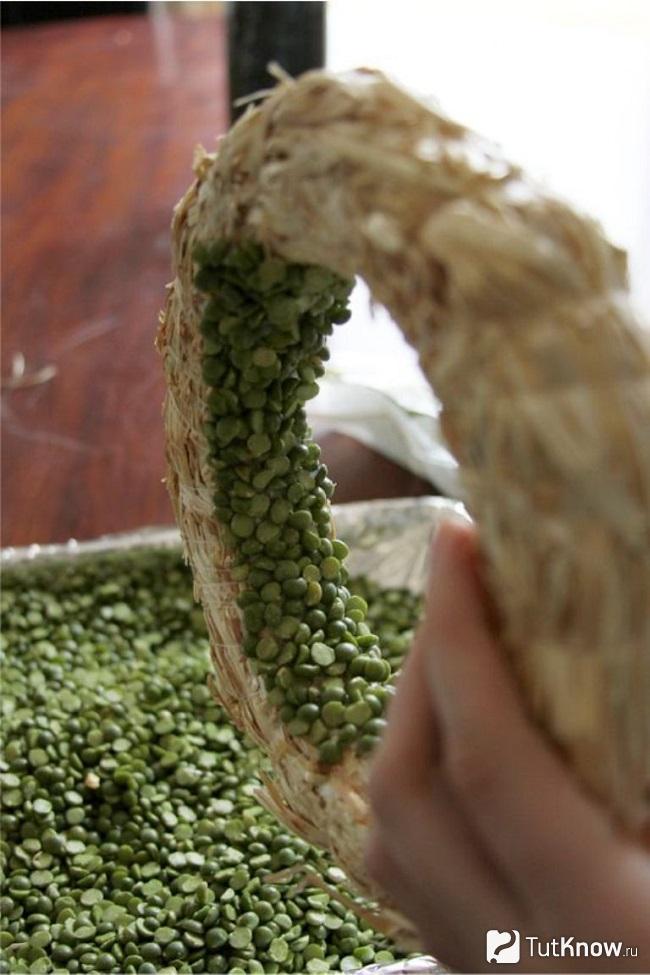
How to make topiary from peas?
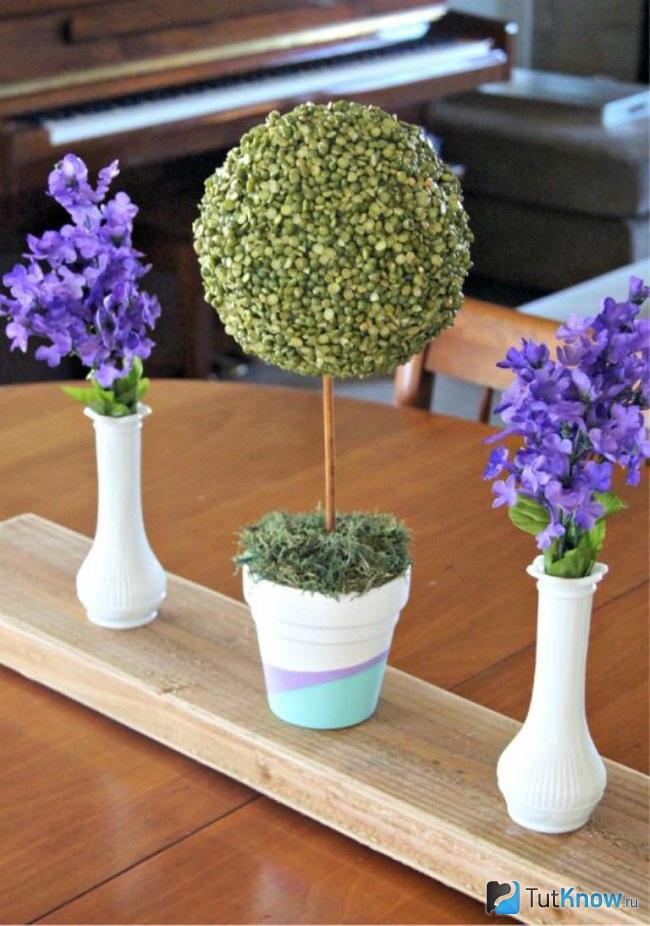
Legume seeds will also help you make it. To make a tree count, you need to take:
- a package of green peas (polished and split);
- foam ball;
- packaging of dry moss;
- 1 medium sized clay pot;
- hot glue;
- PVA glue;
- brush;
- for the trunk - a skewer, a wooden stick or a simple pencil;
- pot paint;
- green acrylic paint;
- floral foam or alabaster or cement;
- Styrofoam.

When it's dry, decorate it with peas. Here's how to continue making topiary. Apply PVA glue to a small area of the ball with a brush, then generously cover it with peas.

Once the beans are attached, decorate the next piece of foam base. Thus, close the ball completely and put it away to dry until the morning.
When this happens, inspect the work; if there are small uncovered areas, sprinkle them with cereal.
It's time to secure the crown. To do this, drop some glue from a “hot gun” into the hole in the ball and insert the barrel here.

For better fixation, it is advisable to additionally secure the barrel with pieces of paper and carefully glue them, pouring more glue here. If you leave the paper out, the hot glue may melt the foam, making the hole too deep.
Now place the trunk in the pot, secure this stick with alabaster, cement or floral foam.

After these solutions have dried, you need to put moss on the surface, glue it, and decorate it with sisal, peas, and cereals.

Applications and panels from cereals
Crafts made from peas and beans are not only various topiaries, but also wonderful paintings.
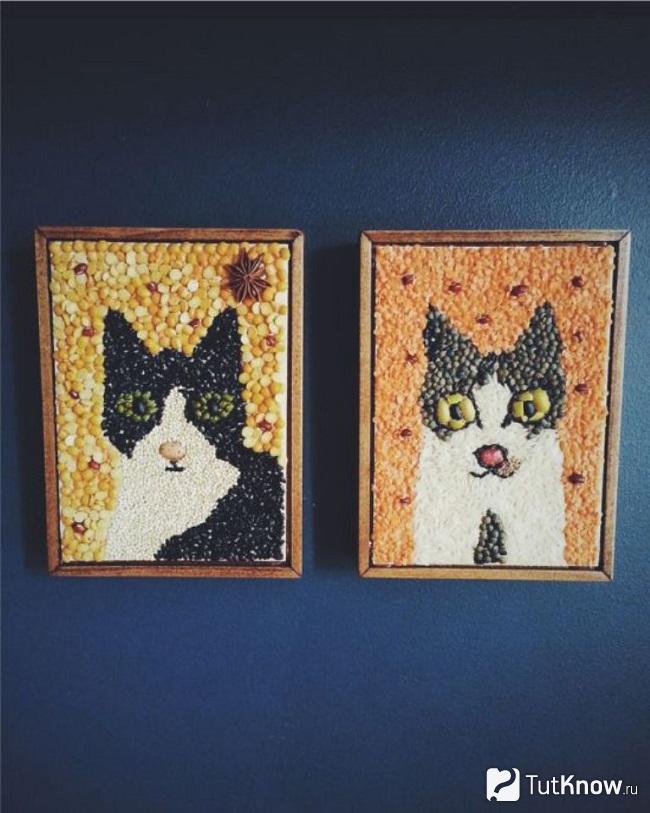
To create one, you first need to draw a cat's face on cardboard. Then fill the areas with legumes of a certain color. Crafts made from cereals are also impressive.

For this one, take:
- cardboard;
- pencil;
- buckwheat;
- semolina;
- gouache;
- PVA glue.
To make such a wreath, take:
- green peas;
- “hot gun” or PVA glue;
- straw wreaths - 2 pcs.;
- baking tray;
- brush;
- leg-split.
If you don't have straw wreaths, then use a foam piece of this shape, but it needs to be covered with green acrylic paint.
Place the peas on a baking sheet or tray. After lubricating the inside of the wreath with glue, sprinkle it with peas.
Then, coating small areas with glue, roll the wreath over the peas to attach these small particles. Once the glue is dry, tie twine to the wreath, decorate with ribbon, and hang above the door.
The door is decorated. Make table decorations. To make napkin rings, take:
- toilet paper rolls;
- paint;
- spices;
- seeds;
- small cereals;
- stationery knife;
- glue.
To give the products additional strength, you can lubricate the decorated surface with glue.
These are the wonderful crafts you can recommend your kids to make from seeds, cereals, beans, and peas. And to make it even easier for them to learn this, let them watch videos with you that clearly show the process of creation.


