Crochet the edges. Crochet the edge. Nuances of the knitting process
Elizaveta Rumyantseva
Nothing is impossible for diligence and art.
Content
The final step in crocheting products is tying their sides. This is the final touch in needlework, giving clothes or linen an attractive look, smoothing out minor flaws. Experienced craftswomen perform the finishing to create beautiful napkins, towels, and bedding.
How to crochet the edge of a product
Beginning needlewomen will be interested in learning how to beautifully crochet the edge of a knitted item. Popular techniques used in the final stage of finishing include the crayfish step, picot technique and openwork patterns. Each of them will look stylish and sophisticated, and the products will be sophisticated and complemented. Making the necessary techniques is not difficult due to the secrets used.
There are 2 ways of tying:
- directly on things - allows you to avoid wasting time on carefully sewing on individual parts, the item turns out to be in a romantic, vintage or ethno style;
- knitting the details of the border and ruffles separately and then stitching them together gives things a retro look.
Finishing the sides of things helps:
- give a new style;
- preserve the appearance of products made from loose soft yarn, which can stretch and deform over time;
- decorate;
- hide flaws.

Crawfish-step tying
Well-known on the Internet is crocheting the edge of a product using the crayfish step method, used to secure the shape of the item. The knitting is based on single crochets, made in the opposite direction - from left to right. During knitting, the thread crosses in a special way and the pattern looks voluminous, beautiful, at the same time fixes the shape and does not allow the fabric to stretch. It is used for children's sweaters, scarves, and shawls for adults.
To complete this, you need to tie the sides with single crochets around the entire perimeter. After this, the thing does not need to be turned over, but on the same side, insert the tool into the loop to the right of it, pull out and tie the air lifting element. Then you need to insert the hook into the right loop again, grab the thread and knit 2 loops together. Repeat until the whole thing is tied.
How to crochet an edge using the picot technique
Not only clothes, but also shoes can be crocheted using the picot technique. It looks airy and playful due to its small size. Pico or pique is a chain of several air loops closed in a ring. There are 2 types of this pattern:
- classic - the hook is inserted into the beginning of the fabric, 3 air loops are cast on, the tool is returned to the beginning of knitting, the elements are knitted together.
- trefoil - cast on 3 air loops, make a circle using a SS (connecting stitch), knit 3 more air elements, insert the tool at the beginning of the second leaf, knit a third leaf, collect them together with a SS.

Crochet openwork edge
No less attractive is the openwork crocheting of the edge, which will require more time and perseverance. You will need hook number 1 for the density of the pattern. First, let's look at the notations that appear in the diagrams:
- VP, VOP – air loop;
- С1Н, СН – column with 1 throw;
- C + number (C3, C4) – a chain of a certain number of VPs;
- BN, SBN - column without throwing.
Knitting the pattern in rows:
- All stitches are knitted in BN.
- 3 VOP, repeat from CH, Ts2, CH, Ts7, skip the loop. To knit the angle Ts13, the last element is connected to the first CH.
- Repeat: BN in Ts2, Ts4, BN in the middle of Ts7, Ts4. In the corners in the middle of Ts13, 2 BN are knitted, with 3 Ts5 between them.
- Similar to the second one.
- Similar to the third, in the corners 3 C6.
- Similar to the second, in the corners of Ts15.
- The same as the third one, in the corners 3 Ts7.
- 3 VP, repeat: CH, Ts2, CH, Ts8. Ts17 is knitted in the corners between the dcs.
- Repeat: all Ts8 are tied with 4 BN, picot clove, 4 BN. Ts19 in the corners are tied: 3 BN, picot clove, 3 BN, picot clove, 3 BN, picot clove, 3 BN.

Patterns for crocheting the edge of a product
There are simple and complex descriptions and patterns for crocheting the finished product. It is better for beginning craftswomen to start from the basics, gradually complicating the patterns. Experienced needlewomen can try complex but beautiful patterns that will decorate the item and make it more attractive. On the Internet you can find ready-made diagrams with descriptions, photos, master classes, video tutorials - all this will help you understand the issue and put one of the tying methods into practice.
Shawl border
There are several options for crocheting the edge of a shawl:
- the finished item is tied with a row of single crochets, turned to make arches: repeat of 3 air loops, 2 passes, 1 single crochet;
- you can simply tie a shawl using any technique (crawfish step, picot) and make a lush fringe - to do this, cut the threads to the required length, fold 3-4 pieces in half, pass through narrow holes along with the braid;
- a border made of 2 rows will be beautiful: in the first, a repeat of 2 yarn overs, an increase in a loop, a yarn over with 2 loops knitted together, 1 yarn over, 1 skip, knitted 4 times with 2 loops each, 1 VP, 1 dc; in the second row - rapport of 3 BN, 5 GP.

Jacket neckline
To create a tight crochet edge, it will be useful for novice craftsmen to know simple techniques and descriptions of finishing the armhole:
- determine the wrong side of the item, lay a VP chain (chain stitch) along the front side - pierce the outer stitches in the middle, knit 2 loops from a double crochet stitch, 1 without it;
- turn the item inside out towards you, knit a strip - from BN or without it, of any openwork pattern.
Crochet border for tablecloth
Cute scallops make a stylish edge decoration for the corners of the tablecloth. There is a description for their execution, following which you can get a three-dimensional dense pattern:
- knit the first row with single crochets;
- in the second row repeat: 1 BN, skip 2 loops, 4 DC in the next loop (2 VP are knitted between the columns), skip 2 loops;
- The row ends with a connecting thread.
For a beautiful patterned border, below is the following diagram, which will be simple even for beginners:
- knit the first row VP;
- second – BN;
- third - 1 BN, 2 skips, from 1 loop knit 4 CH and 4 VP, repeat.

Crocheting the edge of a blanket
A cozy, warm blanket can become even brighter thanks to a lace border, knitted by hand. It can be knitted separately and attached to the item, or you can also knit a blanket separately - then the product will be finished with the same or a contrasting thread. The first processing option is called shells:
- 3 VP, a chain of VP in a multiple of 6;
- wrong side: 1 sc from 2 loops, then 1 sc from each element;
- 3 VP, skip, 1 CH, repeat – 1VP, skip, 2С1Н, turn;
- 5VP, 1 RLS, rapport - 4 VP, 1 RLS, last 2 - 2 VP, 1 SC;
- VP, RLS, rapport - BN, increase, SN, increase, RLS.
The fringe from the border for the towel will be obtained by making a spring pattern:
- the VP base is knitted with 2 rows of BN;
- VP, BN, rapport - BN, 15 VP, turn, skip, 2 BN from each VP, half double crochet in BN at the base.
The net border is knitted crosswise in short rows, description for it:
- 1 C1H in loop 6, alternating - VP, skip, C1H;
- 4 VP, skip, S1H, VP, S1H, alternating 3 times – VP, skip, S1H, alternating three times – VP, S1H.

crochet granny square - diagrams and step-by-step descriptions for them can be found in the presented master classes.
Found an error in the text? Select it, press Ctrl + Enter and we will fix everything!From time immemorial, the border has been considered the element of knitting that gives any product true tenderness and sophistication. It can be used to decorate any crocheted items - from clothing to kitchen accessories (napkins, tablecloths, towels, curtains and much more). Moreover, not only finished knitted items are tied with a decorative border. Openwork lace, knitted along the free edge of the fabric, can breathe new life into an old, long-forgotten item from a women's or children's wardrobe.
There are many ways to knit a border. It is knitted lengthwise and crosswise, in one layer and layered, using fillet, openwork, ribbon techniques, as well as in the form of a border or fringe. Each option for knitting a border has its own subtleties, therefore, if the craftswoman has just begun to master the basics of crocheting, we recommend choosing the simplest tying patterns, then gradually complicating the knitting tasks. 
Today we will talk about how to crochet a border. We offer needlewomen a large collection of patterns and step-by-step instructions for crocheting the edges of knitted items - from simple “picots” to extremely complex crocheted “butterflies”. 
Abbreviations in the text:
- VP – air. a loop;
- Runway - air. lifting loop;
- Art. s/n – double crochet;
- Art. b/n – single crochet;
- Art. s/2n – double crochet stitch;
- pet. - a loop;
- flail - chain;
- RN – working thread;
- PR – previous row;
- SS – connecting column.
The simplest picot-based border for beginners
With the help of such a border you can tie whatever you want: knitted napkins or ordinary fabric handkerchiefs. The knitting is absolutely simple to perform, it consists of four rows, so even a new knitter can master it. 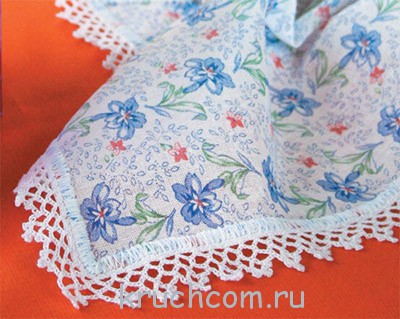

Knitting progress:
We tie the fabric in a circular manner with a row of non-woven columns. SS.
Next in a row we knit 6 VP (1 VP + 5 VP), 1 tbsp. b/n in the 5th Art. b/n PR, then knit with rapports to the end of the row: “5 VP, 1 tbsp. b/n in the 5th Art. b/n PR". SS.
We knit the third row in the same way, only the b/n column should fall on the central loop of the arch of 5 VP PR.
We tie the fourth row around the trace. repeating knitted combination: “1 tbsp. b/n to central. pet. arches from VP PR + 3 VP + 2 tbsp. s/n to the center. pet. track. arches of 5 VP PR, above them and between them - in picot (3 VP + 1 SS in the first VP), between picot - 3 VP, we complete the rapport with three VP and st. b/n to the center. pet. track. arches made of 5 VP PR.” SS. The border is ready!
Narrow openwork border
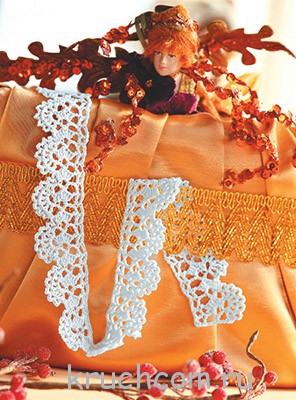
The most beautiful airy border can decorate women's blouses and children's tops; framed by it, a wide variety of clothing items and all kinds of knitted accessories look equally good.
Work steps:
The border is knitted transversely using openwork motifs.
We collect the flail. from 11 VPs (7 VPs + 3 VPs + 1 VPs).
Row No. 1: 1 tbsp. s/n in the 7th VP chain. from the hook, 2 VP, 2 tbsp. s/n in the 4th VP of the base from the hook, between the posts - chain. from 3 VP.
Row No. 2: 5 runways, 3 tbsp. s/n to the center. pet. arches made of 3 VP PR, 1 VP, 3 tbsp. s/n in the same pet. arches, 2 VP, 1 tbsp. s/n in next Art. s/n PR, 1 VP., 1 tbsp. s/n in the 3rd runway PR.
Next, we continue the work according to the knitting pattern until the border reaches the required length. Semicircular motifs are knitted during knitting. b/n with pico.
Treat the finished border with a starch solution and iron it to give it the ideal shape.
Heart border in fillet knitting technique

A border made using the fillet technique is one of the most popular types of crochet bindings. The fillet border is used to decorate towels, napkins and tablecloths; in addition, it can be used to decorate kitchen curtains and other home interior elements in an original way.
A heart-shaped border with scalloped edges can be a bright accent to many knitted and fabric items, take, for example, kitchen curtains, where you want to add a little variety.
Fillet pattern diagram:

The process of knitting a fillet border is incredibly simple and similar to embroidery technology. It must be remembered that each cell of the pattern consists of three loops, the empty one is knitted “1 tbsp. s/n + 2 VP”, filled in – “3 tbsp. s/n.”
For the “heart” border we use a flail. on 55 VP + 3 VP, and knit with empty and filled fillet cells according to the above pattern.
Complex openwork border
Openwork border is the leader among the methods of crocheting the free edges of a product. Openwork binding patterns are in high demand among craftswomen, so there are plenty of options: scallops, “pineapples”, shells, floral motifs, etc.
The openwork border can be narrow or wide. The latter is ideal for framing towels and tablecloths. We invite needlewomen to pay attention to the beautiful pattern of a wide openwork border, perfect for adding elegance to a tablecloth.
The process of crocheting such a border is not easy, but the results of the work will be appreciated, see for yourself! 
Knitting pattern:

Knitting order:
We knit the beginning and end of the border according to the pattern of the first motif, then alternately according to the patterns of the second and first motifs until the border reaches the desired length.
First motive: we start with a chain closed in a ring. for 5 VP.
Row No. 1: 4 runways, 6 st. from 2/n to next. 2 VP rings.
Row No. 2: 4 runways, 1 st. from 2/n to next. Art. with 2/n PR, 2 tbsp. from 2/n to next. Art. with 2/n PR, 3 VP, 2 unfinished. Art. with 2/n with one vertex, in the first VP chain. out of 3 VPs, 3 unfinished. Art. with 2/n with one vertex, in the next. Art. with 2/n PR, 3 VP, 2 unfinished. Art. with 2/n with one vertex, in the 1st VP chain. from 3 VP, 2 tbsp. from 2/n to next. Art. with 2/n PR, 2 tbsp. from 2/n to next. Art. with 2/n PR.
Rows No. 3-4: knit according to the pattern of the first motif.
Second motive: we collect the flail. for 13 VP (7 VP, 4 VP, 2 VP).
Row No. 1: 4 VP, 1 SS between the fourth and third row of the first motif, 2 VP, 8 sts. with 2/n in the ninth VP chain, 3 VP, 1 SS between the fourth and third row of the first motif on the opposite side of the chain.
Rows No. 2-4: knit according to the pattern.
Warp: knit straight and back according to the warp knitting pattern (rows No. 1-8).
Tying: we tie the border in a circular manner according to the tying pattern. Ready!
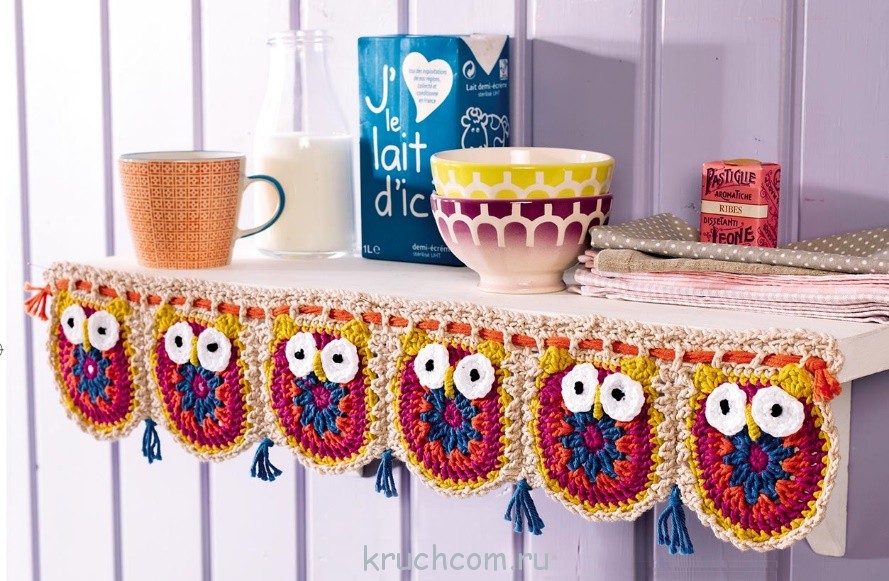
Dense border "funny hearts"
A bright decoration made of contrasting threads will appeal not only to adults, but also to children. With the help of such a border you can decorate shelves for toys in a child’s bedroom, as well as decorate clothes and accessories. 
Knitting pattern:

Knitting stages:
We knit seven hearts from 5 VPs with pink yarn, closing them in a circle with one SS. We knit two circular rows according to pattern A.
Then we make a flail using light green yarn. on 120 VP + 1 VP and knit the next one. way:
Rows No. 1-2: st. b/n;
Row No. 3: 6 tbsp. b/n, 6 rapports: “next. pet. we knit the bases 1 tbsp. b/n, 2 VP, 1 tbsp. s/2n, 2 VP and 1 tbsp. b/n, in parallel, using a column s/2n, we grab the first half of the heart (marked with arrows in the diagram), in the next. 4 pet. We knit the bases according to the 1st tbsp. b/n, next warp loop - 1 tbsp. b/n, 2 VP, 1 tbsp. s/2n, 2 VP and 1 tbsp. b/n, at the same time grabbing the second half of the heart, 11 tbsp. b/n". After last we knit 6 regular stitches for the heart. b/n. The border is ready!
Original border with pompoms

Step-by-step knitting:
- We collect the flail. for 6 VP.
- We dial 3 tbsp. s/n in the 3rd VP from the hook. Total - 4 pets. on hook.
- We make a RN yarn over and pull it through all the loops on the hook.
- Again we collect 3 VP.
- Lastly pet. the previous group of 3 tbsp. s/n again knit 3 tbsp. s/n and repeat all steps. We get another “cluster”.
- We knit a SS in the stitch from which the first “cluster” began. We do this so that 1 tbsp. s/n remained behind, and two - in front. This order also applies to the first cluster.
- Again we collect 3 VP. We attach them with SS to the place of attachment to the main canvas.
- Repeat steps 1-7 the required number of times until the entire fabric is tied with a border of miniature pompoms.

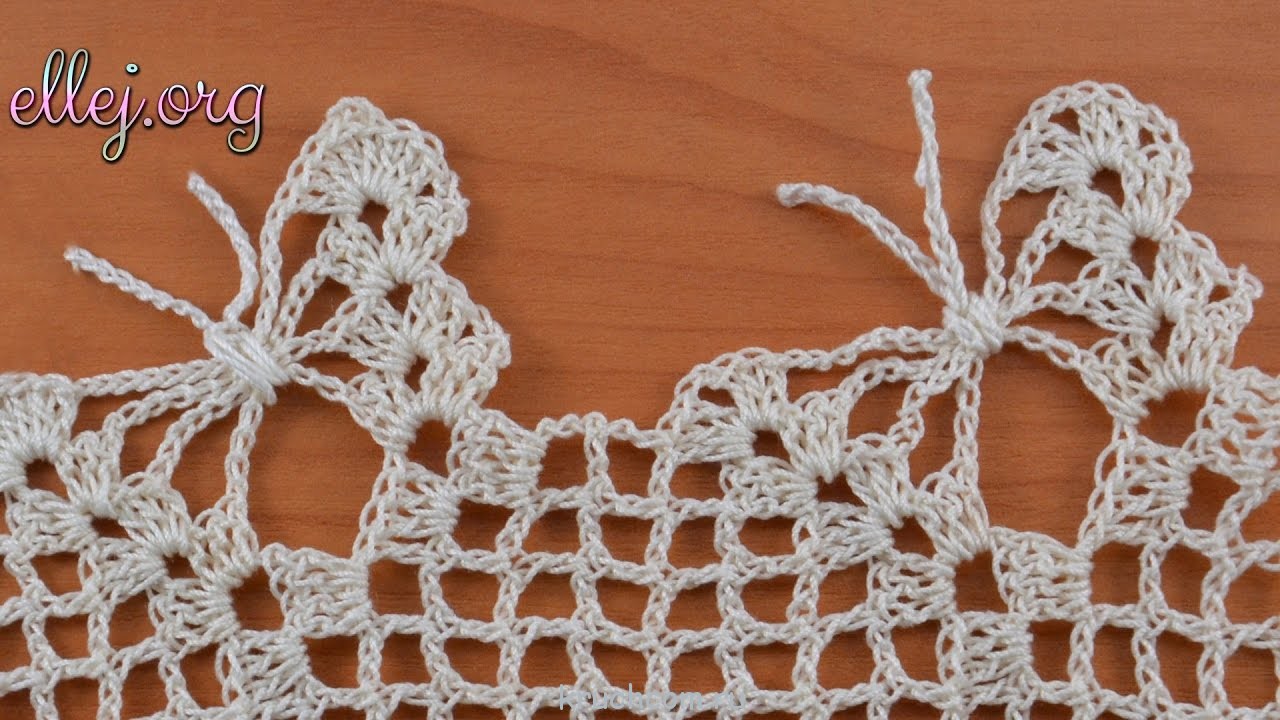
Exclusive border with butterflies
The amazingly beautiful border with butterflies as if fluttering across it captivates many needlewomen. By the way, its knitting is not extra-heavy, so not only professional craftswomen, but also beginners in crocheting can practice knitting such an openwork border.
The knitted border is knitted in cross stitch. Openwork butterflies are knitted along the edge of the fillet mesh. After the main part of the border is ready, you need to knit laces from VP, which subsequently tie the chains of air loops inside the butterflies, thereby forming a clearly defined body and antennae of the butterfly.
To knit such a border, it is best to use the finest cotton threads, then the work will look extremely delicate and airy.

Knitting pattern:

Knitting progress:
- We collect the flail. at 33 VP. From the 9th ch from the hook we begin to knit with a fillet mesh (st. s/n + 2 ch), skip 2 stitches between the stitches. In total you need to knit 5 tbsp. s/n.
- After the fifth st. s/n we dial 2 VP, skip two pets. on a chain and knit st. b/n.
- We cast on 2 more VPs, skip two pets. on a chain, knit st. s/n.
- Cast on 2 ch, skip 2 stitches. Until the end of the row we knit according to st. s/n in each pet.
- We knit according to Art. s/n in next 3 tbsp. s/n PR.
- We dial 2 VP, knit st. s/n in next Art. s/n PR.
- We cast on 5 VP, knit st. s/n in next Art. s/n and then 4 more cells with fillet knitting.
- In the last loin cage PR - knit 3 tbsp. s/n.
- We cast on 4 VPs and unroll the knitting.
- We knit 3 tbsp into the empty fillet cage (after the cage with PR posts). s/n.
- Next we knit with fillet cells until an arch of five VPs (i.e. 3 fillet cells).
- We dial 2 VP, knit st. b/n in the third pet. on an arch of five VPs.
- We collect 2 more VPs, finishing the row: 1 tbsp. s/n + 2 VP + 4 tbsp. s/n.
- We start all rows on this side with the same knitted combination: 3 tbsp. s/n, 2 VP, art. s/n. Then - an arch of 5 VPs.
- We knit 2 fillet cells: st. s/n + 2 VP + st. s/n + 2 VP + st. s/n.
- Above the trail with the fillet cell PR we knit 3 tbsp. s/n. We cast on 4 VPs and unroll the knitting.
- We knit 3 tbsp. s/n in the first empty fillet cell PR + 1 tbsp. s/n in next Art. s/n PR.
- We dial 2 VP, knit st. s/n in next Art. We finish all rows on this side of knitting with a trace. knitted combination: 2 VP, st. b/n in the arch, 2 VP, art. s/n in a column, 2 VP, 4 tbsp. s/n.
- We cast on 3 VPs and unroll the knitting.
- We knit according to the pattern (st. s/n, fillet cell, arch of 5 VP, st. s/n in st. PR), then cast on 2 VP, knit st. s/n in next Art. ETC.
- We cast on 2 more VPs, in the corner knitting arch - 3 tbsp. s/n, 2 VP, 3 tbsp. s/n.
- We cast on 8 VP, knit 3 tbsp. s/n, 2 VP, 3 tbsp. s/n in the lower one is another arch from VP. We cast on 3 VPs and unroll the knitting.
- We knit 3 tbsp. s/n, 2 VP, 3 tbsp. s/n into the central loop of the arch from two loops of the previous step.
- We cast on 10 VP, knit 3 tbsp. s/n, 2 VP, 3 tbsp. s/n in the arch of 2 VP step No. 23.
- We dial 2 VP, knit st. s/n in after. Art. filled cell. We finish the row according to the pattern (loin cells, an arch of 5 VPs, 4 treble s/n).
- We cast on 3 VPs, unfold the knitting, and knit a row according to a familiar pattern.
- After 3 connected fillet cells, we cast on 2 VP, knit 3 tbsp. s/n + 2 VP + 3 tbsp. s/n into the nearby corner arch of 2 VPs (this will be the right wing of the butterfly).
- We cast on 12 VP, knit 3 tbsp. s/n + 2 VP + 3 tbsp. s / n into the underlying arch of 2 VP (left wing of the butterfly).
- We cast on 3 VP, knitting turn.
- We knit the last. row of butterflies: shells - into shells, between them - a flail. at 14 VP.
- Next we knit the row according to the known pattern. We cast on 3 VPs and unroll the knitting again.
- We knit 3 tbsp. s/n, 2 VP, art. s/n, arch for 5 VP, 5 fillet cells. Raise 3 VP, knit as the very first row. Repeat the pattern until the border reaches the required length.
- Let's start with the antennae of the butterfly. We collect the flail. at 25-30 VP, carefully hide the tails of the threads inside. We tie all 4 arches from VP with a chain (you can use a regular knot). We get a clearly defined butterfly. To decorate a butterfly, its larger wing can be tied with a picot. Ready!
A selection of border knitting patterns for your creative inspiration


Video master classes on the topic “Crocheting borders”
For those who find it more convenient to work with video tutorials, we provide detailed master classes on knitting all kinds of borders:
Knitted items will have a finished look and look even more beautiful if its edges are decorated with decorative binding. Edge binding, which is done with crochet, is used to beautifully design necklines, armholes, collars, jacket sides, cuffs, and the bottom of the product. In order to strengthen and weight ruffles and flounces, edge binding is also used. In this article, to help knitters, we have selected patterns for decorating borders of various types of products.
Be original! Use different patterns to achieve the most amazing results in your projects!
Trying to use the Rachy step in crocheting the edge
The most popular of the harnesses is the “crawfish step” pattern. In the photo below you see what the edge of the product looks like, decorated with this binding.

This crocheting of the edge of the product is done from left to right. Insert the hook into the outermost loop of the previous row, grab a new thread and pull out the loop. Next we knit 1 air lifting loop. Then we insert the hook into the loop that is to the right of it, grab the thread and pull out a new loop. Now there are 2 loops on the hook, as if twisted together. We grab the thread again and knit these two loops together. Then we repeat the same steps again. More details in the video tutorial.
In boutiques we are so often impressed by the lace dresses made from thin threads in the windows! But few people know that such dresses, and even better, can be crocheted in one or two evenings even by an inexperienced craftswoman!
Openwork binding for beginner craftswomen using patterns
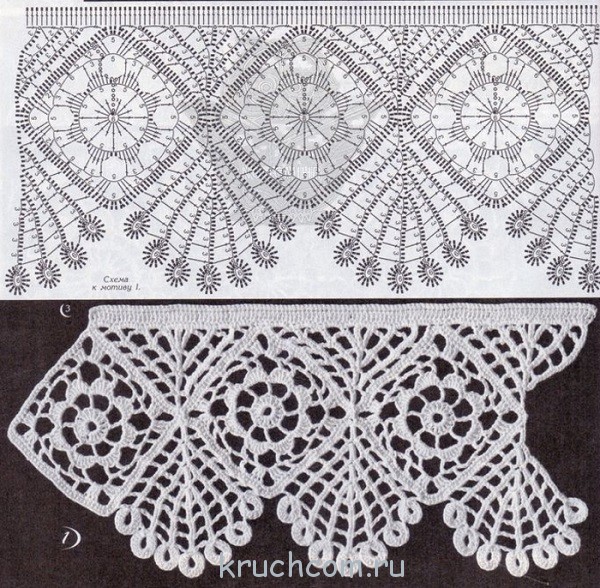
Towels and handkerchiefs, the edges of which are crocheted by yourself, look very beautiful and original. For this design of the edges of the product, openwork crocheting of the edge is used (diagram below).

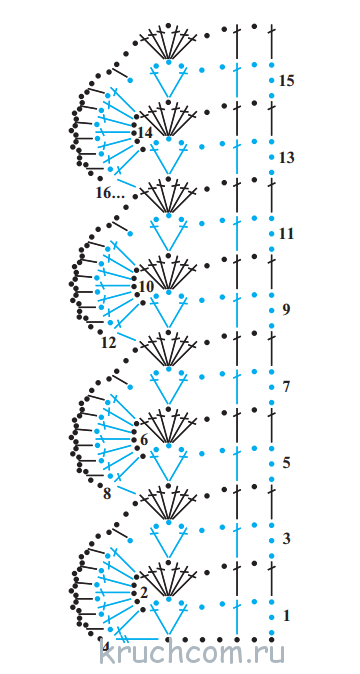
Description of the sequence of performing openwork binding.
From * to * - repetition of the motive.
1 row. Knit all the loops with a b/n stitch.
2nd row. 3 vp rise, * s/n, chain of 2 vp, s/n, chain of 7 vp, skip 1 loop of the previous row. Along the corners of the product to be tied, between double crochets, knit a chain of 13 chain stitches. The last chain of 7 v.p. connect to the first s/n.
3rd row. *1 tbsp. b/n knit in a chain of 2 loops of the previous row, chain of 4 vp, art. b/n in the middle of a chain of 7 vp, a chain of 4 vp* In the corners, knit in the middle of a chain of 13 vp. 2 tbsp. b/n. Between the non-woven posts in the corners, knit 3 chains of 5 loops.
4 row. Knit as row 2.
5 row. From * to * knit as row 3. In the corners knit 3 chains of 6 chains each.
6th row. From * to * knit as row 2. In the corners between the double crochets, knit a chain of 15 chain stitches.
7th row. From * to * knit as row 3. In the corners - 3 chains of 7 chains each.
8 row. 3 v.p. rise, * s/n, chain of 2 ch, * In the corners between double crochets, knit a chain of 17 ch.
9 row. Chains of 8 v.p. knit like this: 4 tbsp, picot, 4 tbsp, picot, 3 tbsp, picot, 3 tbsp. b/n.
You can see the result you should get in the photo.

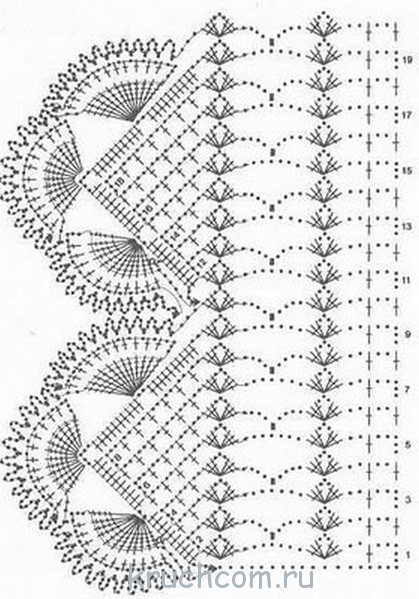
We create our own stylish decoration for a shawl
is a piece of women’s wardrobe that is loved, honored and passed on from generation to generation. She is able to decorate and complement a woman’s outfit. Shawls decorated with arched air loops look great. Even a novice craftswoman can knit this type of binding. In the photo you can see the binding diagram and a photograph of the shawl itself.


The highlight of the shawl can be a fringe made of long threads. But this is a matter of your taste.
A simple and convenient cap with a detailed description of the process
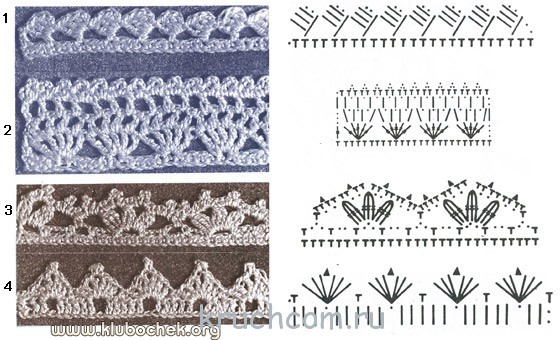
They look more fun and original if their lower edge is decorated with a type of binding such as scallops. Looking at the following photos, you will be convinced that festoons add special charm and attractiveness to women's hats.


Decorating the edge of a hat in the form of festoons is not at all difficult. We bring to your attention a variant of such binding “Lacy Scallops”.
Knitting sequence for beginners in needlework
Cast on the number of loops in multiples of 6. Knit in the round.
1 row. Columns b/n.
2nd row. *1 tbsp. b/n, skip 2 base loops, 4 s/n in the next loop of the previous row (knit 2 ch between the columns), skip 2 base loops.*
Continue the pattern from * to *. Finish the row with a connecting loop.


This concludes our master class for beginners, and you can find video tutorials below. We wish you success and inspiration.
Video lessons for beginners
Neck:
As you can see, not everything is so complicated, the main thing is to approach the knitting process with diligence. In addition, step-by-step master classes can come to your aid, which tell in detail and show what, how and where to knit, for example, our article. Be patient and forward to the feat!
Such a useful hobby as hand knitting still retains its popularity. For centuries it has been used for the manufacture of vital interior items and clothing. Today, its role is reduced to creative self-expression and a kind of therapy.
What's good about a hook?
Crocheting has many advantages over knitting. Among the most obvious are:
- There is only one working loop.
- The ability to change the direction of knitting at your discretion.
- The widest selection of patterns that are easy to perform.
- The ability to perform additions and reductions of loops, thanks to which you can obtain fabrics of a wide variety of shapes and configurations.
That is why knitted toys, summer openwork items, clothes for animals and other similar products are much easier to make using a crochet hook.
Why do you need to tie the edge?
Knowledge of the basic principles of crochet will be useful even for the most ardent adherents of knitting needles. Tying (patterns for such work are very easy to find) is useful for decorating a wide variety of items:
- Caps.
- Blouses, sweaters and cardigans.
- Plaids and knitted blankets.
- Napkins and towels (both knitted and textile).
All open edges of the product require strapping. Some models provide for the creation of strips, edges or other types of edge design during the knitting process.
This method has its advantages: the binding forms a single whole with the fabric, there are no sharp transitions, and you don’t have to worry about the accuracy of its implementation and the coincidence of the density parameters. However, if with the help of tying they plan to adjust the dimensions of the product, use a different color or texture of yarn, as well as a specific pattern, then the only way out is to crochet the edge of the product. Schemes and examples of finished harnesses are located below.
Corner strapping
Openwork corner design is the most popular type of binding. corners of products has its own pattern: mandatory expansion of the canvas at an angle of 45 degrees. Comparing two such angles gives a right angle (90 degrees). This principle must be taken into account if you have to independently develop a scheme for tying them. For example, if you liked the pattern, but the angle formation diagram is not shown.
If everything is found, then all that remains is to follow the instructions. Below is a crocheting pattern based on the principle of circular expansion of the fabric.

The center of the “circle” is a picot of three air loops (VP), into which five fluffy stitches are knitted. Successive expansion creates a rounded corner.
The pattern is universal in that, if desired, it can be continued further, observing the rules of expansion and formation of corners.
Cross-tied harness
We can also offer the old method of making vintage bindings from cotton or linen. They were used for decoration:
- towels,
- Rushnikov,
- paths,
- pillowcases,
- tablecloths,
- curtains,
- blankets and other decorative textile and knitted items.

This crochet pattern is not very suitable for clothing, unless you plan to make something in a folk style.
How does this happen
They start knitting with a set of air loops, the number of which corresponds to the height of the future binding, and knit according to the pattern, increasing the fabric until its height on the side is equal to the length of the edge that needs tying. Then the finished binding is sewn with an “overlay” seam to the edge of the product.

A characteristic feature of this type of binding is the formation of a pattern by combining empty and filled square cells. Empty cells are two double crochets (DC), between which there are two VPs. Filled cells are two CCHs, between which there are also two CCHs. The following crochet pattern perfectly illustrates this description: filled cells are indicated with crosses.
Tying a knitted product
Separately, it is worth mentioning the process of crocheting knitted items. This is done for several purposes:
- achieving a neat edge;
- if desired, decorate the edge with an openwork pattern;
- when knitting button straps;
- if necessary, change the dimensions of the product (increase the length or width).
The process begins after the main work is completed, all the parts are connected and sewn. The best way to prepare a product for tying is to steam it with an iron or wash it in warm water. This way you can see the actual dimensions of the product.
Then perform the first row of binding, which always consists of single crochets (SC)! Here you have to strain your spatial imagination, since the “loop to loop” principle is irrelevant, especially when working with the side edge of the product. You need to select the number of strapping loops “by eye”.
An insufficient amount will cause the fabric to tighten, and an excessive amount will result in a ruffle effect. Therefore, experienced knitters recommend making a trial sample of the binding on a fragment of the product at least 15 cm long (for an objective assessment of the result).

Binding of woven fabric
If you need to decorate a textile napkin, kitchen or bath towel, tablecloth or clothing, you can use two types of bindings.
- A binding tied directly onto the fabric. To form its first row, a thin hook is used, which is threaded between the threads of the fabric. You can also use it on which you then crochet the fabric (as in the photo below). The disadvantage of this method is the difficulty of calculating the required number of loops.
- Knit the border separately and then sew it to the product. This crochet pattern is much simpler than the previous one and has the advantage: it is easier to regulate and adjust the size of the crochet in time. However, you have to deal with sewing on the border, and the seams can look rough.
Tying diagrams and photos
When making a blanket or bedspread, one of the required stages of work is tying.
Its implementation begins when the product is completely ready. Crocheting products (diagrams are located below) can consist of knitting basic scs or decorating a blanket with a more interesting border.

In the first case, a right angle is formed by knitting three sc from one corner sc, in the second - by following the expansion rules described above.
Knowing the basic principles and knowing, even at an elementary level, crochet techniques, you can quickly and accurately decorate the edge of any product.
A hook is an indispensable assistant for every needlewoman. Using this simple tool, you can transform boring items or create new, unique wardrobe pieces. Crochet neckbands are especially in demand today. We bring to your attention schemes for such work.
The simplest single crochets and double crochets, as well as air loops that form neat picot knots - all these techniques are accessible even to a novice master. Using them, you can strengthen the stretched or unfinished neck of any knitted item. And if there is a stitching, this finishing technique is quite applicable for knitted items. So let's get started!
Methods for finishing a finished product using a hook
How to crochet a neckline? The answer to this question depends on your level of experience and ability to handle handmade tools. For beginning craftsmen, the easiest option would be to tie the edge with simple single crochet stitches.
To ensure that your work is as neat as possible, you need to practice using thick threads to simplify the task. To begin with, it is enough to cast on a chain of 10-20 loops, and then knit several rows with single crochets. Move from right to left. Having started work, instead of the first double crochet we knit an air loop - and so on for each row.
The hook is threaded under the upper bow of the 3rd air loop, grabs the thread and pulls it out. You end up with 2 loops that need to be knitted. After 1 loop has formed on the hook, we thread it into the next bow - and so on until the end of the row. Having completed the row, we unfold the work and repeat everything from the beginning. To perform a job such as simple crocheting a neckline, patterns are practically not needed; the slightest handicraft experience is enough.

As a result, you should get a smooth, beautiful canvas.

After completing the sample, having decided on the width of the neck “edging” you need, you can begin tying the finished product. Carefully insert the hook in the area of the shoulder seam, use it to hook the thread, and pull it through the knitted fabric. Fasten the tip from the wrong side.
After this, carefully pry up the threads running along the edge of the neck of the product, using them as air loops in the sample. Work your way around the circle, spacing single crochets evenly along the entire edge of the piece. This is how the neck is crocheted. If you wish, you can design the armholes in the same way.

Rachy step
This option for finishing the edge of the finished product is one of the most favorite among craftswomen. It combines simplicity of execution and impressive results.

To work, you need a thread whose length is 10 times the diameter of the neck. About 15 additional centimeters are left to seal the edge. The main feature of this knitting is the direction of work: they start on the left and move to the right.
To begin, fasten the thread at the shoulder seam and make a lifting loop. Insert the hook under the top bow of the loops running along the edge of the neckline, from front to back. Grab the thread you are using and pull it out.
The resulting 2 loops need to be knitted together. When there is 1 loop left on the hook, repeat the process described above - and so on until the end of the neck.
There are several options for performing the crayfish step.


Using a combination of single crochets and picots
To obtain a more complex and beautiful finish of the finished product, you can complement a simple knitting with an original element - picot, representing 3 air loops connected by a single crochet (knitted into the first air loop). By alternating 2-3-4 columns and such “knots”, you will get a simple and at the same time interesting pattern!

You can also alternately knit 2 double crochets and 2 chain stitches. Alternate them throughout the entire 1st row. Then expand the work. In the second row, place the columns under the arches formed by the air loops. The final stage is knitting single crochets into the bows, between which picot knots are located.

Another equally interesting option is pico “coins”. To create them, you need to knit 3 chain stitches, then alternately knit 2 double crochets into the first loop of the resulting chain. Completion - 3 more air loops. They are secured with a connecting loop at the base (“tied” into the beginning of the double crochets). This neck crochet pattern, the diagrams of which are presented below, will surely appeal to you!

Shells
When knitting a row of non-woven stitches, alternate them with air loops (1-2 loops every 3-4 stitches). In the second row, several double crochets can be knitted into these “holes”. You will get original “fan” shells.