Beautiful hairstyles for medium hair waterfall. French waterfall hairstyle. Video tutorial on how to weave for yourself step by step instructions
If you want to master a unique hairstyle that you can do yourself, try the French Falls. The hairstyle is good for long, medium or even short hair. In addition to the classic version, we will look in detail at how to make different types of hairstyles - double waterfall, with a ribbon, with a bun, with a twist, with an openwork flower.
Features, history of appearance
Braids have always been popular, but a regular one looks too simple. Braid using the French Falls technique – romantic and feminine hairstyle. It looks good as an everyday option, but is also suitable for special occasions.
At the same time, the “French Waterfall” is easy to make, so you can make it yourself. Pigtail Looks good on hair that is curly, shoulder length and below.
If you have them straight by nature, they can be slightly curled. Braided braids attract attention, especially in the warm season.
There are two versions of the origin of such an interesting name. According to the first, the hairstyle received its romantic name from the Gavarnie waterfall, which is located in France, on the Iberian Peninsula. Its height is approximately 420 meters, and is located on the northern mountain slopes, the height of which reaches 1400 meters.
Perhaps the contemplation of the waterfall really inspired the stylists to create their hairstyles. The long, slightly curly locks are very similar to him.
According to the second version of origin, the name comes from the French braid. This version looks more pragmatic in contrast to the previous one.
Before we begin, let's make a list of everything we need for weaving:
- Two combs - a massage comb and a regular one, which are needed to carefully separate additional strands.
- Invisible elastic band.
Step-by-step instructions for weaving the classic version
- Comb your hair thoroughly so that it is smooth at the base and free of tangles. Coarse or curly hair should be waxed at the roots to ensure it lies flat.
- Separate a strand from the front of your head. To make the braid thicker, take a larger strand.
- Start making a very ordinary braid, first let the top part go to the center, then the bottom. Weave this way for 5-6 centimeters, moving towards the center of the head.
- Then the top strand, which in the classic version should be inserted into the braid, remains free, and a new one is taken from under it to be inserted into the braid.
- This is how styling works using this technique: you let go of the curls, replacing them with new ones.
- Once you've finished your braid, secure it with an elastic band. An option is possible when you continue a simple spikelet to the end.
- At the end, you can curl and fix your hair with hairspray - this way it will look most advantageous.
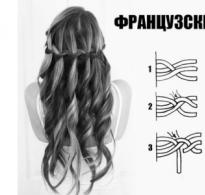
This photo shows a diagram of weaving the “French Falls” hairstyle:

To learn how to weave a French Falls hairstyle, watch this video:
There are many varieties of the French Falls technique.: double, with ribbon, with bun, with twist. Once you master the technique of performing the basic version, you can choose other interesting types.
Double
- First, braid one waterfall braid, starting from one edge, and end it with a regular spikelet.
- From the same edge, braid another one, using the curls already released from the first braid. Try to keep the weaving symmetrical.
- Connect the braids.
- Gather the remaining curls to the end of both braids and secure them with a ribbon or a beautiful hairpin.

You can braid more than two diagonal braids, it will look very interesting.
How to braid an interesting double, triple or with a large number of braids waterfall, watch the video:
With ribbon
Ribbon can create contrast with hair or match the color of clothing or eyes.
To create this hairstyle, tie a ribbon to the middle strand at the very beginning of the braiding. Hide the short end of the ribbon in a braid. Make sure that the ribbon and strand on the right are at the top, and the strand on the left and the ribbon are at the bottom.

With a bun
The execution is no different from the classic one, except that you braid on one side, and then put your hair in a bun. Start doing everything as usual. When you reach your ear, secure the last strand with the remaining hair with an elastic band.
The remaining curls that were passed through the weave must be secured above the tail with bobby pins. Then you need comb your tail to make the future bun look more voluminous. Secure your hair into a bun using hairpins.

With twisting
This variety can be adapted for a celebration or for every day. To make your look more romantic, you can use ribbon, which needs to be braided or curled. You can add small accessories - they will attract additional attention.

- To create this variety, take a wide strand above your ear and divide it into two equal parts. The upper and lower ones need to be crossed so that the upper one (1) goes under the lower one (2).
- Separate another new curl from the top (3), and then pass it between the top (1) and bottom (2) strands. In this case, number 3 goes above 2 and below 1.
- Then you need to twist numbers 1 and 2.
- In your hairstyle, you always need to separate new strands that you pass through the main strands 1 and 2.
- Take strand 4 from above and pass it again over 1 and under 2.
- Twist numbers 1 and 2.
- Continue until the end and then secure the tip with a bobby pin.
In the form of an openwork flower
Create a classic waterfall braid, ending with a regular braid. In a regular braid, let out some braided strands on one side to make it look fuller.
From the end of the spikelet to its base, twist it in the shape of a spiral into a flower, which must be secured with hairpins.

Back
The braiding pattern for the “Reverse French Waterfall” hairstyle is in the following video tutorial:
Braiding on short and medium hair
On short hair, the French waterfall can also be braided, the only feature is you will need mousse or gel, which will give additional hold to unruly short hair so that it does not fall out of the braid.

Suitable for this hairstyle on medium hair haircut with an even cut without graduation or cascade. With a medium length, “French Falls” looks good both as an everyday option and for a holiday.

Falling strands can be gathered into a bun for a more formal look. As you can see, there is no less room for imagination than with a length below the shoulders.
- Master the technique of weaving a simple French braid, and then proceed to the more complex technique of the French Falls. This will significantly speed up the development of technology.
- Start by learning from others, and then practice on yourself - this makes it easier to master the technique.
- Freshly washed hair will fall apart and become magnetic, so it needs to be “glued” with gel or mousse.
If the French Falls weaving technique doesn’t work out the first time, practice. To make such braids requires certain skills and patience.
Try it and you are guaranteed success. Once you get the hang of it, you will be able to create a variety of hairstyles for every day and for holidays.
Everything ingenious is still incredibly simple. Why do complex, bulky hairstyles with tricky weaves, fixing the hair with an impressive amount of varnish? And then sit and soften your hair in a hot bath, trying to comb it with minimal loss? What if you don’t have time for complex styling, but still want to look well-groomed and feminine?
You won’t impress anyone outright with simple braids, and you always want to contrast the usual standards with something new, fresh and contrasting. Today we will weave a chic, delicate, romantic hairstyle with an intriguing name.
French Falls
But you wouldn’t immediately guess that this is the name of the hairstyle! If you have never heard of it before, then most likely a picturesque picture of a tall, seething waterfall crashing on rocks has appeared in your thoughts. The echoing sound of falling water and millions of splashes shimmering in the sun like mother-of-pearl sparkles will play in your imagination. Of course, all this happens in France.
And your imagination will not deceive you, but will lead you to the roots, to the very origins of the French waterfall - one of the most sophisticated hairstyles of our time.

Let's dive into history
As a beautiful legend says, it all started with a real French waterfall called Gavarnie. Its height is just under 500 meters, and the waterfall itself is located 1400 meters above sea level. It is generally accepted that the beauty of Gavarnie became the source of inspiration for the creators of such a stunning hairstyle.
However, there is a less beautiful legend that claims that there is nothing in common between the splendor of natural beauty and hairdressing. Some are of the opinion that they started braiding this way for a change, in order to somehow refresh the usual image of braided hair. Why exactly “waterfall”? Because of the beautiful curls falling from under the braid, their structure resembles this waterfall.

No matter how romantic or, on the contrary, modest, the origins of the hair discussed today were, the result was simply stunning.
Watch the video on how to do such hairstyles at the end of our article.
Tricks of weaving a French waterfall
This hairstyle doesn't look too simple to the point of being boring, but it doesn't look too complicated to the point of being too complicated to pull off. Everything is in moderation here, and this masterpiece looks more than harmonious.
The most ideal option for creating a French waterfall hairstyle is. And the lighter the hair, the more clearly the unusually beautiful, openwork pattern of intertwining curls will be visible on it.

French Falls - the personification of exquisite simplicity
In appearance, the French waterfall hairstyle resembles a regular braid, braided at the back of the head diagonally or perpendicular to the neck line. The beauty of this hair lies in the curls falling freely from under the braid, often wavy, because it is with wavy hair that one can most advantageously emphasize all its beauty.
The weaving technique actually only looks complicated. After the first time, you will understand that the ease of performing this elegant hairstyle exceeds all expectations. Without requiring a lot of time and effort for styling, and, nevertheless, perfectly maintaining its original beauty throughout the day or evening, the French waterfall quickly won the hearts of millions of fashionistas and deservedly soared to the pedestal.

Let's start weaving one of the most feminine hairstyles of our time
The French waterfall begins with a side parting from the very forehead to the very back of the head. After the parting is ready, we begin to weave the base of the hairstyle. We divide the hair into three strands of equal volume (starting from the forehead, respectively, we braid from front to back) and begin to weave a regular braid, BUT! Take your time! A regular braid will only extend to the ear. Next, the hairstyle itself begins.
And there is one highlight here that gives this hair sophistication, femininity and sophistication.
If we forget or miss this important detail, we will end up with a simple side braid and not a French waterfall. For a waterfall, each time you need to let each lower strand of the braid “free float” and take a new part of hair next to the bottom, equal in volume to all the others, and weave it in. Because after we let go of the bottom strand, we only have two left to weave.

And we let go of the hair that we take from above. It turns out that the waves of our “waterfall” descend from the very top of the head, are woven into the braid and freely go down again. And thus we continue and continue to do our hair downwards and diagonally until we reach the second ear. We secure our waterfall behind the earlobe using hairpins or a thin, not bulky hairpin with a beautiful flower.
The standard French waterfall is ready! You can be sure that now admiring glances will accompany you everywhere.
Varieties of hairstyles
As soon as you get the hang of it and start weaving this unusual braid confidently and easily, you can use your imagination and start improvising.
Another popular type of French waterfall is symmetrical weaving on both sides. The difference is, in principle, small.
We weave a regular braid in the same way from the temporal part of the head, and above the ear the braid continues with the release of the strands to create a waterfall. This time we weave not from top to bottom, not from one ear to the other, but exactly perpendicular to the back of the head. Having reached the middle, we secure part of the hair with hairpins or bobby pins and move on to the next part. We do the same on the other side of the head, we reach the middle of the back of the head and carefully connect the two halves of the hairstyle. Alternatively, after connecting the two parts, you can continue to braid a regular braid down, or you can simply leave it free-falling.

There is an option to weave a double and even triple braid, modeled on a French waterfall. Everything is done very simply. We braid a standard French waterfall (from ear to ear, top to bottom), and weave the curls hanging down into another exactly the same braid parallel to the first. The second braid, accordingly, will be located slightly lower, since there should be a gap between them. There can be any number of such braids. You can make the top braid thicker and the lower braids a little thinner, or alternate more voluminous ones with thinner ones. A matter of taste.
A loose bun also goes equally chic with a French waterfall. This hairstyle will certainly turn out elegant and romantic. The basis is a standard form, as in the previous case. We braid an ordinary French waterfall, and upon completion, we collect all the hair hanging down into a light, loose, voluminous bun at the end of the resulting braid, that is, behind the ear. No need to tighten your hair! Let them hang at the back of your head, easily bending and smoothly turning into a bun.
The trend of 2016 is natural beauty, and to emphasize it, it is enough to make a beautiful and original hairstyle.
Standard braids are no longer so relevant these days. Now stylists offer more interesting options, the basic basis of which is openwork weaving. These include waterfall hairstyle.
Waterfall hairstyle: how to weave?
Hairstyle waterfall It is performed on the basis of a French braid (you can watch how to weave it in any video lesson) and can have several options. Its main feature is the flowing strands, which add a special charm to the whole look.

Step-by-step instructions with video
- Hair should be combed well using a comb or wooden comb. They should be smooth, only in this case they will be evenly divided into several strands. In order to hairstyle waterfall lasted for a long time, it is necessary to use styling products - varnish or foam mousse.
- After the hair is completely prepared for braiding, it is necessary to separate the hair at the temple and divide it into three equal parts. Weaving begins in the standard technique, but only the lower strands should be released from the main weave. In place of the released strand, a new one is taken from the top and so on throughout the head.

- To securely fix the hair, you will need to grab a strand above the ear. Moving along the head, releasing the strands, you need to get to the next ear. You can secure the remaining strand using a small silicone rubber band.
- Now the weaving is repeated on the other side.
- After the free hair runs out and you reach the second braid, as can be seen in the step-by-step photo, the elastic band will need to be removed and the two braids connected together. Fasten them together so that the joint is invisible. Then hairstyle waterfall it will look just perfect.
- If you want to get a voluminous braid, you can stretch out the braided strands a little.
This type of weaving can be done in two rows. Looks impressive hairstyle waterfall with a bun.
Waterfall hairstyle: decorate with accessories
The French Falls hairstyle can be decorated in a variety of ways. It all depends on the occasion for which it is created.

- For an everyday option, a hairstyle with straight curls is suitable. If you have naturally curly hair and want to change up the style a little, use a straightening iron. As a decoration, you can use a small clip in the shape of a living flower or a small crab with rhinestones.
- For special occasions, a “waterfall” with curls is suitable. To do this, you can use a curling iron or large curlers. You can decorate this hairstyle with bright ribbons, voluminous flowers, clips, and rhinestones.
- If you're going on a date or for a romantic dinner, " French waterfall hairstyle can be made from an openwork braid.

Waterfall hairstyle: photos of beautiful wedding, evening and everyday looks
We figured out how to make a waterfall hairstyle (photo above). Now it’s time to watch a video lesson in which the whole weaving technique is more clear.
Also in the photo gallery you can see several braiding options for curly and straight hair.


A waterfall is a braid with flowing curls; individual strands passing through the braid remain hanging freely.
This hairstyle can be done by a model or by yourself, which allows you to experiment with a large number of options.
An important advantage: it is suitable for any hair length, so both beauties with short curls and long-haired owners of locks can surprise and inspire.
The waterfall is woven from 2 or 3 strands.
A waterfall is a braid with flowing curls; individual strands passing through the braid remain hanging freely. This hairstyle can be done by a model or by yourself, which allows you to experiment with a large number of options.
Attention! Important advantage: it will suit any hair length, so both beauties with short curls and those with long hair will be able to surprise and inspire.
The waterfall is woven from 2 or 3 strands, the number of levels depends only on the desire of the model and the length of the curls. Look at the photos of examples of various weaving waterfalls.
Hairstyle options from waterfalls
- around the head from temple to temple;
- from the temple down and finish with a braid or bun;
- on 2 sides it begins and ends with a tail on the top of the head;
- as an option for decorating hairstyles (bun, braids, ponytails).
Disadvantages: this kind of weaving is easy to do on your own on the front and side areas, but the back of the head requires more time to practice and your hands may hurt when you weave for quite a long time. Once you finish and lower your arms, the pain will stop almost immediately.
What is needed to create a waterfall hairstyle?
On the model
- When the waterfall consists of 1 branch of weaving, you will need 1 elastic band or hairpin.
- Water to moisturize hair when it gets frizzy.
- Comb.
To myself
- Mirrors 1-2, depending on the placement of the weaving.
- An elastic band or hairpin to secure the hairstyle.
- Comb.
What is the main secret of braiding - a waterfall?
Waterfall braid schemes
Classic
We present 2 classic waterfall schemes; they are the basis for creating other options.

braid pattern - waterfall of 3 strands

diagram of a waterfall braid of 2 strands (plait)
Unusual waterfall options
- waterfall with rings;
- darning in several tiers;
- various node options.
How to braid a waterfall braid (video in Russian)?
This hairstyle is a variation of the French braid, in which the lower strands are left free rather than braided. In this case, it seems that the hanging strands are enclosed in a kind of hair net.
One of the common variations of this hairstyle is the classic waterfall around the head. They weave it on both sides or on one - both methods look very impressive.

On the model
A video tutorial teaching how to braid a waterfall in Russian on a mannequin for reference, it will be especially useful for beginners
Option for a waterfall around the head from temple to temple
An educational video tutorial will help beginners understand and master the weaving technique in the case where 1 braid:
Loose hair:
- curled into curls;
- braided in small braids;
- left loose;
- collected in beautiful bunches.
The finished hairstyle is decorated with combs, hairpins or artificial flowers.
How to braid a waterfall braid for yourself (video)?
To perform complex weaving yourself, you need to practice and learn how to do the work in stages.
A large mirror or trellis will help in the work - everything is visible from three sides, this greatly simplifies the work. If there is no such 3rd mirror, use two mirrors placed opposite each other.
It’s easier to make a waterfall yourself, starting from two sides:

Advice: Do this hairstyle on hair that has been washed the day before or treated with a fixative - it slips less and holds the braid better.
A comb with a long thin tail will help with the work - it can easily separate even and neat strands. If your hair is very thin and thin, lightly backcomb the strands that will be braided and leave the free parts of the waterfall smooth.
For short and medium length hair
The video will help you braid a waterfall on your hair yourself, and step-by-step actions will make the learning process easier for you
To myself on long curls
Step-by-step explanations in the video will help you figure out how to properly hold your hands and fingers or braid a braid - a waterfall
The waterfall turns into a spit
How to complete a waterfall? A tail, a neat stream, or maybe a scythe?

The transition of a waterfall into a French braid is one of the most convenient and practical options. Repeat each step in the video and in 8 minutes you will have a spectacular and practical hairstyle done yourself.
How to braid a waterfall braid with 2 strands (diagram)?
The original version of a waterfall is a braid of their flagella. As a result of this weaving, an interesting hairstyle is obtained, in which the loose strands seem to be enclosed in a frame of two flagella. For all its external complexity, this hairstyle is done quite simply.
On the model

If someone's hair is being done, braiding takes literally a few minutes. In this case, a more complex option looks more interesting, in which the weaving is done in several rows. The finished hairstyle resembles an original basket or net of hair with spectacular loose strands.
- Start creating your hairstyle by combing your hair.
- They are treated with a fixative.
- Separate two thin strands and cross them.
- A wider strand is selected from the main mass of hair and passed between crossed thin flagella.
- Thin flagella cross again. A wide strand is fixed between thin, as if crossed out crossbars of hair.
- The next wide strand is separated, equal in width to the previous one.
- It is passed between thin flagella, which cross again.
- The operation is repeated until the desired result is achieved.
- The remaining strand is secured with a thin elastic band, which is hidden under the hair or covered with a hairpin.
- They complicate the weaving by sequentially performing the same operations in the opposite direction.
- A beautiful hairstyle combines a multi-row waterfall of flagella in combination with curled free ends of the hair or curls laid in a lush bun.
We weave a waterfall from 2 strands on our own

It’s not difficult to make a weave of flagella, several options are used: start above one ear and weave diagonally, braid a waterfall horizontally around the entire circumference of the head, or do a combined weave.
- Comb and smooth hair well.
- Begin weaving on one side, separating the strands high above the ear.
- They make weaving from flagella, intertwining wide strands with thin ones, gradually going down diagonally.
- Repeat the braiding on the same side, opening the ear and creating an asymmetrical hairstyle.
- Complete the weaving at the back of the head.
- The remaining free hair is curled into tight curls.
- The result is an original asymmetrical hairstyle that combines braiding and curling.
How to braid a waterfall braid with step-by-step photos?
It's easy to learn weaving using step-by-step photos. They help you understand the sequence of work. It’s good to practice difficult stages of work on a friend, which would be difficult to do on yourself. This is how complex types of weaving are performed, for example, a double spikelet that looks like a crown of hair. This hairstyle looks impressive on holidays, for example, at prom.
On the model
- Comb your hair until smooth.
- Treat with fixation spray.
- Take three strands as for braiding a regular braid.
- Weave a waterfall braid high on the top of the head, pulling the strands tightly.
- Braid the second row under the first, stepping back a few centimeters and starting from the opposite side.
- Arrange loose hair in curls.
To myself
- Comb your hair and spray with styling product.
- Separate the bangs and pin them up.
- Separate three strands high on the crown and begin braiding.
- Weave a waterfall, going down and to the side. You should get a crescent from the braid.
- Secure the last loose strand with a hairpin.
How to braid a waterfall braid on your own medium hair (video)?
With the help of a waterfall braid, not only long curls, but also medium-length hair are beautifully shaped. This hairstyle with a low waterfall braid looks especially impressive. The hair for the hairstyle must first be curled with curlers or a curling iron.
- If the hairstyle has bangs, it is separated and secured with a hairpin.
- Weaving begins above the ear, highlighting three starting strands.
- Braid the waterfall, making even strands.
- The direction of weaving leads first down to the base of the neck, and then smoothly rising up to the ear. You should get a neat crescent.
- Secure the remaining strand with an elastic band and hide it in your hair.
Knots waterfalls
Option 2 of a waterfall using bobby pins
4 strand waterfall
The triple waterfall hairstyle requires knowledge of how to tie a beautiful ponytail without a rooster. All instructions with the necessary videos and photos are waiting for you in this
Waterfall braid for princesses

Having mastered how to weave a waterfall braid from 2 strands, you can easily turn it into a festive princess hairstyle. If desired, add a tiara, tiara or crown to the top of the head. Thanks to the cords on the sides, it will be held in place perfectly.
- Braid the waterfall braid on both sides using 2 strands. To do this, separate a thin strand and divide it into 3 parts.
- We pick up one (upper) of the 3 strands and pass it between the other 2 (lower) ones, after which we cross the strands to form a tourniquet. Repeat the steps: pick up, skip, twist and repeat with each step.
- Repeat this until you reach the middle of the head, where the parting goes.
- To temporarily protect the strand from unraveling, braid it in a French braid or tie it with an elastic band.
- Do the same on the second side; when the weaving is finished, you should have 2 strands left in your hands.
- Unravel the braid on the right while continuing to hold 2 strands from the left braid in your left hand.
- You have 4 strands in your hands, 2 from the right and 2 from the left. We put the middle ones on top of each other and get 3 strands.
- We make a French braid of 3 strands, adding strands from the waterfall, moving from the nearest strands to the farther ones. We shift the outer strands to the central one, pick up the thin closest strand on the right and add it to the central one.
- We transfer the left strand to the central one, picking up a thin strand on the left.
- We repeat this until the free curls of the waterfall run out.
- Tie the ends of the braid with a small elastic band to match your hair or gather all your hair into one ponytail.
- If you want to make this waterfall more voluminous, curl the remaining curls with curlers or using rags.
This video will help you learn how to weave a waterfall braid from 2 strands and add a braid to it to get a hairstyle for princesses
Useful video master classes on various waterfall options
Crossing harnesses
For straight hair
Hair rings
Prepare your hair for braiding; the entire hairstyle will take you no more than 90 seconds. You will need: wax and a product to prevent your hair from becoming frizzy and electrified.
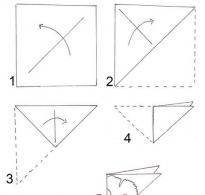
- Comb your hair and part it evenly.
- Separate a section of hair from the parting to the ear. You should end up with a rectangle with one side parted.
- Separate a strand in the area above the ear. Then treat the separated strand with wax or silk, lightly rubbing it on your fingers.
- Make a ring from the strand using 2 fingers, winding the strand around them. At the same time, hold it in the place where the loop meets the long end so that the ring does not fall apart. The curl is on the index and middle fingers, and the thumb holds the tip.
- I grab the next strand with 2 fingers that are in the loop. Don't forget to wax. Pull the loop through the resulting ring not all the way, but make sure that the end of the first link is under the rings on the inside.
- We do this until the end of the row, the length you want, if some link is stretched, don’t worry, you can easily fix it by pulling the end. This weaving is somewhat reminiscent of crocheting.
- To finish the weaving, pull the end out of the last loop and secure the last link with a bobby pin, inserting it into the place from the ear and parallel to the horizon, but so that it is almost invisible in the hairstyle. Cover the attachment point with a strand of hair.
- Adjust the rings so they are the same size. Secure the first ring with 2 bobby pins.
To prevent the loops from falling apart, give the end of the first link to the girl and let her hold it. Lightly wax each strand.
A visual video on creating hair rings in the shape of a waterfall:
In which hairstyles can I use the ability to braid a waterfall braid?
French braid waterfall cross to cross weave to ourselves
Lace braid from a waterfall to yourself
Triple Falls
Hairstyles resulting from waterfall braids are distinguished by their variety and versatility. They allow you to create everyday and evening hairstyles for girls and women of all ages for long hair and medium-length curls.
Recently, braids braided in a variety of ways have become very popular. One of the most common and popular types of weaving is the French waterfall hairstyle. This styling is suitable for any female with medium to long hair. The French waterfall looks especially impressive and mysterious on curly hair with highlights, thanks to the visual increase in volume.
Classic waterfall technique: step-by-step instructions and weaving diagram
There are different ways to braid hair. The technology for creating a French waterfall hairstyle allows you to create a beautiful hairstyle at home, as in the photo. Therefore, you need to have a good idea of how to do this hairstyle yourself. To do this, we present you with step-by-step instructions and a detailed weaving pattern. 
- Before you start braiding, you need to comb your hair well with a thick comb, and then separate it with a side parting.
- From the convenient side, you need to separate a strand of hair from your face and, dividing it into three parts, begin to braid a regular braid.
- If you have bangs, you need to start with them. Weave the braid horizontally along the head to the ear.
- Next, you need to release one lower strand, and take a curl of loose hair in its place.
- A new lock of hair can be taken from both the bottom and the top of the braid.
- The released strand will be the first “jet”.
- Next, weaving continues by analogy.
- The more strands released, the richer the “waterfall” will be.
- The end of the braid must be secured with an elastic band or hairpins.
 Detailed weaving instructions can be seen in the photo and diagram. The waterfall hairstyle has an elegant look and a gentle look.
French waterfall hairstyle - photo with a bun
The elastic band should not be too tight so as not to pull the hair. To achieve a more voluminous bun, the edges of the hair can be combed or twisted into large curls.  The French waterfall bun starts off just like the classic braid pattern. The weaving process is similar. At the end of the braid, all the hair should be gathered into a ponytail.


French Falls: hairstyle with photo
Having mastered the technique of weaving the classic French waterfall braid, you can easily create hairstyles with the addition of any decorative material.  Various variations are also possible with the number of braids braided in the French waterfall style. The hairstyle (photo) is perfect for any hair color. Two braids can start at the same level and weave towards each other, connected by an elastic band at the back of the head. Also, they can start on the same side, but at different heights of the head. They can be woven either strictly horizontally or at an angle.
The classic version of the French waterfall braid hairstyle photo can become an everyday style. By adding a decorative element to the braid, this hairstyle can become elegant and festive. A ribbon woven into a braid will highlight the individuality of its owner.  Many girls use just this method of braiding as a wedding hairstyle, decorating the braid with flowers and beads.