Bruges lace crochet collar patterns. Bruges lace. Large loin collar Rose
Hello.
For a long time I wanted to knit a collar using the Bruges lace technique, and it finally happened!
I found the collar pattern in the magazine “Duplet” No. 132 (2012), developed by Raisa Kolesnik.
The collar is crocheted No. 1 using “White Lace” threads from Pekhorka (100% mercerized cotton, 475 m, 50 g).
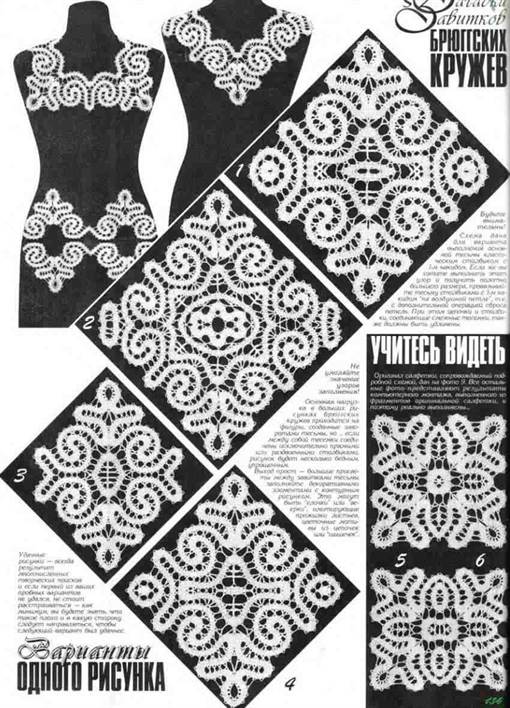
Here is the diagram (click and it will enlarge):
In this case, I started knitting with a straight strip: 4 VP (chain loops), an arc of 6 VPs, 4 double crochets in the first 4 VPs, again an arc of 6 VPs, etc.
I estimated the length of this flat strip very roughly. The entire product, made using the Bruges lace technique, consists of a “twisting” braid that has neither beginning nor end, so very precise calculations are not needed here (according to my personal experience).
To create curves, beveled rows of stitches of different heights are knitted: for example, 2 double crochets, 1 half double crochet and 1 single crochet. These bevels alternate, that is, in the next row after the arch of 6 VPs we knit: 1 single crochet, 1 half double crochet and 2 double crochets.
After turning, we knit 3 VPs (the first half of the inner arch), then insert the hook into 3 VPs, pull the thread through them, make a single crochet and finish 3 VPs. Then we knit 4 double crochets, 6 ch, and start rounding in the other direction.
The curves of the braid are fixed with hitches - the arms located opposite are connected by single crochets or double crochets: one, two, etc. (as indicated in the diagram).
A large curve in the corner of the collar is done like this: 18 rows of braid are knitted (the central rows are beveled), you need to connect 10 arches inside the bend. 9 is there, and for the 10th we knit 3 VP, then an arch of 2 VP, dc in the arch, arch of 3 VP, dc in the next arch, etc. according to the scheme. When we have tied all the arches of the bend, we knit 1 VP and dc in the 1st arch, and then the 3 remaining VPs of the 10th arch (which we started with).
We continue knitting the braid, changing the bending directions.
It turns out this (mine is a little crumpled) Bruges lace:
At first I thought that the diagram showed exactly half of the collar, but I needed a longer collar. So I repeated the small central bend several times and then marked the middle of the collar with a pin and continued knitting the 2nd half symmetrically to the first.
It was because of my increase in lace curls in the middle that I did not have enough length of the even braid base of the collar. And the joint location was not on the corner (which is even better :)).

This article is for those who love unusual and original crochet. Bruges lace, the patterns of which are shown here, is a modern version of ancient needlework.
A few words about lace
At first, knitting was a men's craft, but gradually it became a women's craft. Like any handicraft, lace knitting is very calming to the nervous system. Openwork interior items always add coziness to the apartment. Even a small napkin on the coffee table can set the mood for the entire interior. Just don't overdo it. A lace dress or accessories are great for creating feminine looks. To achieve the desired effect and correspond to modern style, openwork must be used, guided by artistic taste and a sense of proportion.

Distinctive features of the Bruges openwork
What is Bruges lace? The diagrams clearly show that this is braid laid out in a beautiful, smooth, rounded pattern. It is also called vilyushka. Belgian lace is almost three hundred years old. Over the course of three centuries, interest in him either faded or flared up again. There are different ways to create fabric using the Bruges lace technique. which you see in front of you on the screen is just one of the options for weaving openwork.

Bruges lace from factory braid
In sewing supply stores you can find braid with oblique weft threads and loops evenly spaced along the edges. It is great for creating modern items that are reminiscent of ancient Bruges lace. Models and diagrams invented by experienced craftsmen are also suitable for working with ready-made, factory-made braid. The diagonal arrangement of the main thread makes the braid elastic, so the thickening on the folds of the pattern is almost not noticeable. You don't have to put this lace under the press to give it more flatness.

Creating a Pattern
From this braid, which is very rarely on sale, lace is created as follows. A simplified sketch of a flower, butterfly, etc. is made with a one-color pencil, the corners are rounded, most of the lines are closed, and now you have exclusive Bruges lace in front of you. The diagram is enlarged to life-size. It is then placed on a soft, elastic surface into which pins can be inserted. The braid is laid and pinned along the drawing line. Those places where the loops touch each other are sewn together. This is done with very thin threads and a needle. The color of the threads should match the color of the braid. It turns out to be a very beautiful canvas. In this way, elegant collars and napkins, that is, small-sized items, are made.

The ancient way of knitting
Bruges lace: napkins, the diagrams of which are presented in this article, items of clothing, are reminiscent of the products of Vologda and Flemish craftswomen who worked with bobbins. They did not knit the braid separately in order to later lay out a pattern from it. The stripes wove, connected and branched, bypassing the pins, directly on the substrate, in accordance with the wide and thin lines of the design applied to it. Currently a popular technique is to crochet a long ribbon with loops on the sides and join it into a pattern right during the knitting process.

Modern way of crochet
The photographs clearly show Bruges lace. The diagrams show several braid options. All of them are very simple to perform. Try tying different ones and choose which one you like best. You are free to treat it like a factory one: tie a long ribbon, place it beautifully on a pattern or on a clothing pattern if you plan to turn the ribbon into a dress, blouse or skirt, and fasten it with a thread, a needle, a thread or a hook. Even easier - pin the braid onto a mannequin with a felt or knitted covering. You will immediately see how much more braid needs to be tied.

Fitting a lace product on the figure
The tape can be laid out taking into account the curves of the body, and then, without creating darts and raised seams, you will achieve a perfect fit on the figure. There is some difficulty in making the sleeve. Here's the advice. On the mannequin, place the neckline taking into account the armhole, as on a dress pattern with a set-in sleeve. Lay out the braid intended for the sleeve on a paper dress, pin it in the form of a pattern, sew it through the loops, fill the gaps with a mesh of air loops or small lace floral motifs. Before connecting to the main part, press down the sleeve with a heavy press so that the folds of the braid become flatter. You cannot wash or steam the product yet, because you will be connecting the sleeve to the front and back with the same threads using chains of air loops crocheted.

When all the details of the dress are ready and connected, it can be subjected to wet-heat treatment without fear of uneven shrinkage. At home, this usually involves washing, starching (if the item is made of cotton) and ironing.
Simple and stylish dress
If you change the pattern, making the armholes square, then the sleeves can be knitted rectangular, without rounding at the edges. With such a shoulder girdle, the dress does not need to be narrowed at the waist. This style is considered classic and universal for those with slender, thin figures. Try tying it up. Technically it is not difficult, it just requires perseverance. If you take a risk and get down to business, you will end up with a stylish and elegant dress. Bruges lace, the diagrams of which are in this article, are ideally suited for such a thing. If it is very translucent, then you can experiment with the choice of underdress-sheath. It is selected to match or contrast.

At one time it was fashionable to wear guipure with a lining. This is an interesting option, but there are few situations where this is appropriate, since the flesh-colored fabric of the lining creates the illusion of a naked body. Choose the thread color that best matches your color type and go for it!
Lace haute couture collections
The collections of many famous designers include models made of lace. This is the white collection of Valentino, and the masterpieces of Jean-Paul Gaultier, and others. Couturiers constantly turn to historical costume and national handicrafts. If you look at each model individually carefully, it becomes obvious that modern fashion is very inclined to combine lace from different eras and different peoples in one dress.

Combination of different types of lace
Bruges lace, crocheted from winding braid, often requires addition in the form of elements of Irish, Venetian, fillet or other lace. Bruges lace gives the products austerity and laconicism. Napkins or tablecloths decorated around the perimeter with stripes of Bruges knitting take on a finished look. An inexperienced knitter will be right if she begins to learn crocheting from the braid from which Bruges lace is made. For beginners, the circuits are not very difficult, because they consist of simple elements.

The first napkin of a beginning needlewoman
For a small, but very cute and elegant napkin, you need to knit 5-7 strips 10-15 cm long; their number may vary depending on the thickness of the threads and the density of knitting. Starting from the second strip, connections should be made using loops. This operation is known to everyone who knows how to knit stitches and loops. The strips of this napkin lie parallel to each other, without folds. The width of the stripes is 4-5 double crochets, plus lifting loops. Decorative arches of the rise consist of 7 air loops. The connection is made like this. You need to knit three chain loops, then make it into an arch, perform three chain loops and then knit a regular row of double crochets. Iron the finished napkin through a wet cloth.

More complex types of work
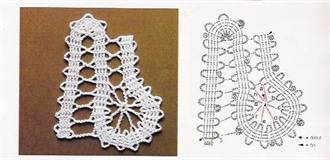
Having coped with this work, you can take on more complex Bruges lace for beginners. Knitting patterns for curved forks clearly demonstrate that at the bends, three adjacent arches of one strip are fastened with a connecting post. If the fold is a smoother wave, then two adjacent arches are connected.
How else can you use Bruges lace? Schemes of various types of braid make you want to use them for finishing dresses made of linen or cotton fabric, such as matting. You can create an amazingly beautiful set in boho or style.

Bruges lace is laconic in design, the patterns of all the stripes of the braid confirm this, it is very suitable for knitting fashionable avocado bags. They can be made from both natural and synthetic yarn. It is better to take thicker and stronger threads, and a 3-4mm hook.
If you decide to take up knitting, then first determine the place where you will do your needlework. It should be well lit. Light is one of the main conditions for enjoying work and maintaining good vision.
When choosing yarn, give preference to mercerized yarn. The thinner the thread and the smaller the hook number, the more beautiful the lace. Knit with loose loops, do not tighten them. After washing, the item will shrink and become denser. If you knit too tightly, the product will be rough and thick to the touch.

If you knit with colored threads, in order to avoid troubles when washing, check before starting work to see if they are fading. Try not to combine threads of different composition and quality in one product. This mix works well only for people with ideal taste. Cotton lace looks better when starched.
To obtain figured lace from a simple straight braid, the braid is connected with side arches in the required places during the knitting process.
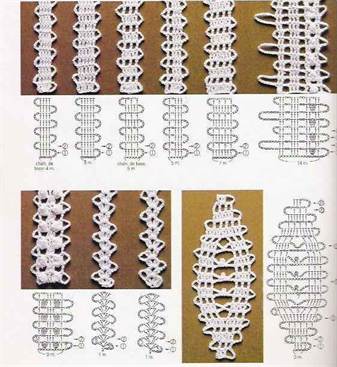
The first rule necessary for making braid roundings is to make beveled rows!
Technique for making beveled rows.
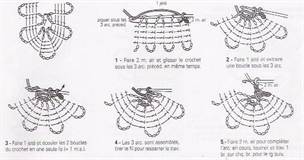
To complete a semicircle, 7 beveled rows are knitted. In the first row dial 6 ch, turn knitting and knit 2 double crochets, single crochet, single crochet, dial 6 vp, turn knitting (Fig. 1). In the next row, knit a single crochet, a half crochet and 2 double crochets, dial 6 vp, turn knitting.
rice. 1 pic. 2 fig. 3
Alternate these two rows. Thus, it turns out that the short stitches (single crochets) of all rows are located on one inner side and lead to the rounding of the braid! In total, you need to knit 6 rows, and in the 6th row, knit 3 air loops for the arch (Fig. 2), insert a hook under the three previous arches (Fig. 3), pick up the working thread and pull it through all the loops on the hook, knit another 2 ch (Fig. 4), and finish another (7th) beveled row (Fig. 5).
rice. 4 fig. 5
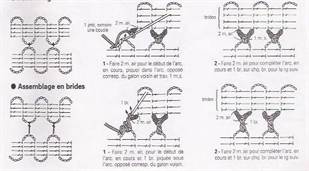
WAYS TO CONNECT BRAND
1. Using a connecting stitch or single crochet.
Opposite arches can be connected as follows. When knitting the opposite arch, 3 air loops are made, the hook is inserted under the desired arch (Fig. 6), the working thread is grabbed and pulled through all the loops on the hook, cast on 3 ch. and continue knitting the braid (Fig. 7). Or pull the working thread through the arch, pick up the working thread again, pull it through both loops on the hook and knit 3 ch.
Rice. 6 fig. 7
2. Using posts of different heights.
If it is necessary for the arches to be connected to be located at a certain distance from each other, columns of different heights are made at the junctions of the arches. In Fig. Figure 8 shows how to perform a double crochet stitch. Knit 3 ch, make a yarn over, insert the hook under the arch and knit a double crochet (grab the working thread and pull through 2 loops on the hook. Grab the working thread again and pull through the remaining 2 loops on the hook). Dial 3 ch. and continue knitting the braid.
In Fig. Figure 9 shows the execution of posts of different heights to connect opposite arches. Accordingly, starting from the inner rounding of the braid, the arches are connected using a single crochet, double crochet, double crochet, 3 double crochet, and 4 double crochet. This leads to a change in the distance between opposite sides of the tape. In the diagrams, the numbers between the arches indicate the number of yarn overs in the connecting column.
rice. 8 fig. 9
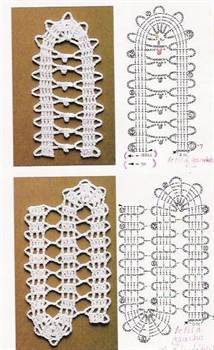
3. Using cross-shaped posts on the leg.
Let's consider this method using the example of knitting a "Double Snake". First, one snake is knitted. Then the second, and the second is connected to the first during knitting.
Cross connection technique:
1) We dial 3 v.p. (Fig. 11), make 4 yarn overs, insert the hook under the lower left arch (Fig. 12), grab the working thread and pull it through the arch, grab the working thread again and pull it through 2 loops on the hook, grab the working thread again and we pull it through 2 loops on the hook (Fig. 13).
rice. 11 fig. 12 pics. 13
2) We make 2 yarn overs and insert the hook under the upper left arch (Fig. 14), grab the working thread and pull it through the arch, *grab the working thread and pull it through 2 loops on the hook*. Repeat from * to* 2 more times.
Rice. 14 fig. 15 pics. 16
3) We make 2 yarn overs and insert the hook under the upper right arch (Fig. 15), grab the working thread and pull it through the arch, *grab the working thread and pull it through 2 loops on the hook*. Repeat from * to * until there is 1 loop left on the hook. Dial 3 ch. (Fig. 16) and continue knitting the braid.
In this way you can get various types of snakes.


Belgium is the birthplace of the interesting art of knitting, now called Bruges lace. Its name comes from the name of the town of Bruges, where back in the 16th century, products made from threads crocheted in an unusual way were extremely popular and highly valued. Despite its ancient origins, this technique is quite popular today. We will help you master Bruges lace, and for those who have never held a crochet hook before, we will help you with patterns for beginners.
Sometimes it is confused with Vologda lace, which is actually very similar in appearance. However, the difference is fundamental: the Bruges technique does not use bobbins, but a hook that imitates bobbin ligature.
The construction of a lace pattern is based on the interweaving of a crocheted ribbon-braid and its connections into curls and ornaments. The tape itself is quite simple in execution; the complexity and at the same time uniqueness of the patterns is created by its attachments according to the pattern. It is this fantasy pattern that makes each product exclusive.


Bruges lace knitting technique with patterns
All knitting is based on the combination of three elements: the main tape, the mesh and the motifs.
This is what a small master class looks like, thanks to which we will create Bruges lace:

In the example shown, the main tape-braid is made of 5 treble stitches. It is knitted in two directions, and the number of columns in width and the size of the ribbon in length can vary according to the model. An arch is made using air loops at the beginning of each row to connect the motifs.
In this technique you can use a wide variety of ribbons:
Connecting motives with job descriptions
In the process of knitting the motifs, the braid-ribbon is connected by bows formed by air loops. The connection is made by air. loop, st. s/n and st. b/n, depending on the design. The parallel arrangement of the braid is achieved by connecting two tapes with identical columns. The divergence of the ribbons is obtained by connecting columns of different heights, this is how we achieve bending of the ribbon:
Complex columns form a grid and fill the void created by knitting the bend of the ribbon:
The ends of the ribbons can be connected in different ways, using a hook or a sewing needle for knitwear, joining with an over-the-edge seam or a loop seam using a hook.
Master class on connection:

We analyze the schemes for beginning craftsmen
The braid, closing in a circle, a square, forms elements that form various patterns. We offer you some patterns of crocheted Bruges lace below:
The Bruges technique allows you to produce amazingly beautiful products - dresses, skirts, blouses, collars, napkins. We offer you a diagram of unusually feminine models from Japanese magazines.
The Bruges technique became widespread in the manufacture of household items. Its similarity with lace and woven bobbins once became the reason for its widespread use in the manufacture of pillows, bedspreads, tablecloths and even items of clothing as decoration. And at all times, Bruges lace has retained the right to personify prosperity, wealth and splendor.
Collar Vita


The openwork collar from the Valya-Valentina magazine for 2009 is crocheted from 80g of Vita Pelican yarn (100% double mercerized cotton; length 330m/50g) with crochet number 1. Collar width 10 cm.
Knitting a collar begins with a chain of 214 air loops (23 repeats of 9 loops + 4 loops for symmetry + 3 lifting loops) and then knitted according to the pattern.
The expansion of the collar occurs due to an increase in the number of air loops in the arches of the French mesh.
After finishing knitting, tie the collar along the narrow sides and neckline with the 1st row of single crochets and the 1st row of “crawfish step”. G
The cotton collar needs to be starched, laid out according to size and left to dry completely.
Jane Eyre Collar


Knitting begins with a chain of 105 air loops and then knits according to the pattern. The finished collar is decorated with a button closure or crocheted laces.
Collar Blooming pineapples


The openwork collar from the Valya-Valentina magazine for 2005 is crocheted from cotton threads No. 0.75. Collar width 12 cm.
Start knitting with a chain of 182 air loops (9 repeats of 18 loops + 17 loops for symmetry + 3 lifting loops) and then knit 16 rows according to the pattern.
Having knitted 16 rows, do not cut the thread, but continue knitting, tying the collar in a circle. Finish the row with a connecting column at the beginning of the 16th row.
Starch the finished collar, stretch it to shape, and leave to dry.
Double layer collar Pineapples


A beautiful collar with a pineapple pattern from an Asian magazine is crocheted from 110g yarn using No. 3 crochet. The length of the thick part of the collar is 50 cm.
The collar consists of a dense part 10 cm wide and pineapple leaves attached to it on both sides. The knitting density of the main part is 25 loops and 14 rows in a 10x10 cm square.
They start knitting the collar from the main part, for it they cast on a chain of 25 air loops and knit according to the pattern, finishing the knitting in a semicircle. The second semicircle is knitted on the initial chain of air loops.
After this, pineapple leaves are tied to the main part, 10 on one side and 9 on the other. The diagram next to each leaf shows in parentheses the rows of the main part to which the leaf is attached.
Finally, tie the ties with leaves at the ends, the length of the ties is 34 cm (32 rows).
Pentagonal collar


Pentagonal collar from Lets Knit Series Hot Line 6960/1993. The collar is crocheted from 35g cotton yarn using crochet number 2. Collar width 11cm, neckline length 44cm.
The collar consists of 8 pentagonal motifs, connected to each other during the knitting process of the last row. When all the motifs are connected and connected, they are tied in a circle in 2 rows according to the pattern.
Starch the finished collar, straighten it to size and leave until completely dry.
Collar Lily


The openwork collar from Valya-Valentina magazine for 2007 is crocheted from cotton yarn with size 1.5. Collar width 13 cm.
The repeat of the collar pattern is only 2 loops, thanks to this the size of the collar along the neck line can be made to any size. A simple pattern, accessible to knitters of any level, looks very gentle and romantic.
Start knitting with a chain of air loops of the required length and then knit 14 rows according to the pattern. Without cutting the thread, tie the collar along the narrow sides and neckline with single crochets.
Trim for square neckline


The lace trim for the square neckline from Puntillas Aplicadas magazine is crocheted using cotton yarn using size 3 crochet.
Collar Carved leaves


An elegant collar from the Spanish magazine MYM Cuellos is crocheted from thin bobbin threads with a size crochet size of 0.75. Collar width 6 cm.
Begin knitting a collar with a chain of 261 air loops (excluding lifting loops), on which a series of single crochet stitches are knitted through 3 chain loops (the first stitch is formed by lifting loops). Next, tie 29 leaves, attaching them to every 3rd column of the 1st row. To make the leaves carved, knit single crochets behind the back wall of the loop.
Connect the tops of the leaves with a new chain of chain stitches, knitting 13 loops between the leaves. On this chain, tie 3 rows of binding.
Along the neck line, knit 3 rows with double crochets, adding 12 chain stitches on each side to the original chain.
Collar Bruges lace


The openwork collar from the Valya-Valentina magazine for 2006 is crocheted using thin cotton yarn No. 1.5-1.75. Collar width 18 cm.
Knitting a collar begins with knitting the inner motifs-forks. Link 11 motifs by connecting them together.
After this, tie a strip of wils with Bruges braid along the outer edge of the collar.
Lastly, the Bruges braid is knitted along the neckline.
Place the finished collar on a horizontal surface, give it the desired shape, moisten it and leave it until completely dry.
Collar Soso


The large lace collar from the Valya-Valentina magazine for 2009 is crocheted from Coco Vita Cotton yarn (100% mercerized cotton; length 240m/50g) using crochet number 1. Collar width 11cm.
Start knitting with a chain of 159 air loops (15 repeats of 10 loops + 9 loops for symmetry) and then knit 17 rows according to the pattern.
Tie 2 ties from air loops of arbitrary length.
Starch the finished collar, stretch it to size and leave to dry.
Collar Amelia


The openwork collar from the Spanish magazine MYM Cuellos is crocheted from thin cotton threads using No. 1 crochet. Collar width 10 cm.
The collar begins to be knitted with a chain of air loops and then 16 rows are knitted according to the pattern. The beginning of knitting is indicated in the diagram with an asterisk, the end of knitting is indicated by a circle divided in half.
Attach the thread to the beginning of the knitting, this place is indicated by a circle with a cross inside. Knit 1 row of binding along the narrow sides and flap of the collar. The end of knitting is indicated by a black square.
Collar Daniela


The openwork collar from the Spanish magazine Ganchillo Puntorama is crocheted from 20g of fine cotton yarn using a No. 1.5 crochet hook. Collar width 12.5 cm, neck length 39 cm.
Knitting a collar begins with a chain of 125 air loops (5 repeats of 24 loops + 5 loops for symmetry) and then knit 11 rows according to the pattern.
In the 12th row, the tying is done with arches of air loops, first along the flying part of the collar, adding a “picot”, and then along the narrow side, the neckline and the second narrow side.
Sun Collar


The collar begins to be knitted with a chain of air loops of the desired length, the beginning of knitting is indicated in the diagram with an asterisk. Next, knit 3 rows with double crochets behind the back wall, knitting a button loop in the 2nd row.
Tie the main part of the collar with French mesh, leaving 12 stitches free on both sides.
Decorate the edge of the collar with round motifs, connecting them together and attaching them to the main part of the collar while knitting the last row.
Cat Paw Collar


Delicate openwork collar from Valya-Valentina magazine for 2007.
The collar, 9 cm wide, is crocheted from cotton yarn “Snowflake” with crochet No. 1.25.
Start knitting with a chain of 109 chain stitches (1 repeat = 9 ch + 1 ch + 3 ch rise). Next, knitting continues according to the pattern. Having finished knitting, and without tearing off the thread, tie the collar with single crochets along the narrow sides and according to the tying pattern along the neck line.
For ties, chains of air loops are knitted, at the end of which rings are made - the chain ring is tied tightly in columns.
The finished collar needs to be starched, stretched to size and left to dry completely.
Collar Sunflower


The openwork collar from the Spanish magazine MYM Cuellos is crocheted from thin cotton threads with size 1.25. Collar width 7 cm.
The collar begins to be knitted with a chain of air loops and then knitted according to the pattern. The beginning of knitting is indicated in the diagram with an asterisk.
After finishing knitting the collar, without breaking the thread, tie the narrow sides and the neckline with one row of binding according to the pattern. The end of the knitting of the binding is indicated in the diagram with a black square.
Collar of large flowers


An openwork collar of pentagonal motifs with large flowers from the Lithuanian magazine Pacios 2008 is crocheted with polyester yarn with lurex (100-120g light and 50-70g dark) with crochet number 3-3.5.
The collar consists of 6 floral motifs. Each flower is tied with 3 rows of arches, the 4th row is used to connect the motifs. In the last row of arches on the sides that form the neckline and bottom of the collar, a smaller number of air loops are knitted to straighten the lines. The neck line and the bottom of the collar are tied in a “crawfish step”.
Collar Bunches of pineapples


Large openwork collar - model by Evgenia Vysokovskaya, crocheted from 3 spools of cotton threads No. 1.25.
On a chain of air loops, knit 8 repeats according to the pattern. At the end of the pattern, each large petal is knitted separately.
Having finished knitting all the petals, knit 1 row of single crochets along the neckline and 1 row of single crochets along the entire perimeter of the collar, making a button loop.
The collar can be worn with a fastening at the front or back.
Collar Mesh


An easy-to-make openwork collar from the Valya-Valentina magazine for 2004. knitted from thin cotton yarn with crochet number 1. Collar width 6 cm.
The collar is knitted in the transverse direction, starting with a chain of 50 air loops (45 pattern loops + 5 turning loops), and then according to the pattern to the desired length.
The collar is tied along the neck line in one row according to the pattern.
The finished collar needs to be starched, straightened and left to dry completely.
Collar Solomon loops


The openwork collar from the Spanish magazine MYM Cuellos is crocheted from thin cotton threads with size 0.6. Collar width 7 cm.
After the strip of French mesh, they move on to rows connected by “Solomon loops,” which are indicated in the diagram by an eye with a cross. After finishing knitting the collar, tie the narrow sides and the neckline with one row of binding according to the pattern. The beginning of the binding coincides with the starting point of knitting. At the end of the row of binding, form a button loop.
Collar Delicate pineapples


A delicate openwork collar from the Brazilian magazine Ganchillo is crocheted using thin bobbin threads using No. 1 crochet. Collar width 10 cm, neck length 44 cm.
Begin knitting a collar with a chain of 193 chain stitches (12 repeats of 16 chain stitches + 1 chain stitch for symmetry). Next, knitting continues according to the pattern. After 16 rows of the main pattern, knit 2 rows of binding in a circle. The number of air loops in the arches is indicated in the diagram by numbers.
The finished collar needs to be starched, straightened and left to dry completely.
New Year's collar


Large openwork collar - model by Evgenia Vysokovskaya, crocheted from 2 spools of cotton thread No. 10 with crochet No. 1.
On a chain of chain loops of obviously longer length, knit 1 row according to the pattern. The number of repeats of 15 loops can be any, depending on the collar length you need. For a turtleneck collar you need 13 rapports. Having decided on the length, cut off the excess air loops, securing the end of the thread, and then knit according to the pattern.
Having finished knitting, without breaking the thread, tie the collar along the narrow sides and flying edge with arches of air loops with “picot”, and along the neck line with single crochets.
The finished collar needs to be starched, arranged according to size and left to dry.
Collar Alice


The openwork collar from the Valya-Valentina magazine for 2008 is crocheted from 40g of yarn (50% cotton, 50% viscose) with a No. 1.5 crochet hook. Collar width 12 cm.
Start knitting with a chain of 189 air loops (15 repeats of 12 loops + 9 loops) and then knit 15 rows according to the pattern. Without cutting the thread, tie the collar along the narrow sides with 1 row of single crochets, and along the neckline with arches of 3 air loops and single crochets.
Starch the finished collar, stretch it to size and leave until dry.
Chain collar


An easy-to-make collar from an Asian magazine is crocheted using 20g of yarn using a size 3.5 crochet hook. Collar width 15 cm, neck length 50 cm.
Start knitting a collar with a chain of 91 chain stitches and then knit 17 rows, increasing the number of chain stitches between single crochets according to the pattern.
After this, make 4 rows of tying from fans with lush columns.
A version of the same collar made from finer yarn with mohair.
V-neck collar


The openwork collar from the Valya-Valentina magazine for 2007 is crocheted from thin cotton yarn with a No. 0.5 crochet hook. Collar width 14 cm.
Start knitting with a chain of air loops of the required length, taking into account that 1 repeat = 6 loops + 2 loops need to be added for symmetry.
The width of the collar can also be changed to suit your taste. In the photo, the collar consists of 7 rows, and the diagram shows 5. Rows 4 and 5 must be repeated again.
Starch the finished collar, stretch it to size and leave until dry.
Openwork collar Volumetric flowers


The openwork collar from the Spanish magazine MYM Cuellos is crocheted from thin cotton threads No. 0.75. Collar width 12 cm.
Knit 28 voluminous three-tier flowers, connecting them together.
On the inside of the chain of flowers, start knitting the mesh part of the collar, the beginning of knitting is indicated in the diagram by a crossed out circle, and the end of knitting by a circle divided in half.
Tie the outer edge of the strip of flowers 1 side by side according to the pattern.
Greta Collar


The openwork collar from the Spanish magazine MYM Cuellos is crocheted from thin cotton threads with size 1.25. Collar width 8 cm.
The collar begins to be knitted with a chain of air loops of the required length at the rate of 1 repeat = 12 loops + 4 loops for symmetry and then knitted according to the pattern. The beginning of knitting is indicated in the diagram with an asterisk.
Finally, without cutting the thread, tie the collar in the round with one row of binding. The end point of knitting is indicated by a black square.
Collar Lace Leaves


The openwork collar from the Spanish magazine MYM Cuellos is crocheted from thin cotton threads No. 0.75. Collar width 8 cm.
Tie 8 leaves according to the pattern. The eye with a cross in the diagram indicates “Solomon loops”. You can watch a video tutorial on knitting Solomon loops.
Connect the finished leaves with 3 rows of binding along the neckline. The beginning of the binding is indicated by a crossed out circle, the end by a black square.
Lay the collar flat and connect the leaves together at the touching points.
Linen Collar Corners


The openwork collar from the Spanish magazine MYM Cuellos is crocheted from thin linen threads with size 0.75. Collar width 9 cm.
The collar is knitted in the transverse direction, the beginning of knitting is indicated in the diagram with an asterisk. They begin knitting the collar with a chain of 23 chain stitches and, having knitted 1 row of single crochets, begin to expand the collar, knitting the first tight triangle.
Upon completion of knitting the main part of the collar, it is tied in a circle with one row of single crochets, complemented by “picot” along the flyaway and narrow sides. The end point of knitting is indicated by a square in the diagram.
The finished collar needs to be starched, straightened and left to dry completely.
Senorita collar


A chic collar-mantle from Fashion Magazine No. 476 is crocheted from 120 g of cotton threads with No. 1 crochet.
Knitting a collar begins with a chain of air loops, on which 26 repeats of the pattern are knitted according to the pattern. After knitting 13 rows, break the thread and knit rows 14-17 on 3 sides of the collar.
After this, on the initial chain of air loops, knit 1-2 rows and on them finishing rows from 14 to 17.
Tie the collar along the neck line with the 1st row of double crochets and a row of crab step. Make a loop and sew a button for the fastener. Starch the finished collar and iron it.
Collar Vintage


The collar-mantle with a stand from Fashion Magazine No. 405 (model by Tatyana Piskunova) is crocheted from 100 g of viscose silk with crochet No. 1. The collar is fastened at the back with 6 small buttons.
Knitting a collar begins with a chain of air loops equal to the circumference of the neck, on which an even number of arches of 5 air loops are knitted. Next, knit according to the pattern, making a lifting loop at the beginning of the odd rows.
Having finished knitting the mantle, on the initial chain of air loops, knit a stand according to the pattern. Tie the vertical edges of the collar and the top of the stand with a row of single crochets, making a picot on every third stitch. Make 6 hanging loops and sew on buttons.
Collar Spikelets


Start knitting with a chain of 281 air loops (18 repeats of 15 loops + 10 loops) and then knit according to the pattern.
Starch the finished collar, stretch it to size and leave until dry.
Collar Stripes


The openwork collar from the Spanish magazine MYM Cuellos is crocheted from 50g mercerized cotton with size 1.25.
The collar is knitted crosswise, which allows it to be made to any required length. Expansion occurs due to an increase in the number of yarn overs in the columns. The knitting direction is shown in the diagram by arrows.
Large loin collar Rose


The loin collar from the Spanish magazine MYM Cuellos is crocheted from thin cotton threads with size 0.6. Collar width 20 cm.
The collar begins to be knitted with a chain of 412 chain stitches (409 stitches along the neck + 3 lifting loops) and then knitted according to the pattern. The beginning of knitting is indicated in the diagram with an asterisk. Finish knitting with one row of single crochets.
Finally, tie the collar in the round with gold thread in one row of single crochets, adding a picot along the narrow sides and flap of the collar.
Collar School


The openwork collar from the Spanish magazine MYM Cuellos is crocheted from mercerized cotton threads No. 1.25. Collar width 6 cm.
The collar begins to be knitted with a chain of air loops and then knitted 5 rows according to the pattern and cut off the thread. The beginning of knitting is indicated in the diagram by an asterisk, the end of knitting the first section of 5 rows is indicated by a circle divided in half.
Attach the thread to the end of the first row of single crochets, this place is indicated by a circle with a cross inside. Knit 3 rows of single crochets on 3 sides of the collar and continue knitting the binding according to the pattern, adding stitches at turns.
Having finished the last row of the picot binding, tie the collar along the neck line with single crochets through a chain loop. The end of knitting is indicated by a black square.
Burdock Collar


The openwork collar from the Valya-Valentina magazine for 2007 is crocheted from 70g of “Iris” yarn with a crochet size of 1.25-1.5. Collar width 15 cm.
Start knitting with a chain of 200 chain stitches (13 repeats of 15 chain stitches + 2 chain stitches for symmetry + 3 chain stitches for lifting). Next, knitting continues according to the pattern.
The finished collar needs to be starched, straightened and left to dry completely.
Richelieu collar


An openwork collar with voluminous “popcorn” elements from the Spanish magazine MYM Cuellos is crocheted from thin cotton threads No. 1.25. Collar width 7.5 cm.
The collar begins to be knitted with a chain of air loops and then knitted according to the pattern. The beginning of the binding is indicated by a crossed out circle, the end by a black square.
Collar Rings


The openwork collar from the Spanish magazine MYM Cuellos is crocheted from thin cotton threads No. 0.75. Collar width 7 cm.
The collar is knitted in the transverse direction according to the principle of continuous knitting. The beginning of knitting is indicated in the diagram with an asterisk.
Having knitted a collar of the required length, without cutting the thread, tie the collar along the neck line. The end point of knitting is indicated by a black square.
Collar Anita


The openwork collar from the Spanish magazine MYM Cuellos is crocheted from thin cotton threads with size 1.25. Collar width 8.5 cm.
The collar begins to be knitted with a chain of air loops of the required length and then knitted according to the pattern. The beginning of knitting is indicated in the diagram with an asterisk. Since the rapport of the collar is small, the length of the neck line can be made to almost any length.
Finally, without cutting the thread, tie the collar in the round with one row of shamrock binding. The end point of knitting is indicated by a black square.
Bird cherry collar


The openwork collar from the Spanish magazine MYM Cuellos is crocheted from thin cotton threads No. 0.75. Collar width 7.5 cm.
The collar begins to be knitted with a chain of 196 air loops (excluding lifting loops) - 13 repeats of 15 loops each + 1 loop for symmetry. The beginning of knitting is indicated in the diagram with an asterisk.
Next, 11 rows are knitted according to the pattern, including a row with triple stitches. After this, a row of circular binding is knitted, making a row along the edge of the collar with 4 stitches knitted together. The beginning and end of the circular row of binding are indicated in the diagram by a black square.
P.S. The diagram does not show a button loop, which can be added when knitting a binding.
Collar Openwork luxury


An unusually beautiful openwork collar from the Valya-Valentina magazine for 2007 is crocheted from thin cotton yarn using crochet No. 1. Collar width 16 cm.
The collar is assembled from dense leaves, small floral motifs and a stripe along the neckline.
Start making the collar by knitting 6 dense leaves. After this, around each leaf you need to knit a frame of 8 round motifs, which are attached to the leaf and connected to each other during the knitting process.
The result is an openwork medallion, which is lined with additional arches, tied with single crochets, between the top motifs. The next medallion is attached to the previous one with “pico” motifs and additional arches.
Once all 6 medallions are tied and connected, tie a lace strip along the neckline.
Starch the finished collar, stretch it to size and leave until dry.
Sakura collar


Delicate collar from the website of the Japanese manufacturer of yarn and needlework goods Daruma, knitted from 45g of fine yarn with a No. 1.5 crochet hook. Collar width (maximum) 21 cm, length along the neckline 58 cm.
Knitting a collar begins with 2 strips of Bruges braid, on which 18 rows of French mesh are knitted with arches of 3 air loops. Next, an openwork binding is made, with which 14 flowers and 13 trefoils, knitted separately, are riveted.
The free edges of the Bruges braid are tied and laces made of air loops with trefoils at the ends are attached.
Collar - flounce for a round neckline


Puffy trim for a crew neck from an old Chinese magazine. Unfortunately, I was not able to decipher the details, but from the photograph it is clear that the shuttlecock is crocheted from cotton threads with a thin hook.
Knit a small sample from the first 2 rows and use it to calculate the required number of loops around the perimeter of the neckline. The trim can be worked in the round or clasped at the back if desired.
After knitting the flounce collar, be sure to starch it hard and dry it, stretching the edges.
Small openwork collar


A small openwork collar from a Portuguese magazine is crocheted with 20g cotton yarn using No. 1.25 crochet. Collar width 4.5cm, neckline length 44cm.
They begin to knit such a collar with a chain of air loops. To avoid the hassle of counting stitches, cast on a chain from a separate thread. You can pick up the missing loops or unravel the extra ones.
Pay attention to the long stitches in the diagram, these are stitches with 4 crochets. The finished collar is tied on all sides with single crochets.
Stand collar Sea blue


A cute and easy-to-make stand, knitted with lush columns, from the Pink Rose Crochet online blog.
Unfortunately, I couldn’t find a detailed description, but from the photo you can see that the collar is knitted from fairly thick cotton yarn.
A matching satin ribbon threaded along the first row of posts makes it possible to adjust the tightness of the stand-up collar to the neck.
Knitted from shiny yarn and decorated with beads, this stand will be a great addition to an evening outfit.
Large collar with voluminous flowers


The collar from the Let`s Knit Series magazine is crocheted with size 1.5 from thin cotton threads. Collar width 12 cm, neck length 45 cm.
The collar is assembled from 11 pentagonal and 12 hexagonal motifs with three-dimensional flowers in the center of each motif. The width of the pentagonal motif is 7 cm, the size of the hexagonal motif is 7.5 x 8.5 cm.
The last 4 rows of motifs of both types are connected by arches of air loops with “picot”, so the beginning of the rows is shifted. The transition to a new row is made through half-columns (connecting columns) knitted along the chain of the previous row.
The motifs are connected to each other during the knitting of the last row. The connection points are shown in the diagram.
The collected motifs are tied in 4 circular rows, placing the neck line up to 45 cm with the binding.
Collar Romance


The elegant collar I found on the Pink Rose Crochet online blog is crocheted from cotton yarn with size 2.5.
The collar is knitted crosswise, which makes it possible to adjust its length during knitting. Start knitting with a chain of 17 air loops + 5 lifting loops and then knit according to the pattern (the number of rows in the finished collar should be a multiple of 6). The beginning of knitting is indicated in the diagram by the letter A.
The knitting pattern uses crossed stitches with one crochet. You can watch a video tutorial on how to knit this element here
Upon reaching the desired length, perform 2 rows of binding, forming corners.
The ties are knitted in one strip along with the neckline trim - 3 rows of single crochets behind the back wall. When casting on stitches along the neckline of the collar, adjust it so that the collar fits better.
Collar Isabel


The openwork collar from the Magic Crochet magazine is crocheted from thin cotton threads with a size 1.5 crochet hook. Collar width 7 cm, neckline length 37 cm.
Start knitting with a chain of 151 air loops and then knit 8 rows according to the pattern. The 9th row is knitted in the round, having finished knitting along the flap of the collar, the narrow sides and the neck line are tied. The black triangle in the diagram marks the end point of knitting.
Place the finished collar on a horizontal surface according to size, moisten it and let it dry completely. Tie a chain of chain stitches and thread it through the edge of the neckline trim as a tie.
Lace trim for round neckline


The lace trim for the round neckline from the Puntillas Aplicadas magazine is crocheted from cotton yarn No. 2.5.
Before knitting, it is recommended to knit a sample and use it to calculate the required number of air loops and repeats that need to be knitted.
Even though the diagram shows a corner in the center, the trim falls on the round cutout. If the neckline is closer to square with rounded corners, then this pattern will not work.
Collar Fevronia


The openwork collar from the magazine “Valya-Valentina” for 2008 is crocheted from 25g of cotton yarn “Snezhinka” with crochet No. 0.75. Collar width 8 cm.
Start knitting the collar with a chain of 315 chain stitches (13 repeats of 24 loops + 3 loops for symmetry) and then knit 14 rows according to the pattern. Cut the thread.
Attach the thread to the base of the collar and knit 1 row of the binding according to the pattern.
Knit a row of single crochets along the neck line, and on the remaining 3 sides the 2nd row according to the piping pattern.
Starch the finished collar, arrange it according to size and leave until completely dry.
Openwork collar Buttercups


The openwork collar from the Valya-Valentina magazine is crocheted from cotton yarn No. 0.8. Collar width 7 cm.
Start knitting a collar with a chain of air loops at the rate of 1 repeat = 10 loops + 1 loop for symmetry. Next, knit 10 rows according to the pattern.
Starch the finished collar, arrange it according to size and leave until completely dry.
Collar Diana


A small collar from Phildar magazine is crocheted using cotton yarn using size 1.75 crochet.
Start knitting the collar with a chain of 142 chain stitches (6 repeats of 20 loops + 2 loops for symmetry) and then knit 11 rows according to the pattern and cut the thread.
Having attached the thread to the right side of the neck, tie the collar on 3 sides with single crochets with a picot.
The finished collar needs to be starched, arranged according to size and left to dry completely.
Lace collar with back closure


The original model of a knitted collar from Fashion Magazine No. 468 is crocheted with a hook No. 1.25 from 50 g of fine cotton yarn.
Knitting a collar begins with a central motif, from which a strip with small pineapples of the required length is knitted on both sides.
Tie the finished collar around the perimeter with picot fans. Make hinged loops at the back on one half, and sew buttons on the other.
Collar Karagoz


The openwork collar from the Magic Crochet magazine is crocheted from thin cotton yarn with size 1.25. Collar width 5 cm, neckline length 41 cm.
Start knitting with a chain of 184 air loops and then knit according to the pattern.
This symbol indicates a double crochet - pull a loop from under each of the adjacent arches and knit all 3 loops on the hook together.
You can watch a video tutorial on how to knit a popcorn element here.
Knitted collar Jadwiga


The lace collar from Fashion Crochet magazine is crocheted No. 1.4 from thin cotton threads. Collar width 8 cm, neck length 39 cm.
Start knitting a collar with a chain of 155 air loops and then knit 13 rows according to the pattern. After this, without cutting the thread, I tie the narrow sides of the collar and the neck line with a series of single crochets.
Tie or twist the lace as ties and sew tassels on the ends.
Collar Iedidi


The openwork collar from the Spanish magazine MYM Cuellos is crocheted from thin cotton threads No. 0.75. Collar width 9.5 cm.
The collar begins to be knitted with a chain of air loops of the desired length, the number of loops should be a multiple of 3 + 1 loop for symmetry (excluding lifting loops) and then knitted according to the pattern. The beginning of knitting is indicated in the diagram with an asterisk.
The main part of the collar is knitted with “Solomon loops,” which are indicated in the diagram by an eyelet with a cross. You can watch a video tutorial on knitting Solomon loops here
After finishing knitting the collar, tie the narrow sides and the neckline with one row of binding according to the pattern. The beginning of the binding coincides with the starting point of knitting.
Collar Vintage


The knitted collar from the magazine “Knitted Finishing” No. 7 2013 is made with crochet No. 2.5 from “Tenderness” yarn (47% cotton, 53% viscose; length 400 m/100 g). Collar width 10 cm.
Knitting a collar begins with a chain of 113 chain stitches and then knits according to pattern 1. Having finished knitting, and without cutting the thread, tie the narrow sides of the collar and the neck line, alternating 1 single crochet and 1 double crochet.
According to scheme 2, knit a flower, sew a pin on the inside and use it as a clasp.
Collar Svetlana


The openwork collar from the Valya-Valentina magazine for 2007 is crocheted from thin cotton yarn with crochet No. 1. Collar width 9 cm.
Start knitting with a chain of air loops at the rate of 1 rapport = 9 loops + 3 loops for symmetry + 4 lifting loops and then knit according to the pattern.
After finishing knitting the 8th row, without tearing off the thread, tie the collar along the narrow sides and the neck line with double crochets. The direction of the strapping is shown in the diagram by arrows.
Starch the finished collar, stretch it to size and leave until dry.
Collar Bells


Openwork collar from Valya-Valentina magazine for 2007. knitted from cotton yarn “Mak” with crochet number 1.5. Collar width 14 cm.
Begin knitting a collar with a chain of 156 chain stitches (25 repeats of 6 chain stitches + 3 loops for symmetry + 3 lifting loops). Next, knit 8 rows according to the pattern and, without tearing off the thread, tie the collar in a circle in a “crawfish step.”
The finished collar needs to be starched, straightened and left to dry completely.
Collar Scales


An interesting wavy collar from an Asian magazine is crocheted from 70g cotton yarn with size 2.5 crochet. Collar width 9.5 cm.
The collar is knitted crosswise in the form of a straight strip with scallops, the length of the collar is 76 cm.
On a chain of 25 air loops, knit the 1st row of arches from 5 air loops, adding “picot” to the last 2 arches. Next, knit 127 rows or 21 scallops according to the pattern. When knitting the 4th and 6th rows, attach the last arch to the side of the “scale” of the previous row. Knit 2 rows of binding on the narrow side of the collar and tie the straight edge with arches of air loops with a picot in the middle of each arch. Without cutting the thread, sew 2 rows of binding on the second narrow side of the collar.
Lay out the collar according to size, moisten it and let it dry completely.
Pull a thin satin ribbon through the tie, slightly moving away from the straight edge of the collar.
Collar Two butterflies


An elegant collar from the Lithuanian magazine Pacios is crocheted from 70-100 g of silky polyester yarn with lurex with crochet size 3-3.5.
The collar consists of 2 motifs in the form of large butterflies, connected at the back and front by the ends of the wings.
Unfortunately, I couldn't find better quality diagrams. Therefore, please note that at the beginning of the pineapples on the wings, stitches with 4 crochets are knitted. The remaining columns in the diagram are with 2 and 1 crochets; they are more visible.
This cape collar, knitted from silver or gold yarn with a lot of lurex, will be a wonderful addition to an open evening dress.
Two-tier collar


The original collar from the Japanese magazine French Girly Crochet Collars and Tippets is crocheted No. 2 from 20 g of yarn. Collar width 6 cm, neckline length 44 cm.
The collar begins to be knitted with a chain of 162 air loops (19 repeats of 8 loops + 1 loop for symmetry + 9 loops for a hinged loop for a button), on which 7 rows are knitted (the lower part of the collar) according to the pattern.
After this, 2 rows of the upper part and 3 rows of the neckline are knitted on the initial chain in the other direction from the initial chain. When moving to the 3rd row of the binding, secure the tail of the initial chain, left under the hinged loop. The starting points of knitting are indicated in the diagram by light arrows, and the ending points of knitting are indicated by black arrows.
The collar is fastened with a round bead tied with collar yarn.
Collar Spikelets


The openwork collar from the Valya-Valentina magazine for 2008 is crocheted from 30g of cotton yarn using No. 1 crochet. Collar width 11 cm.
Start knitting with a chain of 281 air loops (18 repeats of 15 loops + 10 loops) and then knit according to the pattern.
Starch the finished collar, stretch it to size and leave until dry.
Collar Buds

The openwork collar from the Spanish magazine MYM Cuellos is crocheted from thin cotton threads No. 0.75. Collar width 9 cm.
The collar begins to be knitted with a chain of 170 air loops (including 2 lifting loops) and then knitted according to the pattern. The beginning of knitting is indicated in the diagram with an asterisk and arrow.
The last row of knitting is continued along the narrow side and a buttonhole is knitted. The second narrow edge is tied separately, starting from the neckline (the area between the circles in the diagram).
The scheme uses 2 unusual elements. 

Make 5 yarn overs and knit the unknitted stitch, leaving 2 loops on the hook. Make 2 yarn overs, enter the first stitch at the level of the 3rd yarn over and tie the unknitted stitch, 3 loops on the hook. Knit 2 more unknitted double crochets in the same place as the first. Knit 5 stitches together.
Make 3 yarn overs, knit one. Make 2 more uncrocheted single crochet stitches. There will be 2 first yarn overs and 3 loops on the hook, knit these 3 loops together and work the remaining yarn overs.
Collar with tassels

The openwork collar from the Valya-Valentina magazine is crocheted from cotton threads using No. 1 crochet. Collar width without tassels is 4 cm.
Start knitting the collar with a strip of 17 flowers, knitted with continuous knitting. Close a chain of 7 chain stitches into a ring, 7 chain stitches, 2 double crochets in the 4th loop of the initial chain, 7 chain stitches, 2 double crochets in the 4th loop of the starting chain, 15 chain loops (transition to the next flower), connecting stitch in the 7th loop from the hook. Continue knitting the top sides of the flowers. Knit the last flower entirely and then knit the bottom side of the strip. After this, tie the flowers with single crochets.
Knit 2 rows of circular binding according to the pattern and a row of binding along the neckline.
Along the flap side of the collar, knit a strip of ribbon lace, the knitting direction is shown in the diagram. Make the ties to the required length. Decorate the collar teeth and the ends of the ties with tassels.
Marietta Collar

A collar using the Bruges lace technique from Fashion Magazine (Spetsvyausk. Crochet. Embroidery) is crocheted No. 1.5 from 50 g of Snowflake thread.
Depending on the desired length of the collar, knit 11-15 separate internal motifs according to scheme 1, connecting them together. After this, tie the binding with Bruges braid along the outer edge of the collar.
According to pattern 2, knit the upper part of the collar, place it on the lower part, aligning it with the neckline, and tie it with 2 rows of single crochets, connecting both parts.
Starch the finished collar, arrange it according to size and leave until completely dry.
Openwork dome collar


A collar assembled from floral motifs, from Valya Valentina magazine for 2007. The collar is crocheted from 40g bobbin thread No. 10 with crochet No. 1.25. Collar width 10cm.
The collar consists of motifs. Each motif begins to be knitted with a chain of 10 chain stitches connected into a ring. On this ring, 3 rows are knitted in a circle. In the 3rd row, a connection is made with the previous motif. The connection points of the motifs are indicated by arrows in the diagram.
When all the motifs are knitted and connected, 1 row is knitted along the neck line with a separate thread (dark green in the diagram). With a new thread, 1 row along the narrow sides of the collar and neckline, 1 row of binding along the entire perimeter of the collar and 2 rows along the neckline.
Collar Party


The openwork collar from the Magic Crochet magazine is crocheted using thin cotton threads using No. 1 crochet. Collar width 6 cm, neck length 37 cm.
The collar is easy to make and accessible even to beginner knitters. Start knitting with a chain of 210 air loops and then knit 11 rows according to the pattern. The expansion of the collar occurs due to an increase in the number of air loops in the constrictions between pairs of double crochets.
Place the finished collar on a horizontal surface according to size. Moisten and let dry completely. If desired, the collar can be lightly starched.
Collar Marianna

The openwork collar from the Valya-Valentina magazine for 2004 is crocheted from “Iris” yarn using crochet No. 1. Collar width 12 cm.
Begin knitting with a chain of air loops at the rate of 1 repeat 12 ch. + 11 ch. for symmetry + 3 ch. rise + 1 ch). Next, knitting continues according to the pattern. There are 13 repeats in the collar in the photo, that is, 171 loops.
The finished collar needs to be starched, stretched to size and left to dry completely.
Pineapple collar with lush columns

The romantic openwork collar from Valya-Valentina magazine No. 24/2011 is crocheted from 40g of “Iris” yarn using crochet No. 0.9. Collar width 13 cm, length 66 cm.
Begin knitting with a chain of 199 chain stitches (16 repeats of 12 chain stitches + 1 chain stitch for symmetry + 3 chain stitches for lifting + 3 chain stitches). Next, knitting continues according to the pattern. For ease of use, odd rows are indicated in the diagram in blue, and even rows are indicated in black.
The finished collar needs to be starched, straightened and left to dry completely.
Collar Graceful

A small openwork collar from the magazine “Valya-Valentina” for 2004 is crocheted from Iris yarn with size 1.5. Collar width 7 cm.
Begin knitting a collar with a chain of air loops at the rate of 1 repeat = 12 loops + 4 loops for symmetry + 3 lifting loops + 2 loops. Next, knit 8 rows according to the pattern and, without cutting the thread, tie the collar along the narrow sides and neckline with single crochets and arches of 3 air loops.
If you plan to fasten the collar with a button, then form an air loop when tying the collar. Or thread a narrow satin ribbon tie between the posts of the 1st row.
Sirloin Collar Spiders


The loin collar from Asahi Crochet Lace 2013 is crocheted with size 2 using 25g cotton yarn. Collar width 9.5 cm, neckline length 45 cm.
Knitting a collar begins with a chain of 160 air loops, on which 7 fillet segments with “spiders” are knitted. 8 rows of the collar are knitted in a single fabric, and rows from the 9th to the 15th are knitted on each segment separately.
Having knitted all the segments, use a separate thread to tie the neck line with single crochets and knit a buttonhole.
Please note that in the 11th and 13th rows the “popcorn” elements are knitted.
Openwork collar Isabella


An elegant openwork collar from Asahi Crochet Lace magazine is crocheted from fine cotton yarn using a size 2.25 crochet hook. Collar width 8 cm, neckline length 47 cm.
Start knitting a collar with a chain of 145 chain stitches (9 repeats of 16 loops + 1 loop for symmetry) and then knit 11 rows according to the pattern.
The collar pattern uses a beautiful popcorn design.
Finally, the collar is tied along the neckline with single crochets, skipping every 4th chain stitch of the initial chain. Don't forget to make a slip stitch for the button at the beginning of the binding row.
Lay out the finished collar according to size, moisten it and let it dry completely. Sew on a button.
Collar Pineapple medallions


The large collar from Fashion Magazine No. 439 is crocheted No. 1 using 200 g of cotton yarn.
On a chain of air loops, knit 8 repeats according to the pattern. After separating the rapports, each corner is knitted separately.
Tie the finished collar in a circular row of single crochets, starch and iron, giving the corners the desired shape.
Collar Flowers


The delicate collar from the Magic Crochet magazine 12/1992 is crocheted from thin cotton threads with size 0.7. Collar width 4.5 cm, neckline length 45 cm.
They start knitting a collar with Bruges braid; 93 rows are knitted with it. Next, the main pattern with flowers from lush columns is knitted on this chain. Please note that the flowers are formed in two rows, the lower three petals in one row and the upper three in the next.
The finished collar needs to be starched, straightened and left to dry completely. Thread a narrow satin ribbon through the upper arms of the Bruges braid.
Large collar of openwork motifs


The collar from the magazine Wear & small interior lace NV 70174 2013 is crocheted with size 1.5 from 90 g of yarn. Collar width 20 cm, length 126 cm, along the neck line the collar is gathered with a drawstring.
The collar is assembled from 28 motifs with a diameter of 9 cm, which are connected when knitting the last row. The gaps between the motifs are filled with small flower motifs.
The assembled strip of motifs is tied along the outer edge with 3 rows of arches, and along the inner edge (neck line) with 9 rows. The rows of binding in the diagram are highlighted in a darker color.
For a tie cord 120 cm long, on a chain of 420 air loops, tie a series of connecting posts. Thread the finished lace-tie into the arches of the penultimate row of the binding.
Openwork collar Spikelets


A chic openwork collar from a Japanese magazine is crocheted from 65g cotton yarn with size 2.25.
Collar width 18 cm, neck length 64 cm.
Start knitting with a chain of 160 air loops, 10 loops for each repeat.
Having finished knitting, tie a chain of chain stitches with single crochets with a picot.
Collar with mesh and voluminous flowers


A collar from an Asian magazine is crocheted from 100 g of yarn using crochet number 2. The width of the collar is 16.5 cm, the length along the neckline is 44 cm.
They begin knitting a collar with a chain of 156 air loops, on which 14 rows are knitted with a complex mesh with “picot”. The additions necessary to widen the collar are indicated in the diagram in a darker color.
After knitting the main part of the collar, perform 2 circular rows of binding.
Knit 28 small and 29 large flowers. Attach large flowers along the flap of the collar, and embroider the mesh with small flowers according to the pattern.
Large collar with lush columns


The Aiamu Olive Magazine Collar is crocheted in size 2.5 using 170g section-dyed yarn (length 82m/25g). The width of the collar without fringe is 17 cm.
Knitting density: 26.5 stitches and 16 rows in a 10 x 10 cm square.
Begin knitting a collar with a chain of 169 air loops (excluding lifting loops). Mark the 45th, 85th and 125th loops on the chain; along these loops you will need to widen the collar.
Having knitted 27 rows according to the pattern, tie a row of double crochets through a chain loop along the narrow side of the collar and cut the thread.
Carry out the same row on the other narrow side, joining the thread at the neck line.
After this, without cutting the thread, knit a row of fringe binding along the outer edge of the collar and a row of single crochets with picots along the other 3 sides.
Tie a lace 84 cm long and thread it between the double crochets of the 1st row.
It is proposed to use a knitted flower brooch as a collar decoration (there is no flower pattern in the magazine). In addition, you can wear a collar in different ways - with draping ends and turning them over the shoulder.
Collar Elegance


An elegant collar from a Spanish magazine is crocheted using thin cotton thread No. 1.25. Collar width 7.5cm, neckline length 36cm.
The collar begins to be knitted from the line where the scallops join. 14 cm (7 scallops) are knitted in one direction, and 22 cm (11 scallops) in the other direction.
At the same time, the flying part of the collar expands due to scallops, and the upper part forms a small stand.
Since the original Spanish diagram is not very readable, I am using a version of this diagram from Fashion Magazine No. 462.
Using the same pattern, you can knit a symmetrical collar, making 9 scallops (18cm) on each side.
Openwork Lace Collar


Openwork collar from the website of the Japanese company Clover. The collar is crocheted from 30 g of yarn with a crochet number 2.25. The maximum width of the collar is 11 cm, length along the neck line is 57 cm.
Begin knitting a collar with a chain of 137 air loops (34 repeats of 4 air loops + 1 loop for symmetry, lifting loops are not included in this count). Next, knit the middle of the collar from 12 rows according to the pattern.
Next, perform 4 rows of binding, starting from the neck. Without tearing off the thread, knit one tie, tie the collar along the neckline with one row of single crochets with a picot and knit a second tie.
Collar Monastic windows


The openwork collar from the Valya-Valentina magazine for 2007 is crocheted from 30g of raw cotton yarn with a No. 1.25 crochet hook. Collar width 11cm.
Start knitting a collar with a chain of 196 chain stitches (18 repeats of 11 loops + 2 loops for symmetry + 3 lifting loops) and then knit 11 rows according to the pattern.
The finished collar needs to be starched, straightened to size and left to dry completely.
Openwork collar Air


The openwork collar from the Spanish magazine MYM Cuellos is crocheted from thin cotton threads with size 0.75. Collar width 7.5 cm.
The collar begins to be knitted with a chain of air loops and then knitted according to the pattern up to the penultimate row inclusive. The beginning of knitting is indicated in the diagram with an asterisk.
Without breaking the thread, continue knitting the penultimate row, tying the narrow sides of the collar and the neckline. Knit the last row in the round. The end of the knitting of the binding is indicated in the diagram with a black square.
Carolina collar


A large openwork collar from the magazine Wear & small interior lace NV 70174 is crocheted with size 1.5 from 60 g of yarn. Collar width 21.5 cm, neck length 58 cm.
Start knitting a collar with a chain of 200 chain stitches (33 repeats of 6 loops + 2 loops for symmetry) and then knit 28 rows according to the pattern. Please note that when knitting the last row, each scallop is knitted separately with 2 additional rows. After this, without cutting the thread, tie the narrow sides of the collar and neckline with a series of single crochets with a picot.
For the ties, tie 2 30 cm long laces with trefoils at the ends and attach them to the places marked with gray dots in the diagram.
Openwork collar


Yarn "Maxi" consumption about 50 g, hook 1. A very convenient knitting pattern, the collar is knitted lengthwise, you can easily calculate the size and number of motifs.
Based on materials from the site: vorotni4ok.ru
Peacock collar