A simple DIY card for the Year of the Dog. DIY postcard for the Year of the Dog: with a dog and in different styles New Year's Dog. Cutting templates
Beautiful handmade New Year cards are suitable for congratulating all your friends and acquaintances. At school and kindergarten, children make them for mothers, fathers, and grandmothers. But even at home, teenagers and adults can make such cool crafts that will surprise everyone gifted. For example, greeting cards can be made from designer colored paper and cardboard. You can supplement the card with scrapbooking cuttings in the form of the symbol of the coming year - a dog. Using the master classes with photos and videos offered below, you won’t be able to find unusual and magical crafts that both a child and a teenager can make. Moreover, each such postcard for the New Year 2018 is made with your own hands really easily and simply.
Bright DIY scrapbooking card for the New Year 2018 - master classes with photos and videos

Gluing postcards using the scrapbooking technique takes minimal time and any child will enjoy it. And using the master classes with photos and videos offered below, you can learn how to make such crafts easily and simply. With them, a beautiful scrapbooking card for the New Year 2018 2018 can be made with your own hands in literally 1 hour.
Materials for making your own New Year's card using scrapbooking technique
- a set of die cuts for scrapbooking in the shape of leaves, flowers, and bells;
- figured frame;
- a sheet of thick paper;
- markers;
- light green paint;
- glue.
Photos from a master class on making scrapbooking cards with your own hands in honor of the New Year 2018

- Spray light green paint onto a smooth surface and apply card paper to it.

- Wait for the sheet to dry.

- Glue the frame to the background sheet.

- Print a congratulatory inscription inside.

- Color the inscription in the frame. Glue flowers, leaves, and bells to the frame at the top.

- Decorate the bottom of the frame.

- If you wish, you can glue congratulatory poems to the back of the card.

Master class with video of making your own postcards using scrapbooking technique for the New Year 2018
The following simple instructions will tell you about another method of making scrapbooking cards for the New Year 2018 holiday. If desired, individual cuttings for it can be replaced or supplemented with more interesting and convenient ones.
Cute postcard for the New Year 2018, made with your own hands with children - master class with photos

The use of unusual materials when making greeting cards will certainly please a child who studies in kindergarten or school. For example, children can work not only with paper, but also with buttons and voluminous wooden decor. With the help of the following master class with photos, you can learn how to make a postcard for the New Year 2018 with your own hands from colored cardboard paper and additional materials together with children.
List of materials for creating your own postcard in honor of the New Year 2018 with children
- green and white paper;
- white cardboard;
- silicone glue;
- a set of green buttons;
- figured hole punch "Snowflake";
- brush;
- wooden star.
Photo instructions for making a New Year's card 2018 with your own hands with children
- Cut a triangle out of green paper.

- Apply silicone glue to the triangle using a brush.

- Glue green buttons of different sizes to the triangle.

- Using a hole punch, make small snowflakes from white paper.

- Cut a rectangle to the size of the button Christmas tree from white cardboard. Glue a stylized Christmas tree, snowflakes and a wooden star to the cardboard.

How to draw a New Year 2018 card with your own hands - step-by-step master class

Drawing cards at home is a great activity on the eve of the New Year 2018. Using simple instructions, children will be able to prepare gifts for all their friends and acquaintances. Also, the proposed photo lesson is suitable for making New Year's crafts at school and kindergarten. The master class below shows step by step how you can draw a simple card for the New Year 2018 with your own hands, using only three colors of paint. If desired, this craft can be painted in other colors that the child likes.
List of materials for drawing do-it-yourself postcards for the New Year 2018
- watercolor paper (embossed);
- blue, red and cyan paint;
- tassels;
- Christmas tree stencils;
- eraser.
Step-by-step photos for a master class for drawing a New Year's card for 2018 with your own hands

Beautiful do-it-yourself postcard-dog symbol of the year for New Year 2018 - video instructions

The next master class is perfect for school and kindergarten: in it, children will be able to make a cool postcard in the shape of a dog. A cute and simple craft can be complemented with shiny decor and inscriptions with wishes. You can learn more about how to make a postcard with the symbol of the year for the New Year of the Dog 2018 with your own hands in the following simple instructions.
Step-by-step master class with a video of making a postcard in the shape of a dog for the New Year 2018 with your own hands
The proposed master class can not only be repeated, but also used as a basis for making different postcards. For example, according to the specified instructions, the symbol of the coming year can be supplemented with jewelry, New Year's accessories or clothing.
Original do-it-yourself New Year 2018 card with a dog - step-by-step photo tutorial

So that a dog, the symbol of the coming year, can decorate every home, it is recommended to make greeting cards with this animal as a gift to friends and acquaintances. You don’t need to spend a lot of time working on the craft; you just need to prepare the required materials in advance. The base will be cardboard, and sewing supplies will be used as decoration. With them, a postcard with a dog for the New Year 2018 will be made with your own hands, easily and quite quickly.
Materials for making your own original postcard with a dog for the New Year 2018
- sheet of cardboard;
- gel black and red pen;
- copy paper;
- voluminous braid;
- colored embossed cardboard;
- double sided tape;
- buttons or “droplets” for clothing decoration;
- silicone glue.
Photo lesson on a master class on making a postcard with a dog with your own hands for the New Year 2018
- Prepare materials for work.

- Draw a dog on a rough sheet of paper, and then transfer the drawing using carbon paper onto a white piece of cardboard.

- Draw the outline of the dog with a black gel pen. Fill the inner space of the figure with small circles.

- Trace the bow around the neck and fill it in with red circles in a similar pattern.
- Apply double-sided tape to white cardboard and glue it to colored cardboard.

- Glue three-dimensional tape along the contour of a white piece of cardboard.

- Glue buttons or decor for clothes in the corners of the picture.

A simple DIY card made of paper and cardboard for the New Year - master class with photos

Postcards made by your favorite students will help to please kindergarten teachers and school teachers before the New Year 2018 holiday. They can be made using colorful paper, bright cardboard, and complemented with shiny decor. If desired, children can write their congratulations inside or paste in sheets with printed poems. With the help of the following master class with photos, you can learn how to make a postcard from paper and cardboard for the New Year with your own hands in just half an hour.
Materials for making a paper card with your own hands in honor of the New Year
- cream and green paper;
- brown cardboard;
- scotch;
- glue;
- sparkles and sequins.
Photo from a master class for making a New Year's paper card with your own hands
- Fold the cream paper in half to make the card base. Cut out Christmas trees from green paper and fold them in half.

- Glue tape to the inside of the Christmas tree so that it holds the given three-dimensional shape well.

- Make an “accordion” out of brown cardboard and cut out a small piece from it - the trunk of a Christmas tree.

- Glue the trunk to the Christmas tree.

- Glue the finished Christmas trees to the cards, decorate with sparkles and sequins.

Unusual DIY New Year's card with children step by step - master class with photos

Original crafts for the New Year can be made not only by creating them from scratch, but also by using old pictures and postcards. Children can make converted postcards in kindergarten or school, or they can make them together with their parents at home. In the following instructions with a photo, you can find out how easy it is to create a new greeting picture by working with applications. A simple master class will help you step by step create an unusual and cute New Year's card with your children.
List of materials for step-by-step making of a DIY New Year's card with children
- old postcard with a bird;
- cone;
- regular glue and glitter glue;
- cardboard;
- scissors;
- white and red paper.
Photo instructions for creating an unusual New Year's card yourself with your child
- Cut out a bird figurine from an old postcard.

- Break the pine cone into individual pieces.

- Glue a slightly smaller piece of red paper to the white cardboard. Glue the bird on top of the paper and start gluing pieces of the pine cone.

- Parts of the pine cone will imitate a twig.

- Glue a piece of paper with a congratulatory inscription.

- Decorate the craft with sparkles.

Touching DIY New Year's card - photo master class for children

To quickly and easily prepare for the New Year and congratulate their parents, brothers and sisters, the youngest craftsmen should be offered the instructions below. It can be used in both elementary school and kindergarten, as it makes it easy to make cute crafts from paper and magazines. The next master class shows how little children can make their own New Year's cards.
List of materials for making a DIY children's card for the New Year holiday
- 2 sheets of white paper;
- clippings from old newspapers;
- shiny paper;
- glue;
- scissors;
- pencil.
Photo lesson on a master class on how to make a New Year's card for children with their own hands

How to draw a New Year's card with your own hands - master class with photos

Not only children's, but also adult crafts for the New Year can be a wonderful gift for loved ones. For example, with the help of the following instructions, even teenagers can make an amazing congratulations card. A step-by-step master class will tell you how to draw your own bright postcard for the New Year 2018 to present to your family and friends.
List of materials for drawing a New Year's card with your own hands
- paints;
- glitter markers;
- pencil;
- black gel pen;
- corrector;
- paper.
Photo master class on drawing cards in honor of the New Year with your own hands
- On a piece of paper, draw a Christmas tree, a winter hat and snow, and a congratulatory inscription with a pencil.

- Color the Christmas trees and let the picture dry.

- Using a corrector, draw garlands on the Christmas trees.

- Color the hat.

- Use a black pen to draw a congratulatory inscription and patterns.

- Use a gold marker to draw stars on the picture.

- Draw snow and add sparkles to the picture.

How to make a New Year's card for your mother and grandmother - step-by-step master class

The following master class will help teenagers and children please their loved ones and give them a magical craft. He will show what a beautiful card with shimmering sparkles can be made for your mother and grandmother for the New Year. The work must be carried out very carefully and checked step by step to ensure that all actions are performed correctly. Then the finished postcard will certainly turn out the same as in the photo example.
Materials for making a New Year's greeting card for mother and grandmother
- white and turquoise cardboard;
- scissors;
- glue;
- glitter;
- protective glass for phone;
- thin and thick double-sided tape;
- small beads.
Master class with photos of gluing postcards for mother and grandmother for the New Year holiday
- Make a double frame from turquoise cardboard (one protrudes slightly from the other).

- Use a thin brush to write a congratulation using glue and sprinkle it with glitter.

- Shake off excess glitter.

- Dry the glue with a hairdryer.

- Cut out a picture of trees, draw it or make a stamp using a template.

- Cut a piece of protective glass for your phone a little smaller in size than the picture frame.

- Glue the glass to the frame with thin double-sided tape.

- Cover the framed picture around the perimeter with thick double-sided tape.

- Place beads on the picture.

- Cover the picture with glass on top.

- Glue the finished composition onto white cardboard.

With master classes offered for children in kindergarten and school, and teenagers, you can find many options for amazing New Year's crafts. These can be either gift items for mom, dad, or grandma made of paper and cardboard, as well as greeting appliques and scrapbooking crafts. Moreover, each considered postcard for the New Year 2018 can be made with your own hands very quickly and simply. You just need to carefully study the step-by-step instructions with photos and videos, prepare the materials required for the work and start making the craft.
The New Year holidays are approaching, you need to buy a bunch of gifts for friends and relatives, but you can do something yourself, because no one has canceled the principle of saving. Even if gifts are really tight, a postcard will be an excellent present. Whether you are visiting your parents or friends, a homemade card given in honor of the holiday will remind you of you for a long time.
Postcards with dogs: ideas
You probably already know that 2018 will pass under the sign of the Dog. It goes without saying that a hand-made postcard for the Year of the Dog can be made in the form of this four-legged creature. There are interesting ideas for moving cards. One of them is a dog moving its tongue and ears. It is done simply, from ordinary colored paper.
Video: moving postcard “Dog”
Another stunning idea is the dog from the animated series "Adventure Time". If the person the card is intended for is a fan of the series, then you will certainly hit the nail on the head.
 |
Prepare: a sheet of yellow cardboard, a small piece of black and white cardboard, a stationery knife, a ruler, a marker, scissors, a pencil. |
 |
Place a ruler in the center of a yellow sheet of cardboard. Use a utility knife to draw a straight line under the ruler. This is the fold line to prevent the cardboard from breaking. |
 |
We bend the sheet. |
 |
The workpiece should be square, so cut off the excess. |
 |
Cut out two circles from black cardboard. |
 |
From white cardboard we cut out two circles of smaller diameter. |
 |
Glue the black parts in place of the eyes. |
 |
We place white blanks on top. Glue on the oval nose. |
 |
We draw a smile with a marker. |
 |
We cut out a horseshoe-shaped blank from yellow cardboard. On the reverse side we glue double-sided foam tape to it. |
 |
We glue it above the nose. Foam tape will add volume to the card. |
Read Masks for split ends of hair
Other versions of postcards are mostly made in the form of appliqués, although they are not without originality. Look at the selection of photos. Among them there are funny, cute, charming specimens.


Indescribably charming scrapbooking - how to learn
That we are all about dogs, and about dogs, because if the Year of the Dog is coming, this does not mean at all that you need to give New Year cards only with them. It’s unlikely that anyone will be against a beautiful postcard using the scrapbooking technique, for example. If you are completely unfamiliar with this type of creativity, you can learn it by studying the master class.
 |
From a sheet of thick cardboard you need to cut out the base for the postcard. |
 |
From scrap paper you need to cut out a part 4-5 mm smaller than the base. |
 |
For decoration we use a flower made of foamiran, cuttings in the form of twigs, leaves made of foamiran, and artificial berries. |
 |
We age the scrap paper using scissors and scrape the edges. |
 |
Glue it to the base. |
 |
You need to make the back of the card. |
 |
We cut a piece of cardboard with a fold for gluing 2-3 cm. The width is arbitrary. Glue the part in the center. |
 |
We trim the corners. |
 |
Glue foamiran leaves to the front side. |
 |
Then - cuttings and berries. |
 |
We place a flower on top. Glue up small parts if necessary. |
 |
Making a bow for the ball. We sew the ribbons with a needle and thread. We tighten and wrap. We fasten the thread from the wrong side. |
 |
Glue the bow. We glue a bead on top. |
Here is another card that is not too difficult to make.
Video: scrapbooking with deer
If you, as a professional, are interested in something more original, watch the following instructions in the video.
Read How to celebrate New Year 2016 together
Video: multi-layer scrapbooking card
Are you familiar with shaker type cards? The shaker card is unusual. Shiny sequins shimmer and shimmer inside. Let's make a card in the shape of a Christmas ball. It's very simple.
 |
It will be so beautiful. |
 |
Prepare a cardboard base. In the middle of the ruler, draw a sharp object along the outside. Bend the workpiece. |
 |
Cut out the background sheet from decorative cardboard. |
 |
Then another smaller one. |
 |
In the second sheet we make a “window”. Use a tape reel as a stencil. You can use a compass or ruler with circles. |
 |
Cut it out. |
 |
To create a transparent window, you can use any transparent material, for example, from packaging. |
 |
Cut out the piece to the appropriate size. |
 |
The most important secret is applying foam tape. It needs to be glued in such a way as to create the required thickness, so we glue it in two layers, leaving no gaps through which the filler could spill out. |
 |
We select sequins, beads, micro beads. Pour into the center. We glue several sequins with Moment glue so that they remain in place. Remove the protective film from the tape and glue it. |
 |
Attach the decoration to the base of the card with double-sided tape. |
 |
Glue a bow on top. |
 |
We use gel and glitter to create a border along the contour of the ball. |
Video: Christmas tree shaker card
We invite you to view a gallery of works using the scrapbooking technique. Explore and be inspired.


Unusual cards: instructions and templates
In postcards, the most valuable thing is, of course, the congratulations, but the design is also important. See how to make a paper Santa Claus with a surprise inside.
 |
To make such a postcard you need a blank 28x10 cm. |
 |
The top part should be 8 cm long. |
 |
The lower part is 6 cm long. |
 |
Accordingly, the back part will be 14 cm long. |
 |
You can paint the cardboard with paint, or you can take a colored double-sided sheet of cardboard. |
 |
Let's prepare the belt. Cut out a strip of black colored paper 21 cm long and 2 cm wide. |
 |
And also a paper square with cuts along the edges. |
 |
We thread the black strip through the holes. |
 |
Then we wrap the postcard with a belt and glue the ends together. |
 |
Using curly scissors or simply cutting out the trim of the fur coat by hand. |
 |
Glue the strip in the middle of the bottom and along the bottom. |
 |
Cut off the excess. |
 |
In the middle of the top part of the card, also glue the “edge”. |
 |
You can apply glitter to the plaque. |
 |
Place your wish inside and secure the edges of the card with a belt. |
Read Decoupage champagne for the New Year
There is something mesmerizing about cards that open in unusual ways. Below you can find templates for similar postcards


Not a single New Year's holiday is complete without pleasant surprises and presents. They are prepared long before December 31st. While adults are rushing around the shops looking for the gifts they need, children are deciding which DIY New Year 2018 card can please their friends and family. Since the symbol of the coming year is the yellow Dog, older children, teenagers, choose scrapbooking with the image of this animal of the Eastern calendar. Children in kindergartens and schools make unusual crafts for their mothers and grandmothers from colored paper and cardboard and draw snowmen, Christmas trees, Santa Clauses, and snowflakes. We decided to tell them how to make a New Year-themed greeting card and posted master classes on making such beautiful crafts here. Look at the photos and videos, remember all the steps performed by the craftsmen, and you, too, will get a great gift for December 31st!
DIY children's card for the New Year 2018 - Scrapbooking with a picture of a dog (step-by-step master class)
According to an ancient legend, Buddha, leaving this world, called all the animals to say goodbye to him, promising them rewards. Among the twelve animals that came to him first was a dog. She came second to last, eleventh - she had too much to do at home. She, like the other twelve animals, was given 1 year out of a 12-year cycle. The coming period again passes under the sign of this faithful friend and favorite of many families. That is why, for the New Year 2018, parents will receive their sons and daughters hand-made children's cards using the scrapbooking technique with an image of a dog. Our master class with step-by-step instructions will teach you how to make such a craft.
How to make a postcard with a picture of a dog - Master class on scrapbooking techniques
Designing and creating cards from newspaper and magazine clippings is always fun. Despite the fact that this technique appeared only a few years ago, it has already become popular in Russia. With its help, you will get an original children's card for the New Year 2018 with your own hands - scrapbooking with an image of a dog is carried out according to the general instructions for such work. Well, the master class will explain to you step by step how to do everything.
- Prepare as many unnecessary magazines, newspapers, and colored paper as possible. Buy thick sheets of cardboard - the basis for your postcard.
- You can make a card in the form of a book - to do this, fold a sheet of cardboard in half.
- Cut out photos from magazines on the New Year's theme and create a collage from them, gluing everything onto a postcard.
- Cut out an image of a dog from colored paper and glue it on top of the collage.
- Make the inscription “Happy New Year of the Dog 2018”, draw the details of the card and decorate the craft with ribbons, beads, sparkles, gluing them with “Moment” glue.
- Open the finished card and write a congratulation to the person you want to give the gift to.
Examples of scrapbooking cards with dogs


How can you make a postcard with your own hands for the New Year 2018?
If you haven’t yet decided what kind of postcard you can make with your own hands for the New Year 2018, look at examples of such unusual New Year’s crafts in our videos and photos. Postcards are made not only from paper: cardboard, magazines, photographs, stickers, decorative materials (serpentine, confetti, beads), etc. are used.

Homemade “Christmas Tree” card for the New Year - Master class with photos

This master class with step-by-step explanations and photos will clearly show you how unusual and original you can make a postcard with your own hands for the New Year 2018 with your children.
Before starting work, prepare:
- Corrugated cardboard with an image;
- Pastel paper;
- Double-sided tape;
- Cutter;
- Spray paint;
- Rhinestones;
- Glue "Moment";
- Golden lace;
- Pencil;
- Ruler.

How to draw a New Year 2018 card with your own hands for school and kindergarten
Even if a child has never made crafts on his own, teaching him how to draw a New Year 2018 card with his own hands for school and kindergarten is not difficult at all. You can watch this video and repeat all her steps after the girl.
Or use one of the six master class ideas on video.
We draw a postcard with our own hands - examples with photos
You don’t have to worry about how to draw a New Year 2018 card with your own hands for school and kindergarten if you have a sketchbook or ready-made cardboard on hand. Just fold a piece of paper in half and draw a Dog on the outside - a symbol of the coming year. If you don’t like this idea, choose something with a New Year’s theme for the card - snowflakes, Christmas trees, Snow Maiden, Santa Claus or a bag of toys.


Funny postcard for the New Year 2018 with your own hands with the symbol of the year Dog
Postcards are not always simple pieces of paper or cardboard with thematic images. See how you make a funny postcard for the New Year 2018 with your own hands with the symbol of the year Dog, and you will want to make the same one.
How to make a surprise card for the Year of the Yellow Dog 2018 - Master class with photos
Follow all the steps of this master class step by step, checking your steps with the photo, and you will get a funny, hand-made New Year 2018 card with an image of the symbol of the year, Dog.
1. First prepare all materials and tools:
- Black, yellow and white cardboard;
- Ruler;
- Stationery knife;
- Scissors;
- Marker;
- Pencil.


DIY greeting card with a Dog for the New Year 2018
The best gift on the eve of the upcoming holidays will be a handmade greeting card with a Dog for the New Year 2018. You can decorate it as a drawing, as a scrapbooking book, or as a cheerful puppy with wishes written on his long ears and round tummy. Here are just a few examples of ready-made New Year's cards.


Postcard with a cheerful dog for the New Year 2018 - master class on video
If you really need to learn in detail how a DIY greeting card with a picture of a Dog is made for the upcoming New Year 2018, watch the video on this page. Follow all the tips in the master class and you will get the best New Year's surprise!
How to make a New Year's card with your own hands from colored paper and cardboard - Master class with photos
On December 31, according to tradition, everyone exchanges surprises. Don’t forget to prepare a little surprise for everyone at home. Learn how to make an origami New Year's card with your own hands from colored paper and cardboard from the explanations of the master class with photos.

Origami New Year card with Christmas tree - Master class with step-by-step instructions

After reading how to make a New Year's card with your own hands from colored paper and cardboard - you will find a master class with photos below the text - you will learn how to make original New Year's gifts.
1-3. First, fold the square of colored construction paper diagonally once, and then a second time. Expand the sheet.
- Make folds so that you get a voluminous triangle.
- Fold one side of the triangle inward.
- Now do the same on the other side.
- Bend the previously folded sides of the future Christmas tree inward.
- Glue a piece of tape on top of one part (module) of the Christmas tree. Connect the Christmas tree craft module by placing the larger one inside the smaller one. This way you will get a Christmas tree made of paper, which can decorate any New Year’s card made of cardboard.

A beautiful DIY New Year's card made with children: step-by-step instructions
It is wrong to think that you can make beautiful New Year cards with your own hands with children only from paper, cardboard and magazines. On this page you will find step-by-step instructions for making such crafts from the most unexpected means and materials. Try creating your own mini-masterpiece too.
New Year's card "Christmas tree 2018" made of multi-colored tape - Photo with explanations

A very simple, bright and beautiful New Year's card, made with your own hands with children, is made from decorative tape in literally 15 minutes. Photos and step-by-step instructions from the master class located just below will help you quickly make it.
All you need is:
- Scissors;
- A sheet of cardboard for crafts;
- Several strips of decorative tape.
After seeing the photo of the finished postcard, you will understand how to make this simple craft.

The instructions will speed up and simplify the process of working on a New Year's surprise.
- Fold the cardboard in half. Glue a vertical strip of plain tape to the top side of the future postcard.
- Cut colorful decorative tape into strips of different sizes. Cut the ends of the strips diagonally - this way they will look more like spruce branches.
- Place the strips on top of the vertical tape, starting at the bottom of the largest one.
Unusual DIY New Year's card for children in 3D
The most original New Year's cards are obtained if you make them voluminous. Try making an unusual New Year's card with your own hands for children in 3D. Even if you spend at least an hour creating it, the gift will come out just wonderful!


Homemade three-dimensional New Year's card for children - Master class with photos

If you want your unusual DIY New Year's card for children in 3D to turn out flawless, pay attention to this simple master class with a photo of each step performed. But first, prepare everything you need for work:
- Colored cardboard;
- Figured hole punch;
- Curly scissors;
- Glue;
- Colored cardboard;
- Double-sided tape.
1-2. Fold the cardboard in half. Cut cardboard strips one and a half centimeters wide and fold them in half. Fold the ends of the strips into bird corners to secure them to the inside of the card. Glue them as you can see in the photo.

Cut out three white cardboard circles and glue them together to form a snowman shape.


How to draw a New Year's card with your own hands - Master class with photos
After reading this paragraph and all the instructions to the end, you will be able to explain to your child how to draw a New Year’s card with your own hands. A master class with photos and explanations for each step performed by the master will be your faithful assistants. Please read them carefully before starting work.

How to draw a New Year's card with watercolors - Master class with instructions

If you have watercolor paints, whatman paper or a sketchbook and brushes at home, immediately after reading how to draw a New Year's holiday card with your own hands, you can get to work. Otherwise, purchase all the materials and tools necessary for the job listed in the list below. Don’t forget to check your actions, paying attention to the explanations of the master class and photos.
In addition to paints, paper and 2 brushes (fine and large), you will need:
- Paper tape;
- Soft simple pencil;
- A container with water for rinsing brushes;
- Palette;
- Black gel pen;
- Paper towels.

What kind of postcard can you make for your mother and grandmother for the New Year: photo of DIY crafts
Pay attention to the variety of materials used to create festive New Year's crafts. This includes plain paper, cardboard, foam rubber, tape, multi-colored beads, cotton wool, adhesive tape, stickers, etc. Ideas for such postcards can be found not only in special collections of master classes sold in bookstores. On December 31st, don’t forget to give your loved ones small gifts from the bottom of your heart. Find out what kind of card you can make for your mother and grandmother for the New Year from photos of DIY crafts and video clips presented on this page.
New Year's card for mother and grandmother - Photos and videos on making crafts
As the end of December approaches, everyone, secretly from their friends and family, begins to look for unusual gifts and souvenirs related to the New Year theme. However, in order to give the best gift, it is not necessary to purchase it somewhere in a souvenir shop. Please your loved ones with the best gifts - small homemade presents. See what kind of postcard you can make for mom, dad and grandma for the New Year 2018 - the most unexpected and original ideas will be suggested to you by the photos of DIY crafts and videos on this page.


A simple but good-looking postcard for the New Year 2018 with your own hands will give your dads, moms, grandparents a piece of the warmth of your heart. Together with your children, draw on it a smiling Dog, a symbol of the coming year, cheerful snowmen, a Christmas tree, Grandfather Frost, toys - integral attributes of any New Year holidays. Make paper and cardboard crafts, a scrapbooking album or a picture for your friends on December 31st. Well, our master classes with step-by-step instructions, various photos and short videos will tell you what kind of surprise you can prepare for the coming year for your household.
DIY cards 2018 you can start doing it long before the New Year itself, because there are a huge variety of handmade techniques in the world - it takes a lot of time to try just a few of them. But as a result of your efforts, you will have excellent greeting cards ready for all your relatives and friends.
DIY postcard for 2018
You can get an excellent design option with a minimal set of materials. The first thing you need to think about is the size of the finished product - it should be noted that a small craft will be the most attractive. Take a yellow paper rectangle measuring 15 by 20 cm and fold it in half.Decorate the edges of the part with decorative tape - it is best to choose one that is contrasting and corresponds to the New Year's theme.
Take green corrugated paper and cut out a couple of triangles, one should be larger than the other. Break a popsicle stick in half and glue it as stems on the back of the Christmas trees. Place a small piece of padding polyester in the middle of the card, which will act as a snowdrift, and place Christmas trees behind it.
Write warm words of wishes on a separate piece of paper. You can print out the greeting if you want to use a particularly beautiful font. Outline the boundaries of the detail with strokes - this will look even more impressive.
The final stage of production will be gluing the rhinestones; they can be attached in any order.
DIY postcard for New Year 2018
Everyone will be very pleased to receive a Christmas tree as a gift, and it is not at all as difficult to do as it might seem when looking at the photo.
Cut out green paper rectangles - the narrowest, medium and widest, while the length of the parts should be identical. Fold them accordion-style along the short side. Fold the white sheet in half along the long side to form a card base.
Lubricate the end and beginning of the smallest accordion with glue, open the white sheet halfway and glue the accordion to the inner fold on the right. Do similar manipulations with the remaining accordions, placing them in ascending order in the center and on the left. The result should be a voluminous Christmas tree.
To decorate the craft, cut out paper details - a couple of red balls and a star, as well as blue, yellow and orange balls. The star is glued, of course, on the top, and the balls are in a chaotic order. So, DIY New Year's card for 2018 It’s almost ready, all that remains is to add the congratulations - for this purpose you can choose to use pencils, felt-tip pens or colored pens.
DIY New Year 2018 card
The scrapbooking technique is ideal for making cards - the result is simply masterpieces. Be sure to try it too - follow the photo tips and everything will certainly turn out as it should. The boot card looks very original; its production will not be quick, but the result is worth it.To work, you will need to use a boot template - attach it to watercolor paper, trace and cut out the two bases.
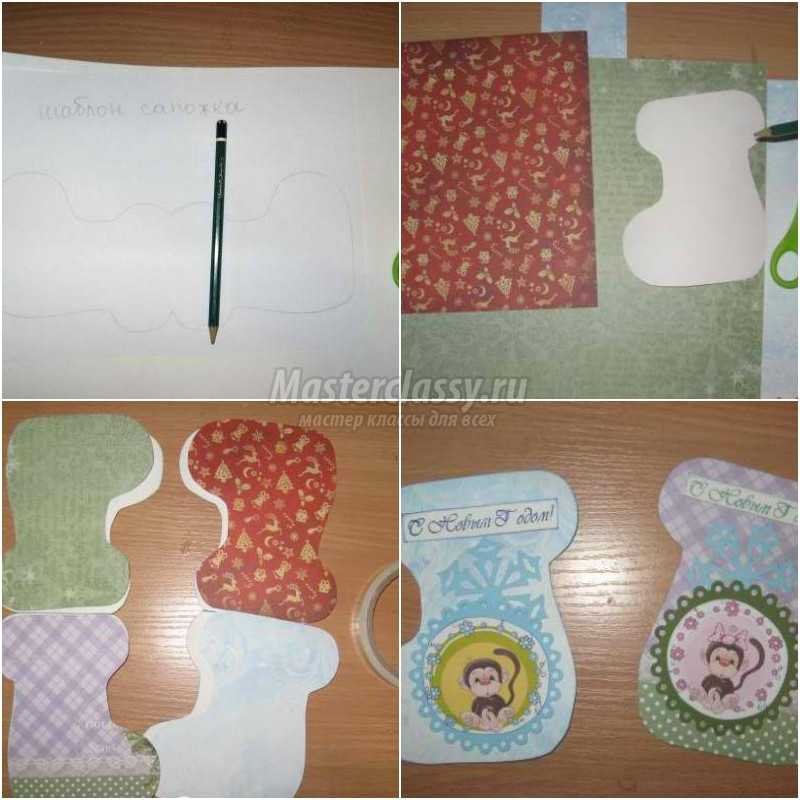
The front parts must be decorated using stamps, pictures and decorations. First of all, tint the pictures with pads along the edges, then glue them with a glue stick onto the cut out green and blue circles. In the master class, the pictures show funny monkeys, but since you are making DIY 2018 symbol postcard, then you should look for images of dogs. Also glue a large blue snowflake from a cut-out, and at the top - a pre-tinted inscription “Happy New Year!” Sew inscriptions and pictures on a typewriter.

Attach the front boots to the backing, sew each side separately with a machine. Cut a couple of pieces of 3mm wide blue satin ribbon, blue pom pom ribbon and blue mesh. Tie bows and arrange bouquets of white stamens with glitter and berries in sugar of different colors (green, blue, white, silver). Glue the decorations, to complete the decoration process there will be dots that will need to be placed on the circles with liquid silver glitter. Funny New Year's boots are ready!
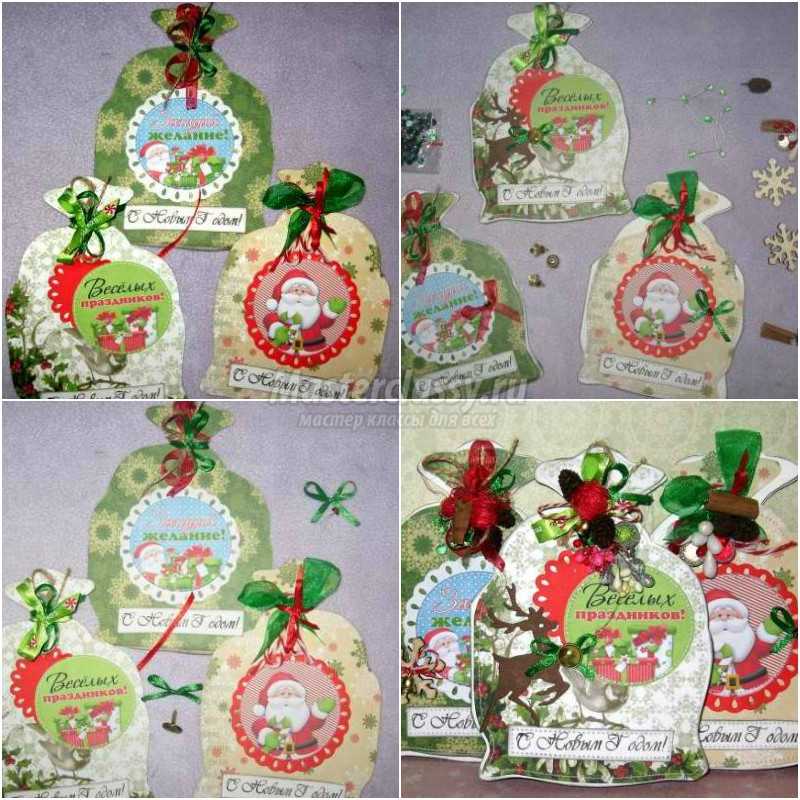
DIY New Year cards for 2018
Postcards in the shape of New Year's bags will look very beautiful; they can also be made using the scrapbooking technique.The first step is to cut out the template; it should be traced three times on watercolor paper and cut out. Tint each bag to create an attractive aging effect.

Cut the template in half and trim the whole thing by a couple of millimeters. Attach a single template to the New Year's scrapbook paper and cut out 6 parts - 2 pieces for each card bag.
Immediately attach one piece to each backing and begin decorating the front ones. Cut out three "Happy New Year" stamped in black ink, tint the edges of each and attach to the front pouches. Also glue a die-cut circle in red and white, as well as a holiday-themed picture. Sew all the decor on a machine.
As you know, almost every bag has ties and ours will not be an exception, which is why cut pieces of red and white cotton cord, as well as various ribbons (green and red, satin with a New Year’s print, green and red organza). With all this splendor, “tie” the bags with bows using New Year’s bracelets. Glue each front pouch onto the backing and sew.
Using the scrapbooking technique, make and.
DIY postcard for 2018 dogs
This technique, such as quilling, is extremely popular with both children and adults, because with the help of twisted elements you can create very interesting and attractive compositions.To create a greeting card using the quilling technique, you should prepare a card base, narrow long paper strips (you can purchase ready-made ones, or you can cut them yourself). You can use Dragon glue as a fixing composition; you also cannot do without a twisting tool and a thematic decorative element - snowflakes.
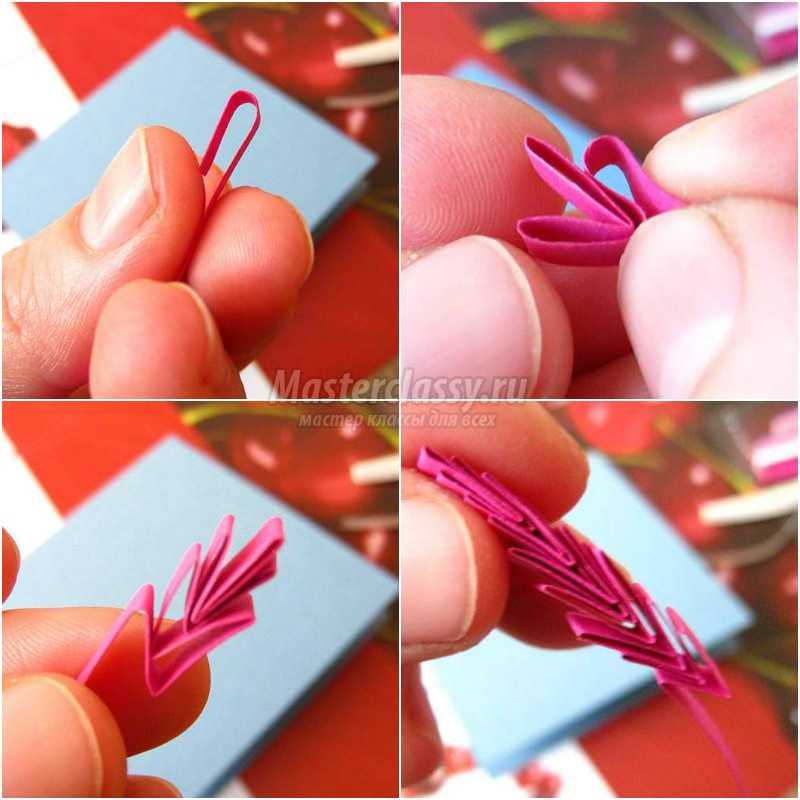
Make two spruce branches, following the photo hint. To make a candle, attach a strip of paper of the required color to the tool and roll it into a roll, then remove it and loosen it slightly, pressing the ends on both sides. Twist the candle flame in the same way, only use two colors of paper at once.

To make bells, roll up a tight roll, remove from the instrument and immediately glue it on. Make another such element. When the rolls are dry, carefully push out the center using a toothpick. Press on both sides to make the bell flatter.

Apply glue to the desired places on the card base, then lay out the paper elements, lightly pressing on top with your finger. Try to disturb the product for a while so that the glue sets. After gluing the bell, twist the tiny strip into a tight roll and, having glued the tip, glue it inside - this will be the tongue. Use a decorative element to complete the composition. Of course, this is one of the simplest options for quilling cards, but in general, using paper components you can “draw” anything.
Make and.
DIY New Year card 2018 year of the dog
Excellent volumetric option DIY cards for the year of the dog 2018 can be done together with children, keep in mind that its design is such that if you want to print a congratulation on a printer, this must be done first.

To create the card base, take A4 cardboard and fold it in half. On one half, draw a sketch of the Christmas tree - you don’t have to do it in detail, a couple of lines will be enough.
Cut the corrugated paper into strips, they should be one and a half centimeters high, the length will depend on the fluffiness of the future Christmas tree. Please note that the stripes must be of different lengths to create a stylized Christmas tree.
The next step will be gluing the corrugated paper strips - first you need to glue the bottom tier, and then gradually rise to the top. After gluing the strips, you should gather them up a little so that the outline of the tree resembles a skirt with tails.
For decoration, you can use a Christmas tree on the top, pieces of “rain” and tinsel, sparkles, etc.
Dina Fomina
Paper card craft"Dog"
Description: master class on making crafts-postcards« dog with moving ears". If you pull the tab up or down, the ears move down and up. It turns out to be a very modest puppy who hides his eyes if he is shy. From crafts you can make a greeting card.
Equipment, materials: scissors, colored cardboard, glue.
We cut out the details - muzzle, ears, long tongue. The length of the tongue should be longer than the muzzle.


We bend the ears at the base. We glue the tongue with its base to the fold on the ears.

Take the base blank for the postcard and fold it in half. In the middle of the workpiece we make a cut - suitable in width for the tongue. We stick our tongue in dogs into this incision. The ears remain outside, glue them along the fold to the workpiece.


Fold the postcard blank in half. Glue along the edge. Glue a muzzle on top along the edge dogs. We don’t seal the bottom of the muzzle, where the tongue sticks out!

Decorate - glue on eyes, nose. The eyes can be glued exactly under the ears.
Ready! Pull the tongue down - the ears rise, the eyes become visible. Pull the tongue up - the ears go down, the eyes are not visible.


Publications on the topic:
Goal: To teach children to create the image of an elegant holiday Christmas tree. Instill the desire to create crafts with your own hands for your loved ones. Develop.
The wonderful, beloved New Year holiday is approaching. And an elegant Christmas tree is a symbol of this holiday. We have been decorating for many years.
Hello guests of my page. The pleasant “troubles” for the New Year have begun. I would like to bring to your attention a very simple one (to make).
Angels fly invisibly, glorifying the birth of Christ. The Virgin bowed over her Son, In her heart there is purity, Meekness, love and humility. The breath blows.
Women's Day - March 8th - is approaching. What to give to your mother, grandmother, sister? Many kids think about this. Beautiful flowers made of paper. which.
New Year is a time of miracles, and the main miracle we create is at home, at work, in kindergarten. Everything is given a festive look, creating a winter look.
Good evening, dear guests of my page! There are only a few days left until Valentine's Day. A lot has already been shown on our website.


